Apple’s Best Computer Gets WiFi

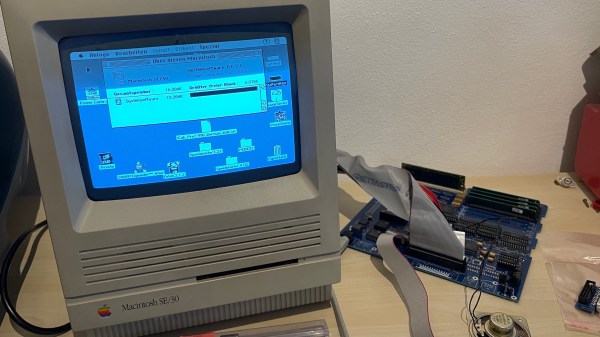
The greatest computer Apple will ever make isn’t the Apple II, it isn’t the Bondi Blue iMac, it isn’t the trash can, and it certainly isn’t whatever overheating mess they’re pushing out now. The best computer Apple will ever make is the SE/30, at its time a server in a tiny portable shell, and capable of supporting 128 Megabytes of RAM thirty years ago.

Over the years, people have extended and expanded the SE/30 to absolutely ludicrous degrees, but now we have a simple way of adding WiFi to this classic computer. Over on the 68kmla forums, [ants] discovered a tiny cheap card that could easily serve as an Ethernet to WiFi bridge. After attaching this card to a Danaport Ethernet card and bending some aluminum for a bracket, they had a WiFi antenna sticking out of the back of a 30-year-old computer.

But adding a WiFi card to an old computer is nothing new — this could have been done with a Pi, or if you’re a hacker, a TP-Link router flashed with OpenWRT. To really do this right, you’ll need integration with the operating system, and that’s where this build goes off the rails. [ants] wrote a WiFi extension for System 7 (with the relevant GitHub)

The problem with the Vonets WiFi card is that configuration has to be done through a browser. Since there are no modern browsers for classic macs, this meant either pulling out a PowerBook or doing the configuration through your daily driver desktop PC. The WiFi extension gets around that by giving a classic mac the ability to configure the Vonets card almost automatically. This extension also looks like how you would configure the WiFi on a modern mac, complete with the WiFi icon in the toolbar. It’s beautiful, and one of the rare examples of modern 68k mac programming.

As for what you can do by adding WiFi to a 30-year-old computer with a 16MHz processor, the answer is a resounding, ‘not much’. Your choice of browsers is limited (iCab seems to be the best), but you can load the Google homepage slowly. HTTPS isn’t going to work, and the Internet right now is full of megabytes of Javascript cruft. If you find a nice, lightweight web page — such as the Hackaday Retro Edition, for example — you’re looking at a capable web browsing machine. Of course, the real use case for giving the SE/30 WiFi is file transfer around the home network, but still: it’s WiFi for the best computer Apple ever made.

Desperately Trying To Find A Use For The ChugPlug

[AkBKukU] writes in to tell us of his experiments with the rather vile-sounding “ChugPlug”, an odd portable AC power bank designed for the express purpose of powering MacBook chargers. It would seem more efficient to simply build a DC power bank with a MagSafe connector to cut out the charger all together, but presumably there is some market for this particular niche device. Especially at the $15 they are currently selling for on Amazon.

Unfortunately, the ChugPlug that [AkBKukU] bought doesn’t seem to work. After some experimenting he found that it appears to only be outputting 80 VAC, obviously too low for many devices to function. But he reasoned that some things, like switch mode power supplies or restive loads, might still work. He just needed to come up with a way to plug them into the ChugPlug.

If his testing setup gives you a case of sweaty palms, you aren’t alone. He breaks open a dead MacBook charger to recover the female AC connector, and then solders that directly to an AC grounding adapter. The resulting pigtail lets [AkBKukU] plug in various AC loads while allowing him to probe the wires with his multimeter and oscilloscope.

Once he’s satisfied his hack works conceptually, that is, he’s able to plug arbitrary AC loads into this purpose-built battery pack, he follows up with a less dangerous looking adapter. Making use of the shell of the dead MacBook charger and what some might describe as a salacious amount of hot glue, he produces a compact and relatively safe looking device that will let him use his handicapped ChugPlug as a general purpose source of AC power.

It’s not the most elaborate portable power supply we’ve ever seen, and certainly wouldn’t be our first choice in an emergency, but at least [AkBKukU] managed to wring some use out of the thing in the end.

Continue reading “Desperately Trying To Find A Use For The ChugPlug”

CNC’d MacBook Breathes Easy

Sick of his 2011 Macbook kicking its fans into overdrive every time the temperatures started to climb, [Arthur] decided to go with the nuclear option and cut some ventilation holes into the bottom of the machine’s aluminum case. But it just so happens that he had the patience and proper tools for the job, and the final result looks good enough that you might wonder why Apple didn’t do this to begin with.

After disassembling the machine, [Arthur] used double-sided tape and a block of scrap wood to secure the Macbook’s case to the CNC, and cut out some very slick looking vents over where the internal CPU cooler sits. With the addition of some fine mesh he found on McMaster-Carr, foreign objects (and fingers) are prevented from getting into the Mac and messing up all that Cupertino engineering.

[Arthur] tells us that the internal temperature of his Macbook would hit as high as 102 °C (~215 °F) under load before his modification, which certainly doesn’t sound like something we’d want sitting in our laps. With the addition of his vents however, he’s now seeing an idle temperature of 45 °C to 60 °C, and a max of 82 °C.

In the end, [Arthur] is happy with the results of his modification, but he’d change a few things if he was to do it again. He’s somewhat concerned about the fact that the mesh he used for the grill isn’t non-conductive (he’s using shims of card stock internally to make sure it doesn’t touch anything inside), and he’d prefer the peace of mind of having used epoxy to secure it all together rather than super-glue. That said, it works and hasn’t fallen apart yet; basically the hallmarks of a successful hack.

It’s worth noting that [Arthur] is not the first person to struggle with the Macbook’s propensity for cooking itself alive. A few years back we covered another user who added vents to their Macbook, but not before they were forced to reflow the whole board because some of the solder joints gave up in the heat.

The Other Way To Brick A Mac Classic

Why would you build a mini Mac Classic using LEGO and a Raspberry Pi? Well, why wouldn’t you?

[Jannis Hermanns] couldn’t find a reason to control this outburst of nostalgia for the good old days of small, expensive computers and long hours spent clawing through the LEGO bin to find The Perfect Piece to finish a build. It turns out that the computer part of this replica was the easy part — it’s just an e-paper display driven by a Raspberry Pi Zero. Building the case was another matter, though.

After a parti-colored prototype with whatever bricks he had on hand, a session of LEGO Digital Designer led him to just the right combination of bricks to build an accurate case, almost. It turns out that the stock selection of bricks in LDD won’t allow for the proper proportions for the case, so he ordered the all-white bricks and busted out the Dremel. LEGO purists may want to avert their eyes from the ABS gore within, but in the end the case worked out and the whole build looks great.

Fancy a full-size Mac Classic reboot? How about this iPad docking station? Or if tiny and nostalgic is really your thing, this retro-future terminal build is pretty keen too.

[via r/raspberry_pi]

Magsafe 1 To Magsafe 2 The Cheap Way

[Klakinoumi] wanted to use their Magsafe 1 charger from 2007 with their newer Macbook Pro Retina from 2012 — but it had a Magsafe 2 port. There were a few options on the table (buy an adapter, buy a new charger, cry) but those wouldn’t do. [Klakinoumi] went with the brute force option of grinding a Magsafe 1 charger to fit Magsafe 2.

Based on the existence of passive adapters that allow Magsafe 1 chargers to work with newer laptops, we’d assume that the older chargers are probably electrically similar to the newer models. That said, it’s not our gear and we’d definitely be checking first.

With that out of the way, it’s a simple enough modification — grind away the Magsafe 1’s magnet until it fits into a Magsafe 2 port. It really is that easy. The spring-loaded pins all seem to line up with the newer port’s pads. [Klakinoumi] reports it worked successfully in their tests with 2012, 2014 and 2015 Macbooks but that it should be attempted at your own risk — good advice, as laptops ain’t cheap.

When doing this mod, consider taking care not to overheat the connector during grinding. You could both melt plastic parts of the connector, or ruin the magnet by heating it past its Curie point.

Interested in the protocol Magsafe speaks over those little golden pins? Find out here.

Fixing Bugs In A 37 Year Old Apple II Game

Emulators are a great way to reminisce about games and software from yesteryear. [Jorj Bauer] found himself doing just that back in 2002, when they decided to boot up Three Mile Island for the Apple II. It played well enough, but for some reason, crashed instantly if you happened to press the ‘7’ key. This was a problem — the game takes hours to play, and ‘7’ is the key for saving and restoring your progress. In 2002, [Jorj] was content to put up with this. But finally, enough was enough – [Jorj] set out to fix the bug in Three Mile Island once and for all.

The project is written up in three parts — the history of how [Jorj] came to play Three Mile Island and learn about Apple IIs in the first place, the problem with the game, and finally the approach to finding a solution. After first discovering the problem, [Jorj] searched online to see if it was just a bad disk image causing the problem. But every copy they found was the same. There was nothing left for it to be but problem in the binary.

Continue reading “Fixing Bugs In A 37 Year Old Apple II Game”

Top Ten Reasons Not To Buy A Fake MacBook Charger. Number Eight Will Shock You.

Yesterday, Apple showed the world how courageous they are by abandoning their entire PC market. It’s not time for a eulogy quite yet, but needless to say, Apple hardware was great, and the charger was even better. It had Magsafe, and didn’t start fires. What more could you ask for?

When it comes to fake MacBook chargers, you can ask for a lot more. [Ken Shirriff] has torn apart a number of these chargers, and his investigations allowed for an obvious pun in this post. The fake ones will make sparks thanks to the cost-saving design, and shouldn’t be used by anyone.

A genuine Apple MacBook charger is a phenomenal piece of engineering, but the fake one is not. In fact, it’s almost the simplest possible AC to DC converter. The mains power comes in, it’s chopped up into pulses, and these pulses are turned into a high-current, low-voltage output in a flyback transformer. This output is converted into DC with a few diodes, filtered, and wired into a MagSafe adapter.

The genuine MacBook charger is much more complicated. Like the cheap copy, it’s a switching power supply, but has a few features that make it much better. The genuine charger does power factor correction, uses quality caps, has real isolation on the PCB, and uses a microcontroller that’s almost as powerful (and a direct architectural descendant) as the CPU in the original Macintosh. It’s this microcontroller that kept you safe that one time you decided to lick a Magsafe connector not allowing the full 20 Volts to go through until the connector has connected. Until then, the Magsafe connector only outputs 0.6 Volts. The fake charger doesn’t do this, and when you poke the connector with a paper clip, sparks fly.

This isn’t [Ken]’s first teardown of genuine and not Apple products. He’s done iPad chargers, iPhone chargers, and other small, square, white switching power supplies. The takeaway from these teardowns is that cheap chargers are a false economy, and you probably should pony up the cash for the real version.