Robot Harvesting Machine Is Tip Of The Agri-Tech Iceberg

Harvesting delicate fruit and vegetables with robots is hard, and increasingly us humans no longer want to do these jobs. The pressure to find engineering solutions is intense and more and more machines of different shapes and sizes have recently been emerging in an attempt to alleviate the problem. Additionally, each crop is often quite different from one another and so, for example, a strawberry picking machine can not be used for harvesting lettuce.

A team from Cambridge university, UK, recently published the details of their lettuce picking machine, written in a nice easy-to-read style and packed full of useful practical information. Well worth a read!

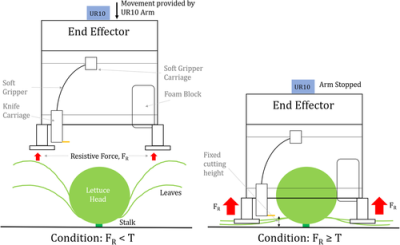
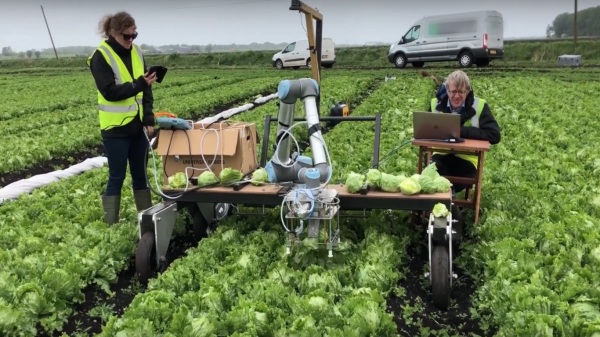
The machine uses YOLO3 detection and classification networks to get localisation coordinates of the crop and then check if it’s ready for harvest, or diseased. A standard UR10 robotic arm then positions the harvesting mechanism over the lettuce, getting force feedback through the arm joints to detect when it hits the ground. A pneumatically actuated cutting blade then attempts to cut the lettuce at exactly the right height below the lettuce head in order to satisfy the very exacting requirements of the supermarkets.

Rather strangely, the main control hardware is just a standard laptop which handles 2 consumer grade USB cameras with overall combined detection and classification speeds of about 0.212 seconds. The software is ROS (Robot Operating System) with custom nodes written in Python by members of the team.

Although the machine is slow and under-powered, we were very impressed with the fact that it seemed to work quite well. This particular project has been ongoing for several years now and the machine rebuilt 16 times! These types of machines are currently (2019) very much in their infancy and we can expect to see many more attempts at cracking these difficult engineering tasks in the next few years.

We’ve covered some solutions before, including: Weedinator, an autonomous farming ‘bot, MoAgriS, an indoor farming rig, a laser-firing fish-lice remover, an Aussie farming robot, and of course the latest and greatest from FarmBot.

Video after the break:

Continue reading “Robot Harvesting Machine Is Tip Of The Agri-Tech Iceberg”

The Theremin Gets A Voice

Every once in a while, we come across a project that adds a ridiculously good twist on an existing design. This is exactly what [Xiao Xiao] and the team at LAM research group at the Institut d’Alembert in Paris have done. Their project T-VOKS is a singing and Speaking Theremin that is sure to drive everyone in the office crazy. (YouTube link, embedded below for your viewing pleasure.)

For the uninitiated, the Theremin is an electronic music instrument that does not require physical contact. Instead, it uses two antennas to sense the distance of the operators hands and uses that to modulate the pitch and volume of the output audio. From music concerts to movie background music to even scaring the neighbours, this instrument can do it all.

T-VOKS is a different take on the instrument, and it interfaces with a voice synthesizer to sing. There is an additional sensor that is used for the syllable sequencing, and the video below shows the gadget in operation. The icing on the cake is the instrument playing, or should that be singing in an actual concert. There is also a research paper detailing the operation on Dropbox[PDF] if you need the nitty-gritty.

We wonder how a TTS engine would work with this idea and hope to see some more projects like it in the future. Fore those looking to get started, have a look at the build guide for a DIY theremin.

Continue reading “The Theremin Gets A Voice”

Space Age Bitcoin Mining On An Apollo AGC

Imagine you’ve got an Apollo Guidance Computer, the machine that took men to the Moon 50 years ago. You’ve spent ages restoring it, and now it’s the only working AGC on the planet. It’s not as though you’re going to fly to the Moon with it, so what do you do with it? Easy – turn it into a perfectly awful Bitcoin mining rig.

The AGC that [Ken Shirriff] and others have been restoring barely resembles a modern computer. The AGC could only do about 40,000 operations per second, but raw speed was far less important than overall reliability and the abundant IO needed to run a crewed spacecraft. It was a spectacular success on the Apollo missions, but [Ken] wanted to know if turning it into a Bitcoin mining rig was possible.

[Ken] gives a great overview of how Bitcoin mining works, with one of the best explanations of the hashing algorithm we’ve seen. Getting that to run on the AGC was no mean feat, especially with limits imposed by the memory addressing scheme and the lack of machine instructions for manipulating words. He eventually got it working, though, clocking in at a screaming 10.3 seconds per Bitcoin hash. [Ken] estimates that the first coin will be successfully mined in a mere 400 zettaseconds, which is about a billion times older than the universe. With about 13 quadrillion years to the first ka-ching, you have plenty of time to watch a block mined in the video below; alas, it was an old block, so no coins were awarded to compensate the team for their efforts.

This isn’t the first time [Ken] has implemented a useless Bitcoin mine. The Xerox Alto mine was actually fast compared to the AGC, but it sure beats the IBM mainframe and punchcards.

Continue reading “Space Age Bitcoin Mining On An Apollo AGC”

Liquid Damaged MacBook Saved With A Keen Eye

Even among those of us with a penchant for repairing electronics, there are some failures which are generally considered too severe to come back from. A good example is liquid damage in a laptop; with so many components and complex circuits crammed into such a small area, making heads or tails of it once the corrosion sets in can be a real nightmare. Especially in the case of an older laptop, the conventional wisdom is to try and recover your files and then buy a new one.

But as we’ve come to learn, [Jason Gin] is not a man who often finds himself concerned with conventional wisdom. After finding an older MacBook with suspected liquid damage, he decided to see what it would take to restore it to working order. According to a note on the device, the screen was dead, the USB ports were fried, the battery didn’t take a charge, and it wouldn’t boot. No problem then, should be easy.

Upon opening up the circa-2012 laptop, [Jason] found the machine to be riddled with corrosion. We’re not just talking surface gunk either. After giving everything a good cleaning with isopropyl alcohol, the true extent of the damage became clear. Not only had traces on the PCB rotted away, but there were many components that were either damaged or missing altogether. Whatever spilled inside this poor Mac was clearly some nasty stuff.

[Jason] used OpenBoardView to pull up schematics and diagrams of the motherboard, and started the arduous task of visually comparing them to his damaged unit. In some areas, the corrosion was so bad he still had trouble locating the correct traces and pads. But with time and effort, he was able to start probing around and seeing what components had actually given up the ghost.

For the USB ports it ended up being a bad 10-microfarad ceramic capacitor, but for the LCD, he ended up having to replace the entire backlight driver IC. The prospect of working on this tiny BGA-25 device might have been enough for some to throw in the towel, but compared to the hand-soldered magnet wire repairs required elsewhere on the board, [Jason] says the installation of the new LP8550 chip was one of the easier aspects of the whole operation.

The write-up is a great read if you like a good repair success story, and we especially like the way he documented his diagnosis and resulting work on a per-system basis. It makes it much easier to understand just how many individual fires [Jason] had to put out. But if you’re more interested in feats of steady-handed soldering, check out his recent project to add a PCI-E slot to the Atomic Pi.

FlexLED Is A Unique Take On Persistence Of Vision

Many hackers have experimented with the persistence of vision effect. Whip around a bunch of LEDs, flash them at just the right times, and it’s possible to make images to appear to hang in the air. There’s plenty of ways to do this, whether by manually shaking the LEDs by hand, spinning them around, or even putting them on your bike wheels. [Carl Bugeja] went a different route, taking advantage of the possibilities created by flex PCBs.

[Carl]’s project goes by the name FlexLED. This aptly describes the build, which, in prototype form, mounts a single LED on the end of a flex PCB. The PCB itself has a pattern of traces creating a coil, which enable it to interact with magnetic fields more strongly. By passing the right current through the coil, the flexible PCB can be made to flap up and down, moving the LED on the end at a rapid rate. By then controlling the flashing of the LED, it’s possible to create a persistence of vision effect.

Currently fitted with only one LED, capable of 3 colors, the visual display of the FlexLED is somewhat limited. However, [Carl] reports the effect is more impressive in person than on camera, and is already working on plans to scale up the project to a multi-LED diplay.

POV technology can do some pretty impressive things – even volumetric displays are possible. If you’re working on something yourself, be sure to let us know. Video after the break.

Continue reading “FlexLED Is A Unique Take On Persistence Of Vision”

It’s NICER In Orbit

Given the sheer volume of science going on as the International Space Station circles above our heads every 90 minutes or so, it would be hard for any one experiment to stand out. ISS expeditions conduct experiments on everything from space medicine to astrophysics and beyond, and the instruments needed to do the science have been slowly accreting over the years. There’s so much stuff up there that almost everywhere you turn there’s a box or pallet stuck down with hook-and-loop fasteners or bolted to some bulkhead, each one of them doing something interesting.

The science on the ISS isn’t contained completely within the hull, of course. The outside of the station fairly bristles with science, with packages nestled in among the solar panels and other infrastructure needed to run the spacecraft. Peering off into space and swiveling around to track targets is an instrument with the friendly name NICER, for “Neutron Star Interior Composition Explorer.” What it does and how it does it is interesting stuff, and what it’s learning about the mysteries of neutron stars could end up having practical uses as humanity pushes out into the solar system and beyond.

Continue reading “It’s NICER In Orbit”

Soak Up The Sun With This 3D Printed Solar Harvester

At first glance, adding solar power to your project might seem easy. Get a photovoltaic panel, point it towards the big ball of burning gas in the sky, and off you go. But in reality, there’s a bit more to it than that. Especially when you’re trying to do something on a small scale. Without a rooftop full of panels pumping out power, you’ve got to take what you can get.

If you’re looking to power small electronic devices such as sensors with a single solar panel, [Vadim Panov] has put together a very concise write-up and video on building a low-cost solar harvester. It combines a relatively small photovoltaic panel, a charging circuit, and a battery for energy storage into a easily mountable package. He’s provided all the details necessary to create your own version, all you have to do now is come up with the application for it.

As far as the electronics go, this project is about as straightforward as it gets. The three watt panel is connected up to a simplistic charging circuit, which in turn feeds into a single 18650 cell. You might be wondering why a charge controller is even necessary in such a simple set up. One problem is that the output voltage of the panel is higher than that of the battery. You also need a blocking diode that will prevent the battery from discharging into the cell during the night or in cloudy conditions.

While the electronics might seem elementary to some readers, we think the 3D printed case alone is worth taking a look at. Not only has [Vadim] come up with a design that perfectly encloses the fragile solar panel and associated electronics, but in the video after the break, he also explains how the entire thing can be made waterproof with an epoxy coating. As 3D prints can have a tendency to be porous, this technique is definitely something you should file away mentally if you’ve been thinking of deploying a printed enclosure outdoors.

Whether you’re looking to power environmental sensors for as near a century as is technically possible or a portable OpenWRT router for mobile anonymity, these small solar panels hold a lot of promise if you know how to work around their limitations.

Continue reading “Soak Up The Sun With This 3D Printed Solar Harvester”