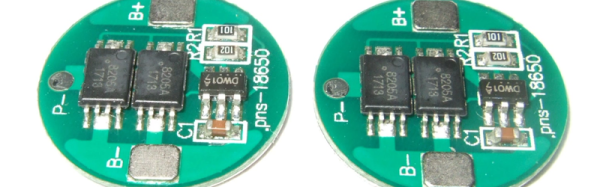
Paperback: ePaper desktop monitor playing Doom

Hackaday Prize Entry: PaperBack Desktop EPaper Monitor

When we announced the Hackaday Prize with its Best Product category, [PK] polled his wife and co-workers about the idea of making a desktop monitor using 6″ 800×600 ePaper, which he has since built and calls the PaperBack. One such requirement for a monitor is to be able to connect to it using one of the usual desktop methods: VGA, DVI or HDMI. Given his previous experience making his own VGA card for the 2015 prize, he went with that. HDMI is in the works.

But it ended up being more than a desktop monitor. He first made a power and breakout board that a VGA input board would eventually connect to. To test it, he included a socket for plugging in an ESP32. With only one bodge he had the Hackaday logo displayed on the ePaper. He also now had the option of using it as a wireless internet connected display.

Moving on to VGA support, [PK] made a VGA input board using the MST9883 chip, which does the A/D conversion of the VGA RGB graphics signal and also recovers a pixel sampling clock from the HSYNC. His new VGA ePaper monitor has to identify itself to the VGA source, telling it dimensions, resolution and so on. This is called the EDID and was handled by the addition of an Atmel ATmega328 to the board. To finish it off, an LCMXO1200C FPGA does the high-speed conversions with the help of a 4 MBit SRAM framebuffer.

His very first test involved simply displaying the Hackaday logo using the ESP32, but now with the VGA input board he has it displaying Doom. Since it’s using ePaper it has only a 1-second refresh rate but it’s hard to come up with a more awesome way to proved that it works. He can also unplug it at any time and walk away with the latest screenshot intact. See it for yourself in the video below.

Continue reading “Hackaday Prize Entry: PaperBack Desktop EPaper Monitor”

Cleaning Up A Low-Cost Buck-Boost Supply

Cheap DC-DC converters have been a boon on the hobbyist bench for a while now, but they can wreak havoc with sensitive circuits if you’re not careful. The problem: noise generated by the switch-mode supply buried within them. Is there anything you can do about the noise?

As it turns out, yes there is, and [Shahriar] at The Signal Path walks us through a basic circuit to reduce noise from DC-DC converters. The module under the knife is a popular buck-boost converter with a wide input range, 0-32 VDC output at up to 5 amps, and a fancy controller with an LCD display. But putting the stock $32 supply on a scope reveals tons of harmonics across a 1 MHz band and overall ripple of about 66 mV. But a simple voltage follower built from a power op-amp and a Zener diode does a great job of reducing the spikes and halving the ripple. The circuit is just a prototype and is meant more as a proof of principle and launching point for further development, and as such it’s far from perfect. The main downside is the four-volt offset from the input voltage; there’s also a broad smear of noise at the high end of the spectrum that persists even with the circuit in place. Centered around 900 MHz as it is, we suspect a cell signal of some sort is getting in. 900 kHz.

If you haven’t checked out the videos at The Signal Path, you really should. [Shahriar] really has a knack for explaining advanced topics in RF engineering, and has a bench to die for. We’ve covered quite a few of his projects before, from salvaging a $2700 spectrum analyzer to multiplexing fiber optic transmissions.

Continue reading “Cleaning Up A Low-Cost Buck-Boost Supply”

3D Printed Lamp Even Prints The Nuts And Bolts

The first print to come off a shiny new 3D printer is usually a toy widget of some sort that will forever sit at your desk without purpose. The alternative is a practical project that is custom and personal like this 3D Printed Articulating Lamp. [IgorF2] shares his design for this wall mounted device which was created using Fusion 360.

The complete design consists of eight parts which includes the arms, nuts, and bolts, as well as the wall mount, each of which can be printed individually. These come together to form a structure that can be attached to a wall or your work bench. Though [IgorF2] has provided arm pieces of length 100 mm, 140 mm and 200 mm, you can mix and match to create a much larger project. The files are available for download from Thingiverse for your making pleasure.

We think this can be a great basic structure for someone looking at custom wall mounted projects. The lamp mount can be easily supplemented by a Raspberry Pi and Camera holder if you feel like live streaming your bench. Alternatively, it may be customized to become a motion detecting lamp just for fun. We hope to see some good use come of it in the future.

Opto-Isolating Automatic Cat Feeder Problems

When you buy an off-the-shelf automatic cat feeder, you might well expect it to do the one thing it’s supposed to do. Feed the cat. Well, at least as long as you do your part by keeping it filled with food nuggets. [Stephen] had the sneaking suspicion that his feeder was slacking occasionally, and set out to prove this theory.

He had a few ideas for approaching the investigation. One was to set up a web cam, but that proved unreliable. Another idea was to log the weight changes of the food bowl. This seemed like a possibility because the reading would change dramatically whenever it was filled. The method he settled on is a good one, too — monitor the motor’s activity and look for holes. After all, the motor only runs when it’s feeding time.

The design is based around a smart door/window alarm, which is little more than a reed switch with networking capabilities. [Stephen] wired up an opto-isolator so that when the motor runs, the reed switch is triggered but not fried, and the event gets logged in Google Sheets. Any missed meals are weeded out with a script that alerts [Stephen] via email and text that his poor kitty is hungry.

If [Stephen] ever wants to build his own cat feeder, we have plenty of designs for inspiration.

Engineering And Artistry Meet An Untimely End At Burning Man

Burning Man is so many different things to so many people, that it defies neat description. For those who attend, it always seems to be a life-changing experience, for good or for ill. The story of one man’s Burning Man exhibition is a lesson in true craftsmanship and mind-boggling engineering, as well as how some events can bring out the worst in people.

For [Malcolm Tibbets], aka [the tahoeturner], Burning Man 2017 was a new experience. Having visited last year’s desert saturnalia to see his son [Andy]’s exhibition, the studio artist decided to undertake a massive display in his medium of choice — segmented woodturning. Not content to display a bamboo Death Star, [Malcolm] went big– really big. He cut and glued 31,000 pieces of redwood into rings of various shapes and sizes and built sculptures of amazing complexity, including endless tubes that knot and loop around and back into each other. Many of the sculpture were suspended from a huge steel tripod fabricated by [Andy], forming an interactive mobile and kinetic sculpture.

Alas, Burning Man isn’t all mellowness in the desert. People tried to climb the tripod, and overnight someone destroyed some of the bigger elements of the installation. [Malcolm] made a follow-up video about the vandalism, but you’ll want to watch the build video below first to truly appreciate the scale of the piece and the loss. Here’s hoping that [Malcolm]’s next display is treated with a little more respect, like this interactive oasis from BM 2016 apparently was.

Thanks to [Keith Olson] for the tip.

Enresoning An IPhone 8 Ring

The iPhone 8 was just released last week, and that means some people were standing in line in front of an Apple store for hours waiting to get their hands on the latest and greatest glowing rectangle. [Patrick Adair] had a better idea: he would stand in front of an Apple store for four hours, then do something productive with his new smartphone. With the help of a waterjet, some resin, a lathe, and some very fine grades of sandpaper, he created the Apple Ring.

Setting aside the whole process of actually acquiring an iPhone 8 on launch day, the process of turning an iPhone into a ring is more or less what you would expect. First, the iPhone was cut into ring-shaped pieces on a waterjet cutter. Special care was taken to avoid the battery, and in the end [Patrick] was able to get a nice chunk ‘o phone that included the camera lens.

This ring piece was then embedded in clear resin. For this, [Patrick] used Alumilite epoxy, a pressure pot, and a toaster oven to cure the resin. Once the phone parts were firmly encased for the rest of eternity, the ring blank moved over to the lathe. The center of the ring was bored out, and the process of sanding, polishing and gluing in all the tiny parts that fell out during the process commenced. The end result actually looks pretty great, and even though it’s probably a little too bulky, it is a remarkable demonstration of the craft of turning.

You can check out [Patrick]’s video below, along with a video from the Waterjet Channel showing the deconstruction of a glowing rectangle.

Continue reading “Enresoning An IPhone 8 Ring”

Hand-Carving Geometric Art

[Scott Cramer] is a retired professional woodworker who specializes in geometric art made from beautifully joined wood. In this project he’s carving four interlocked cloverleaf rings from a block of basswood. First he made a series of cuts to turn the block into a cuboctahedron, a geometric solid comprising six squares and eight triangles. Then he drew on the basic lines of the rings on the wood and went to work with a chisel, smoothing and separating the rings and carving out the interior. You can see more shots of the project on his Facebook post, which is included after the break.

To see more of [Scott]’s projects you can follow his Twitter feed. Our favorites include this 70″ pentagonal icosatetrahedron built out of hemlock that [Scott] says is the “largest in Coös County, NH” — what, there are others? He also made a magogany representation of a Hamiltonian circuit of a dodecahedron’s vertices.

We love math art on Hackaday — see our interview with Francisco do Comité we ran earlier this year.

Continue reading “Hand-Carving Geometric Art”