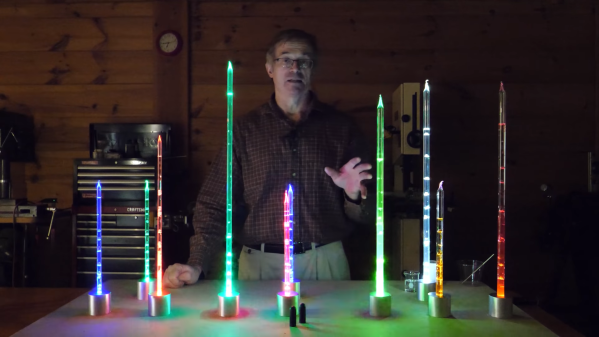
Automating Pool Monitoring And Chemical Dosing

Anyone who has had a backyard pool will know that it only takes a little lapsed attention to turn the whole thing green. For those sick of having to stay on top of things, the idea of automating pool care may be attractive. This project from [Discreet Mayor] hopes to do just that.

Data is graphed for easy analysis using Grafana.

The project uses a TI SimpleLink wireless-enabled microcontroller to run the show, which allows data to be offloaded to a base station for graphing with Grafana. The system can monitor pH levels as well as ORP (oxidation/reduction potential) levels using probes attached via BNC connectors. Based on these readings, the device can dose chlorine into the pool as needed using a peristaltic pump driven by a TI DRV8426 stepper motor driver.

We’d want to keep a close eye on the system for some time, making sure it wasn’t over or underdosing the pool with chemicals. However, that’s easy enough to do when all the data is logged neatly in a web-accessible graph.

We’ve seen other hackers implement similar controls to their own pools, too. If you’ve been working on your own home automation projects, be sure to drop us a line.

A 2nd gen Amazon Echo Dot inside a 1980s answering machine.

An Echo Dot For The 1980s

There’s so much obsolete technology out there with great design. It’s really sad to see it end up in the landfill, because even though the insides may be outdated, good design is forever. Take this 1980s Panasonic answering machine, for instance. The smoky plastic of the cassette lid is the perfect screen for Dot, because it lets the light through while hiding the modernity of the thing in the process. Check it out in action after the break.

What [ehans_makes] has written is really more of an overall guide to repurposing old electronics and fighting e-waste in the process. First, they non-destructively figure out what needs to be done to both the old thing and the newer thing to get them to play nicely together — what 3D printed parts need to be added, what can be salvaged and reused from the old thing, and what parts of the old enclosure can be Dremeled away. In this case, [ehans_makes] ended up printing an adapter to be able to re-use the original speaker’s mounting points inside the answering machine, and printed a mount for the Dot as well. The STLs are available if you happen to find the same answering machine at your local thrift store or neighbor’s estate sale.

While we’ve always managed to hold on to the screws when we disassemble something, [ehans_makes] has an even better idea: draw a diagram of where they go, and tape the actual screws to the diagram as you remove them.

Some of the best designs never really existed, at least not on a commercial scale. If you can’t find a cool old enclosure, you can always build one yourself.

Continue reading “An Echo Dot For The 1980s”

You Can Build A Lego Rubik’s Cube

Rubik’s cubes are a popular puzzle — one found exciting or infuriating depending on your personal bent. [PuzzLEGO] has designed a LEGO Rubik’s cube, with the latest revision improving on flimsy earlier designs.

The first step was to design a core that would allow the cube to rotate freely without being too loose. This involved a lot of trial and error until [PuzzLEGO] found just the right combination of parts to do the job. From there, it was a matter of introducing the edge pieces and corner pieces without jamming everything up.

It took some experimenting to get everything moving together smoothly, but the end result is pretty impressive. It’s certainly not a build you’d use for speedcubing; the fragility meant that it took 20 minutes to solve just one face. [PuzzLEGO] hopes to make further improvements to increase playability.

If you want to replicate the feat, you’ll need plenty of little Lego bits and pieces, but it’s definitely a replicable build. Alternatively, consider using Lego to build a Rubik’s Solver, instead. Video after the break.

Continue reading “You Can Build A Lego Rubik’s Cube”

New Part Day: Raspberry Pi LEGO HAT

The Raspberry Pi Foundation have been busy little bees for the last couple of years producing their own silicon, new boards and now in collaboration with the LEGO Education team a new HAT to connect to the LEGO SPIKE education platform. This new HAT board will work with every Raspberry Pi board with a 40-pin GPIO header.

Based on the RPI2040 microcontroller, it makes an interesting detour away from dumb slave boards, although it looks like the firmware is closed (for now) so you’ll have to make do with the pre-baked capabilities and talk to it with the supplied python library.

According to the documentation, the communication between the Pi and the RPI2040 nestled beneath the HAT PCB is plaintext-over-serial, freeing up the majority of the GPIO pins for other uses. The board uses a surface mount pass-through type header which allows pins from the Pi to protrude through the PCB, allowing stacking more HATs on top. Curiously they decided to mount the PCB with active parts facing down, giving a flat rear surface to park things on. We suspect that decision was made to improve access to the LPF2 connectors, especially if they were surface mount parts.

Continue reading “New Part Day: Raspberry Pi LEGO HAT”

Smokeless Burn Barrel Makes Your Backyard Fire Much Cleaner

Old 55-gallon drums are often repurposed into fire barrels with the simple addition of a few holes cut into the walls. Generally, they’re fit enough for purpose but can have a very smoky output, particularly when overloaded.  However, this design from [Building Stuff Is Fun] combines two drums into one to create a barrel that burns far more efficiently with less smoke! (Video, embedded below.)

Note the vent holes feeding oxygen to the fire just before the barrel outlet.

Through some clever cuts and folding of steel, a single burn barrel is created from the original two that helps eliminate smoke entirely, through two clever design features. First of all, plentiful air is provided to the fire thanks to the intakes at the bottom of the barrel. Secondly, the barrel-in-barrel design, paired with some smart vents, helps provide fresh air to the fire just before it leaves the barrel. This extra oxygen supply helps create secondary combustion at the outlet which burns up all the matter that would normally be passed out as smoke.

The design involves a lot more work than just hacking some holes in an old drum, but the results are undeniably impressive. The output of the smokeless burn barrel looks far hotter and cleaner. We’ve seen similar designs used to supply workshop heat, too. Video after the break.

Continue reading “Smokeless Burn Barrel Makes Your Backyard Fire Much Cleaner”

Build A Dog Ball Launcher That Kinda Looks Like A Dog

The average garden dog will play fetch long beyond the average human’s endurance. If you want to keep your dog exercised without hurting your pitching arm, [brankly’s] automatic dog ball launcher might just be what you need.

The design is straightforward. The 3D printed housing features a large funnel into which a ball can be dropped. A servo then holds the ball while a pair of rollers are spun up by brushed DC motors. After two seconds, the servo releases the ball towards the rollers which launch the ball out of the machine. A Raspberry Pi Pico runs the show, controlling the timing of the ball launch and varying the motor speed to change the distance the ball is launched on each firing.

Files are available on Thingiverse for those eager to build their own. If you’re good, you might even be able to train your dog to drop the ball in themselves. We’ve seen similar builds before, too! Video after the break.

Continue reading “Build A Dog Ball Launcher That Kinda Looks Like A Dog”

Fail Of The Week: Magnetic Levitation

We are big fans of the little desktop magnetic levitation setups that float a small object on a magnet. As [3D Printed Life] points out, they look like magic. He was surprised that the commercial units use analog electronics. He decided to build a digital version but didn’t know what he was getting into. He details his journey in the video you can see below.

Along with a custom control board, he decided to wind his own electromagnets. After finding that tedious he built a simple coil winder to automate some of the work.

Continue reading “Fail Of The Week: Magnetic Levitation”