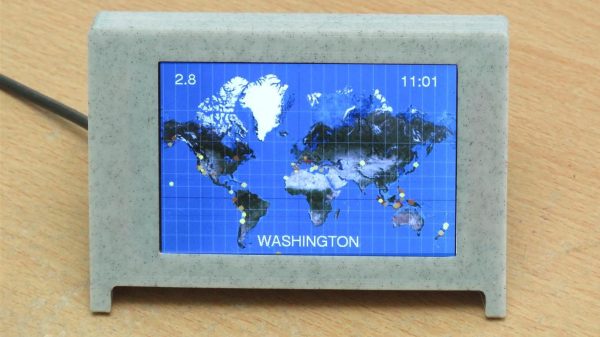
The Internet has brought us the ability to share data all over the globe, and nearly instantaneously at that. It’s revolutionized the sharing of science across the world, and taking advantage of this global data network is this earthquake display from [AndyGadget].
The build relies on an ESP32 fitted with an ILI9486 TFT display. The screen is in color and has a nice 480×320 resolution. This enables it to display a reasonably legible world map using the Web Mercator projection to fit the rectangular screen. The microcontroller then pulls in information from Seismic Portal, a site that aggregates data from seismographs and other sensors scattered all over the world. Data from the site is pulled into the device live and overlaid on the world map, allowing the viewer to see the location of any current earthquakes at a glance.
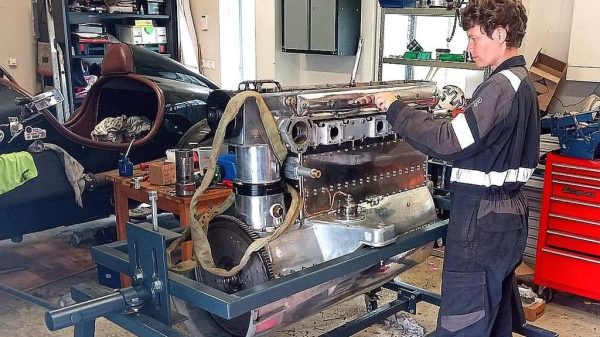
Engine stands are great to have on hand for when you need to work on an engine outside a vehicle. However, if your engine is particularly large, you might find off-the-shelf solutions difficult to find. [Liebregts] was recently contacted by someone in just such a pickle, who had an 8-litre Bentley engine from 1928 and nothing to put it on. Thus, constructing a custom engine stand was in order.
The original home of the hefty 8-liter engine.
The stand is built out of stout 50x50x4mm steel tubing in order to handle the weight of the gigantic vintage engine. It’s designed with an eye to ground clearance, such that an engine crane can easily slide under the stand when it’s time to lift the engine back in the car. It also allows the whole engine to be turned upside down, and even raised and lowered. This makes it easier to get to different parts of the engine, while keeping the center of gravity where it needs to be to avoid the whole assembly falling over.
It’s not a hugely complicated build, but it goes to show just how much of a difference it can make when you have the right tools for the job. With the engine out and on its stand, it’s much easier to work on and handle the many complicated tasks in its restoration. It also benefits from being custom built to suit the dimensions of the Bentley engine. Everything fits and it just works!
While few of us have rare 1928 Bentleys in need of an engine-out service, it’s a build that should serve as great inspiration for those working on similar tasks. Meanwhile, consider building yourself a custom engine crane to help out around the garage.
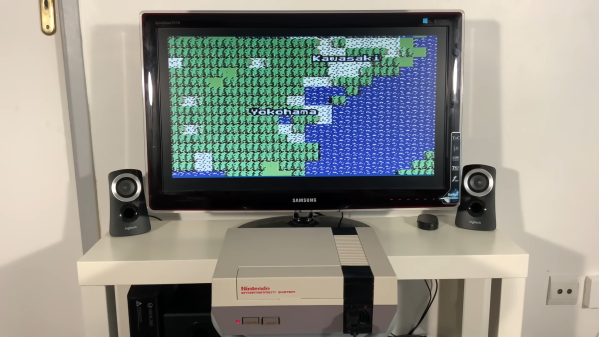
Many years ago, Google created one of its famous April Fools jokes suggesting it would make an 8-bit version of Google Maps for the original Nintendo Entertainment System. [ciciplusplus] decided it needed to become a reality, however, and set to work. (Video, embedded below.)
It’s a suitably blocky, low-resolution implementation, but it nevertheless is a mapping app running on an NES. Zooming in and out is via the A and B buttons, while the D-pad is used to scroll. Country and city labels are rendered on the map in the relevant areas in a charming old-school font.
The project uses a Raspberry Pi 3A+ and a Cypress Semiconductor FX2LP microcontroller, which fits inside a NES cartridge. It works the same way as the earlier NES Doom project which uses the Raspberry Pi to feed data to the NES’s Picture Processing Unit. It’s achieved with a simple bit of code burned on a ROM inside the cartridge, which boots up the NES and primes it to receive data from the Raspberry Pi via the FX2LP.
In current form, it’s not capable of doing much more than allowing the user to scroll around and zoom in on parts of the map. We’d love to see a fully-fledged version that could deliver driving directions or similar, however. If you end up achieving such a feat, be sure to let us know. Continue reading “Google Maps, Now On The NES”→
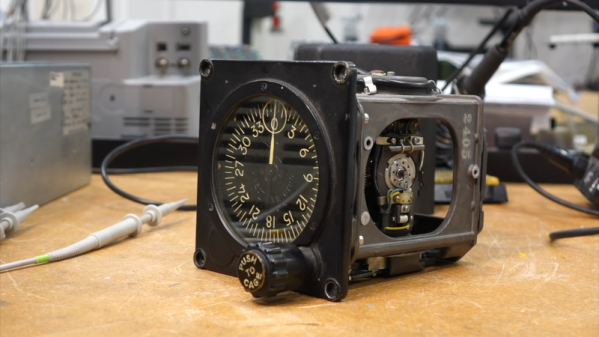
[Curious Marc] has an Apollo-era gyroscope but isn’t quite ready to put it through this paces without some practice. So he borrowed a 1949 vintage Sperry C5 gyro and did some experiments with it using a 3-phase power supply he plans to use on the other gyro.
There is a little bit of troubleshooting and a lot of gorgeous close up shots of these electromechanical marvels. They sure are noisy, though.
[Marc] wanted a gyro testing table that can control the orientation of a gyro under test. He went the auction route to get a pretty expensive piece of gear for a relatively low price but without the expensive software. In a stroke of luck, he managed to score the required software from the vendor who was intrigued by his project. It looked to us like a table like this wouldn’t be that hard to build from scratch, either.
We are interested in what [Marc] will do with his gyros next. It is hard to imagine that gyros have come from this sort of device to a tiny IC inertial measurement unit that can fit in a phone. Imagine packing the Sperry unit on your next walking robot or self-balancing unicycle.
Need a refresher on how gyro’s work? We got that, too. It even covers the modern kind.
Theoretically, ambisonic microphones allow you to perfectly encode the soundscape around you and recreate it from the focal point of any direction. To do this, you need at least four microphone capsules and some math. Ambisonic microphones have been around for 50 years, but [DJJules] wanted to bring ease of use to these tools and push them into the open source fold.
As you’ll see in the video below, there were a few iterations before this one. Everything changed for the better when [DJJules] found out about TSB25905 capsules. These are electret condenser mics with 1″ diaphragms and built-in EMI/RFI-suppressing capacitors. Another big help was deciding to color code everything from the XLR cable boots to the cable sleeves to the electrical tape that’s protecting each of the P48 resistor-capacitor pairs inside the XLR plugs.
[DJJules]’ buddy [Tom] designed and printed a single piece that holds the four capsules in a perfect tetrahedral array, and an elegant two-piece basket that protects the mics and provides a base for a one of those furry windscreens. The mics and the basket are separated with four silicone plugs designed for quadcopters that provide both isolation and vibration dampening.
If you want to make one of these yourself, [DJJules] has STLs for both a normal microphone stand and another for GoPro mounts. Check out the build video after the break and the sound demos on Instructables.
In 2019 [Simen] and [Amud], two students from the University of Oslo, set out to design a unique open-source display. The result was Fetch, a display that uses electromagnets to suspend ferrofluid on 252 “pixels” across the screen. After some delays due to COVID, they have recently unveiled version 2.0 of the display on their project’s page.
While the duo managed to overcome the mechanical challenges associated with using ferrofluids fairly easily, they were quickly bottlenecked by their electronics. The use of electromagnets holding up a liquid presented a unique challenge; the magnets could not be switched off, even for a millisecond, or else the “pixel” would fall down to the bottom of the screen. That immediately ruled out any sort of multiplexing and meant everything would have to be driven in parallel. As if that wasn’t already difficult enough to work around, the effect of having multiple electromagnets activated next to each other would change how the ferrofluid flows. This meant that the strength of each electromagnet would have to be adjusted based on what is currently being displayed, rather than just being on or off.
The mess of connections were not helped with the layout of the old driver boards shown here. The new design puts the connections closer to each individual electromagnet.
All of this, paired with other overhead like generating pulse-width modulation for the inputs, was just too much for a single microcontroller to handle. So, the pair set out to design a better version of their electronics that would offload a lot of the hard work. At the same time, they decided a bit of mechanical optimization was in order; they redesigned the boards to be longer and thinner, allowing them to fit cleanly behind the row of electromagnets they controlled.
The new boards feature a PCA9685 IC, which allows for the control of up to 16 channels of 12-bit PWM over i2C, perfect for the size of the display. Since this IC can’t source enough current to drive the electromagnets, it was paired with a ULN2803 Darlington Transistor Array, capable of delivering up to 500mA to each electromagnet.
With prototypes in hand (and a few bodge wires here and there), [Simen] and [Amud] had the new driver boards running beautifully, displaying text in a mesmerizing way that no ordinary display could match. Watch the video after the break for a demonstration of the new controllers in action, as well as a deeper dive into the process of developing them.
Remember when work meetings were just a bunch of people filling up a small, poorly ventilated room with their exhaled breath? Back in the good old days, all you had to worry about was being lulled to sleep by a combination of the endless slide deck and the accumulation of carbon dioxide. Now? Well, the stakes may just be a little bit higher.
In either situation, knowing the CO2 level in a room could be a handy data point, which is where a portable CO2 sensor like this one could be useful. Or at least that’s [KaRMaN]’s justification for SYPHCOM, the “simple yet powerful handheld carbon dioxide meter.” The guts of the sensor are pretty much what you’d expect — an Arduino Pro Micro, a SenseAir S8 CO2 sensor board, and the necessary battery and charging circuits. But the build does break the mold in a couple of interesting places. One is in the choice of display — a 1980s-era LED matrix display. The HDSP2000 looks like it belongs in a nice bench meter, and is surprisingly legible without a filter. It looks like it flickers a bit in the video below, but chances are that’s just a camera artifact.
The other nice part of this build is the obvious care [KaRMaN] put into making it as small as possible. The layout of boards and components is very clever, making this a solid, compact package, even without an enclosure. We’ve seen CO2 sensors with more features, but for a quick check on air quality, SYPHCOM looks like a great tool.