Some things just go hand in hand. Hacking and guitars are one perfect example. A huge number of hackers, makers, and engineers have at least dabbled in playing the guitar. Even those who don’t play have heard the swan song of the wayward guitarist “Bro, you fix amps?”. Seriously, once your guitar toting friends find out you tinker in electronics, you’ll never be left wanting for pizza or beer. This week’s Hacklet is about some of the best guitar projects on Hackaday.io!
Musical Hacks1374 Articles
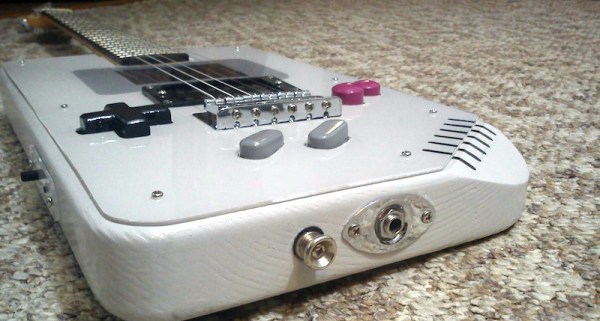
Introducing The Nintendo Guitar Boy
Need to thrash out some wicked 8-bit riffs? There’s only one guitar you should be doing that with, and it’s a Guitar Boy!
[Fibbef], an administrator on BitFixGaming boards built this as an exhibition piece for his 2015 Game Boy Classic build off. He started the build just three months ago and we have to say we’re impressed. It’s a fully functioning Raspberry Pi Game Boy emulator — and a full fledged electric guitar. The A and B buttons double as volume and tone dials for the guitar, while also being push buttons for the Game Boy!
Under the hood is a Raspberry Pi B+ running RetroPie v2.3, with a 5″ LCD display, custom wooden buttons, the entire body is hand made, and a plexiglass shell covers the whole thing.
Discovery MIDI Sample Player
[Igor b] plays in a band and wanted a way to use a foot pedal to trigger samples. Since he had a STM32F429 evaluation board handy, he decided to build the Stmpler using the board, a touch screen, an SD card, and not much else.
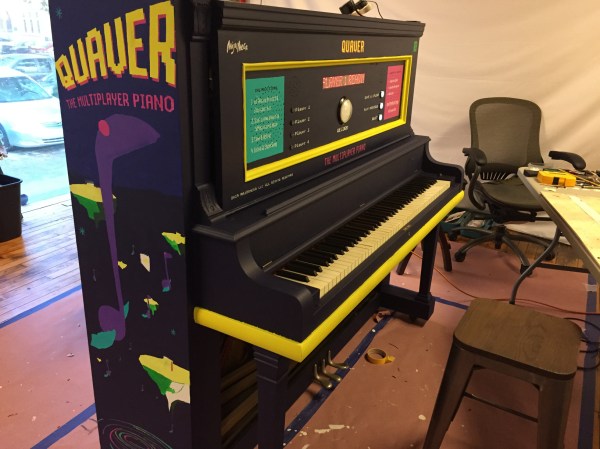
It’s An Upright Piano, It’s A Looper, It’s A Pi Project
We don’t really get out much, but we have noticed that there are brightly painted upright pianos in public places these days. Research indicates that these pianos are being placed by small, independent local organizations, most of which aim to spread the joy of music and encourage a sense of community.
[Sean and Mike] took this idea a couple of steps further with Quaver, their analog looping piano. Both of them are maker/musicians based in Lancaster, Pennsylvania, which happens to be a hot spot for public pianos. [Sean and Mike] often stop to play them and wanted a good way to capture their impromptu masterpieces. Quaver is an antique upright that has been modified to record, save, loop, and upload music to the internet. It does all of this through a simple and intuitive user interface and a Raspi 2. Quaver works a lot like a 4-track recorder, so up to four people can potentially contribute to a song.
The player sits down, cracks their knuckles, and presses our personal favorite part of the interface: the giant, irresistible record button. A friendly scrolling LED matrix display tells them to start playing. Once they are satisfied, they press the button again to stop the recording, and the notes they played immediately play back in a loop through a pair of salvaged Bose speakers from the 1980s. This is just the beginning of the fun as you play along with your looping recording, building up several voices worth of song!
Continue reading “It’s An Upright Piano, It’s A Looper, It’s A Pi Project”
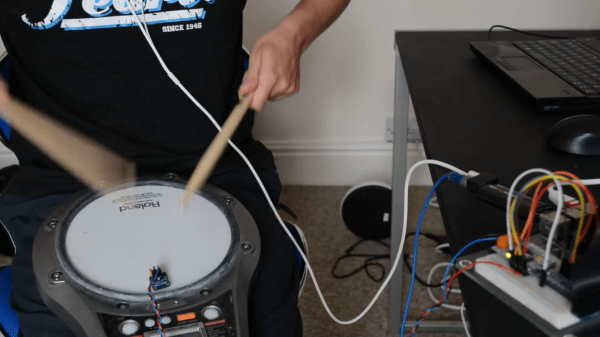
RaspiDrums Uses Expensive Sensors
Piezoelectric sensors are great for monitoring mechanical impacts with a microcontroller. Whether you’re monitoring knocks on a door or watching a heartbeat, they are a cheap way to get the job done. They do have their downsides, though, so when [Jeremy] wanted to build an electronic drum set, he decided to use more expensive accelerometers to measure the percussive impacts instead.
Even though piezo sensors are cheap, they require a lot of work to get them working properly. The ADXL377 3-axis accelerometer that [Jeremy] found requires much less work, plus provides more reliable data due to a 1kHz low-pass filter at the output. In his setup, a Raspberry Pi handles all of the heavy lifting. An ADC on each drum sends data about each impact of the drum, and the Raspberry Pi outputs sound via the native Alsa driver and a USB sound card.
This project goes a long way to show how much simpler a project like this is once you find the right hardware for the job. [Jeremy]’s new electronic drums are very well documented as well if you are curious about using accelerometers on your newest project rather than piezo sensors. And, if you’re into drums be sure to see how you can have drums anywhere, or how you can build your own logic drums.
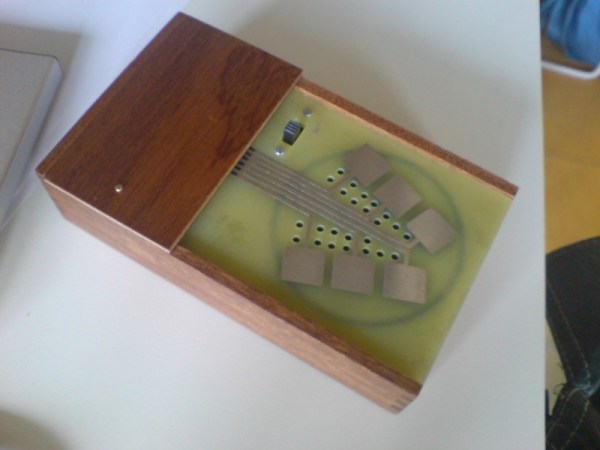
The Kraakdoos — Musical Abuser Of An Ancient OpAmp
A friend from the newly founded Yeovil Hackerspace introduced me to a device known as “The Kraakdoos” or cracklebox.
The cracklebox is an early electronic instrument produced by STEIM in the 1970s. The instrument consists of a single PCB with a number of copper pads exposed on one side. The player touches the pads and the instrument emits… sounds which can perhaps best be described as squeeze and squeals.
While the cracklebox was original sold as a complete instrument, the device has been reverse engineered, and the schematic documented. What lies inside is quite fascinating.
The heart of the cracklebox is an ancient opamp, the LM709. The LM709 is the predecessor to the famous LM741. Unlike the 741 the 709 had no internal frequency compensation. Frequency compensation is used to intentionally limit the bandwidth of an opamp. As input frequency increases, the phase shift of the opamp also increases. This can result in undesirable oscillation, as the feedback network forms an unintentional phase-shift oscillator.
Most modern opamps have internal frequency compensation, but the 709 doesn’t. Let’s see how this is used in the cracklebox:
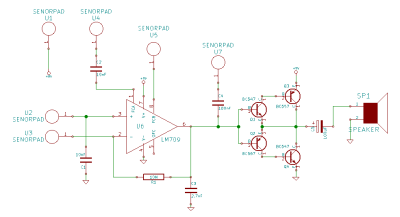 Rather than using the frequency compensation pins as intended the cracklebox just routes them out to pads. In fact the cracklebox routes almost all the pins on the opamp out to pads, including the inverting and non-inverting inputs. A single 1MOhm feedback resistor is used in a non-inverting configuration. However reports suggest the instrument can work without a feedback resistor at all!
Continue reading “The Kraakdoos — Musical Abuser Of An Ancient OpAmp”
MIDI Sampling Off Magnetic Tapes
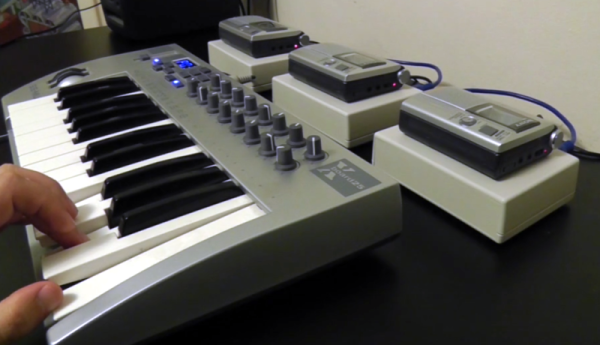
Ever heard of the Mellotron? It was a British made audio sampler that used the most cutting edge technology available back in 1963… Magnetic tapes. You could record different sounds, music, beats or rhythm onto these magnetic tapes, and then play it back with the keyboard, much like a MIDI Sampler keyboard today. Well, someone has gone and made a newer version of one.
He calls it the Crudman, and it’s the same concept of a Mellotron, but uses slightly more modern components. Specifically, audio cassettes.
A MIDI keyboard sends output commands to a series of cassette players outfitted with Teensy microcontrollers. Depending on the settings, pressing a key can speed up or slow down a tape in order to generate a note. If it sounds simple, trust us, it’s not. The project has been a labor-of-love for the unnamed creator, who has spent nearly 10 years designing it. He now sells them (but demand is pretty high) — you’ve gotta take a listen — they produce some of the most unique sounds we’ve ever heard.


