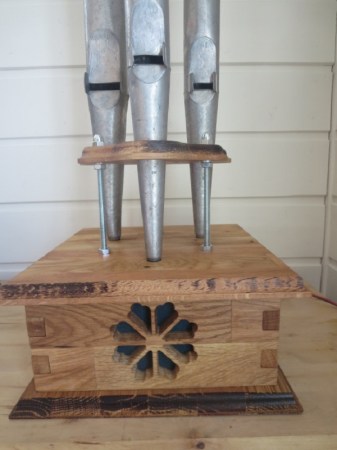
Stereo Audio On A PIC32

The PIC microcontrollers are powerful little devices, and [Tahmid] is certainly pushing the envelope of what these integrated circuits can do. He has built (for educational purposes, he notes) an audio player based on a PIC32 and a microSD card. Oh, and this microcontroller-based audio player can play in stereo, too.

The core of the project is a PIC32MX250F128B microcontroller. 16-bit 44.1kHz WAV files are stored on the microSD card and playback is an impressive 12-bit stereo audio. It can also play back 8-bit files (with some difficulty). [Tahmid] programmed the interface to work through the serial port and it is very minimalistic, mostly because this was a project for him to explore audio on a microcontroller and wasn’t to build an actual stand-alone audio player that he would use from day to day.

Still, even though the project isn’t ready to replace your iPod, the core audio-processing parts are already done if you want to try to build on [Tahmid]’s extensive work. You could even build a standalone audio player like this but have it play high-quality 12-bit stereo audio!

Continue reading “Stereo Audio On A PIC32”

DIY guitar mute pedal

Guitar Mute Pedal Made From Upcycled Parts

Rockin’ out on your fave guitar is pretty fun for sure but whether your on stage or jamming in your basement, it can be convenient to quickly mute those killer licks. [wozlaser] wanted a mute pedal for his guitar and instead of shelling out the tens of dollars for a commercial version, he decided to build one himself.

This pedal is heavy-duty and made out of metal. If the frame looks familiar, that is because in a prior life this was a control pedal for a sewing machine. [wozlaser] found it cheap at a thrift store. After the internals were taken out, he added a few key parts. First were the 1/4″ input and output jacks that were scavenged from an old stereo system. There is a momentary switch from a VCR and a standard guitar stomp pedal switch mounted all the way in the front of the frame. The wiring is as follows:

DIY guitar mute pedal

The wiring schematic is pretty darn simple, it just grounds and ungrounds the signal wire. As stated earlier, there are 2 switches, a momentary and a push-on/push-off switch. A normal mute pedal would only have one switch but [wozlaser] wanted something special. If you push the pedal all the way forward it will mute or unmute the signal until it is pushed again. When the pedal is in the spring-supported ‘up’ position a lever pushes on the momentary switch, a slight push on the pedal lifts the lever off of the momentary switch to mute or unmute the signal. The function of the momentary switch (mute or unmute) changes with the state of the other switch. This works exactly the same as a 3-way light switch circuit allows two switches to control one light in your house. With this setup [wozlaser] is able to not only mute and unmute his guitar but strum a chord with it off and pulse the chord on to the beat of the music or tap the pedal with some guitar feedback to make the sound cut in and out. All that only cost [wozlaser] a little time and spare parts… and there are no batteries to replace!

Music in a CD Case

This CD Jewel Case Plays Music Without A Disc

We’ve all heard the terrible greeting cards that have soundbites of 2 bit jingles that usually make you want to tear the battery out… but Hallmark is finally catching up with technology and now including real music in their cards — it might only be about 10 seconds, but hey, it’s a step!

They’re still pretty corny though, and we’re not really sure what even dictates an ideal situation to give someone an audible greeting card — but regardless, [Dmitry Grinberg] thought he could do better than Hallmark — and we’d have to agree. He’s created a New Year’s Greeting card using a CD jewel case, and what he’s packed inside is pretty incredible.

The case, when opened, will play a full-length song in full fidelity. Next time you open it, it’ll play something new and at random, from its very own micro SD card 300-song library.

Continue reading “This CD Jewel Case Plays Music Without A Disc”

Sound Reactive Drums Of Trailing Light

If you’re going to be the drummer in a band for a Back to the Future themed New Years Eve party, you really need to add something to your gig that captures that kitschy futuristic ambiance as seen by the 80s. Rainbow LEDs will do the trick.

For his drum set’s reactive trailing light display, [Alec Smecher] was inspired by a similar project he’d seen in the past where Neopixels were added to a regular drum kit and activated with several individual microphones. Since the microphones ultimately heard all of the thundering noise from every drum and cymbal at once, there was a lot of bleed over in the response of the LEDs. To remedy this, [Alec] used piezo pickups which listen to discrete surface vibrations rather than sound in order to clean up the effect produced by the lights. Each of the five LED strips lining the stands of his cymbal and inside of his drums were programmed to react with a burst of light equal in brightness to the intensity of the vibration sensed by the piezo.

To insure everything kept together amidst all the constant motion and shaking during performance, [Alec] soldered his connections directly onto his Trinket’s pins as well as the fragile pickup of the piezo. The pickup of the sensors were taped directly against the skin of his drums and along the inside of each cymbal to maximize responsiveness. After ringing in the new year appropriately as the ‘band from the future’, [Alec] reports that his colorful addition worked fantastic the whole night.

Those interested in building their own can find a nice schematic on [Alec’s] blog as well as the code he used on github. Difficulty level taken into account, this is a great first project for a musician who has yet to dabble in electronics… and seeing that it’s a brand new year, there’s no better time to have a go at something new.

Continue reading “Sound Reactive Drums Of Trailing Light”

Pendulum Music For Oscilloscope And Photodiodes

Two turntables and a microphone? Try two oscilloscopes and a couple of photodiodes. [dfiction] reinterpreted Steve Reich’s classic feedback piece for more modern electronics. The video is embedded after the break.

The original Pendulum Music is a conceptual musical composition from the heady year of 1968. Basically, you set a bunch of microphones swinging across speakers, making feedback as they pass by. The resulting rhythmic and tonal oscillations change over time as the swinging damps down. It’s either mesmerizing or entirely boring, depending on your mindset.

In the [dfiction] version, the feedback is produced by passing a “light microphone” over an oscilloscope. And since he’s got a pair of these setups, the one microphone also feeds the other ‘scope. The resulting sound is this chaotic and gritty noise-rumble. We dig it.

If slowly evolving “process music” pushes the boundaries of your attention span (or if it’s just not your thing) you can totally skip around in the video. Try around 1:40 and 3:45 into the piece just to get an idea of what’s going on. But once you’re there, you might as well let it run its course.

Continue reading “Pendulum Music For Oscilloscope And Photodiodes”

Ambilight For Your Piano (Hero)

That old upright piano still sounds great, and now it can easily have its own special effects. [DangerousTim] added LED strips which change color when he tickles the ivories. The strips are applied along the perimeter of the rear side of the upright causing the light to reflect off of the wall behind the instrument. This is a familiar orientation which is often seen in ambilight clone builds and will surely give you the thrill of Guitar Hero’s brightly changing graphics while you rock the [Jerry Lee Lewis].

Key to this build is the electret microphone and opamp which feed an Arduino. This allows the sound from the piano to be processed in order to affect the color and intensity of the LED strips. These are not addressable, but use a transistor to switch power to the three colors of all pixels simultaneously.

We think there’s room for some clever derivative builds, but we’re still scratching our heads as to how we’d use addressable pixels. Does anyone know a relatively easy way to take the mic input and reliably establish which keys are being played? If so, we can’t wait to see your ambilight-piano-clone build. Don’t forget to tip us off when you finish the hack!

Making A Player Piano Talk MIDI

[Ramon] was always fascinated with pianos, and when he came across a few player piano rolls in an antique shop, a small kernel of a project idea was formed. He wondered if anyone had ever tried to convert a player piano into a full MIDI instrument, with a computer tickling the ivories with a few commands. This led to one of the best builds we’ve ever seen: a player piano connected to a computer.

[Ramon] found an old piano in Craigslist for a few hundred dollars, and once it made its way into the workshop the teardown began. Player pianos work via a vacuum, where air is sucked through a few pin points in a piano roll with a bellows. A series of pipes leading to each key translate these small holes into notes. Replicating this system for a MIDI device would be impossible, but there are a few companies that make electronic adapters for player pianos. All [Ramon] would have to do is replicate that.

The lead pipes were torn out and replaced with 88 separate solenoid valves. These valves are controlled via a shift register, and the shift registers controlled by an ATMega. There’s an astonishing amount of electronic and mechanical work invested in this build, and the finished product shows that.

As if turning an ancient player piano into something that can understand and play MIDI music wasn’t enough, [Ramon] decided to add a few visuals to the mix. He found a display with a ratio of 16:4.5 – yes, half as tall as 16:9 – and turned the front of the piano into a giant display. The ten different styles of visualization were whipped up in Processing.

display

The piano has so far been shown at an interactive art exhibit in Oakland, and hopefully it’ll make it to one of the Maker Faires next year. There are also plans to have this piano output MIDI with a key scanner underneath all the keys. Very impressive work.

Video below.

Continue reading “Making A Player Piano Talk MIDI”