TweetHeart Shows You Some Love

[Stacey] wanted a more interesting way to monitor events related to her Twitter account. What she ended up with is a beautiful animated heart light.

Tweetbox
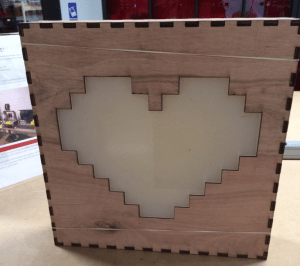
She started out by designing the enclosure. Having access to a laser cutter, she opted to make it out of thin plywood. [Stacey] used an online tool called BoxMaker to design the actual box. The tool is very simple to use. You simply plug in the dimensions of the box and it will provide you with a two dimensional template you can use with your laser cutter. The resulting plywood pieces fit together like a puzzle. The heart piece is made from frosted acrylic and was also cut by the laser.

To light up the heart, [Stacey] opted to use NeoPixels. These are like many of the RGB LED strips we’ve seen in the past, though the pixel density is higher than most. She cut up the LED strip into the appropriate sizes and glued them to a piece of plywood in a rough heart shape. She tested the lights during each step so she would know exactly when any errors were made.

[Stacey] opted to use a SparkCore to control the LEDs. This had the advantage of including WiFi connectivity out of the box.  [Stacey] started with NeoPixel example programs, but quickly realized they all relied on the Delay function. This was a problem for her, because she needed to constantly watch for new Twitter events. She ended up having to write her own functions that relied on interrupts instead.

[Stacey] then wrote a Node.js script to monitor twitter and control the Spark. The script watches for specific events, such as one of [Stacey’s] tweets being re-tweeted, or a user unfollowing [Stacey]. The script then sends a message to the Spark to tell it which event just occurred. The Spark will then repeat the event until a new one occurs. Check out the demonstration video below. Continue reading “TweetHeart Shows You Some Love”

Stereo Audio On A PIC32

The PIC microcontrollers are powerful little devices, and [Tahmid] is certainly pushing the envelope of what these integrated circuits can do. He has built (for educational purposes, he notes) an audio player based on a PIC32 and a microSD card. Oh, and this microcontroller-based audio player can play in stereo, too.

The core of the project is a PIC32MX250F128B microcontroller. 16-bit 44.1kHz WAV files are stored on the microSD card and playback is an impressive 12-bit stereo audio. It can also play back 8-bit files (with some difficulty). [Tahmid] programmed the interface to work through the serial port and it is very minimalistic, mostly because this was a project for him to explore audio on a microcontroller and wasn’t to build an actual stand-alone audio player that he would use from day to day.

Still, even though the project isn’t ready to replace your iPod, the core audio-processing parts are already done if you want to try to build on [Tahmid]’s extensive work. You could even build a standalone audio player like this but have it play high-quality 12-bit stereo audio!

Continue reading “Stereo Audio On A PIC32”

Hackaday Links Column Banner

Hackaday Links: January 11, 2015

Listening tests reveal significant sound quality differences between various digital music storage technologies. Finally the audiophile press is tackling the important questions. This listening test looks at the difference between two four-bay NAS boxes, with one making the piano on Scherzo and Trio from Penguin Café Orchestra’s Union Cafe sound more Steinway-like, while another NAS makes it sound more like a Bosendörfer. Yes, your choice of digital storage medium can change the timbre of a piano. Another gem: “Additionally, the two units also had different processor architectures, which might also affect perceived audible differences.” There must be a corollary to Poe’s Law when it comes to audiophiles…

[10p6] has begun a project that can play every old Atari cartridge. Right now it’s just a few bits of plastic that fits every non-Jaguar Atari cartridge, but it’s a start.

The Android IMSI-Catcher Detector. You’ve heard about Stingrays, devices used by law enforcement that are basically fake cell towers. These Stingrays downgrade or disable the encryption present in all cellphones, allowing anyone, with or without a warrant, to listen in on any cell phone conversation. Now there’s an effort to detect these Stingrays. It’s open source, and they’re looking for volunteers.

[Rob] sent in something that’s the perfect application of projection mapping. It’s called Face Hacking, and it’s pretty much just a motion capture systems, a few projectors, a whole lot of CG work, and just a tiny bit of dubstep. It look cool, but we’re wondering what the applications would be. Theatre or some sort of performance art is the best I can come up with.

A while ago, [4ndreas] saw a 3D printed industrial robot arm. He contacted the guy for the files, but nothing came of that. [4ndreas] did what anyone should do – made his own 3D printable industrial robot arm. The main motors are NEMA 17, and printing this will take a long time. Still, it looks really, really cool.

heartbeat sensor

Simple And Inexpensive Heartbeat Detector

There are many ways to detect a heartbeat electronically. One of the simpler ways is to take [Orlando’s] approach. He’s built a finger-mounted pulse detector using a few simple components and an Arduino.

This circuit uses a method known as photoplethysmography. As blood is pumped through your body, the volume of blood in your extremities increases and decreases with each heartbeat. This method uses a light source and a detector to determine changes in the amount of blood in your extremities. In this case, [Orlando] is using the finger.

[Orlando] built a finger cuff containing an infrared LED and a photodiode. These components reside on opposite sides of the finger. The IR LED shines light through the finger while the photodiode detects it on the other side. The photodiode detects changes in the amount of light as blood pumps in and out of the finger.

The sensor is hooked up to an op amp circuit in order to convert the varying current into a varying voltage. The signal is then filtered and amplified. An Arduino detects the voltage changes and transmits the information to a computer via serial. [Orlando] has written both a LabVIEW program as well as a Processing program to plot the data as a waveform. If you’d rather ditch the PC altogether, you might want to check out this standalone heartbeat sensor instead.

Massive Tesla Coil

Massive Tesla Coil Plays Music In The Snow

One of our tipsters stumbled across a pretty impressive video of a giant Tesla coil playing music — in a snowy forest! The forum showing off the video is in Finnish but Google Translate does a pretty good job getting the point across.

This massive Tesla coil dubbed the BiggerDR was built by [Kizmo], who lives way up north in Finland. He was originally inspired by another build and decided to try his hand at making one. The Tesla coil, detailed in another forum post (in English this time) has some pretty impressive specs. The coil alone has 1550 wraps! Not too mention a pretty impressive bank of capacitors in series…

His YouTube channel has some great videos of the build — in fact, he’s been messing around with Tesla coils for at least 7 years already — stick around after the break to see BiggerDR in action.

Continue reading “Massive Tesla Coil Plays Music In The Snow”

switchboard

Bypassing Broken SIP ALG Implementations

The SIP protocol is commonly used for IP telephone communications. Unfortunately it’s notorious for having issues with NAT traversal. Even some major vendors can’t seem to get it right. [Stephen] had this problem with his Cisco WRVS4400N router. After a bit of troubleshooting, he was able to come up with a workaround that others may find useful.

The router had built in SIP ALG functionality, but it just didn’t work. [Stephen] was trying to route SIP traffic from a phone to an Asterisk PBX system behind the router. The router just couldn’t properly handle these packets regardless of whether SIP ALG was enabled or disabled.

[Stephen] first tried to change the SIP port on the external VOIP phone from the default of 5060 to something else. Then he setup port forwarding on the router to the Asterisk box to forward the traffic to the Asterisk system on the original port. This sort of worked. The calls would go through but they would eventually drop after about 20 seconds.

The only thing that [Stephen] could get to work completely was to change the SIP port in Asterisk’s sip.conf file using the “bindport” directive. He changed it to some random unused high port number. Then he setup port forwarding on the router to forward incoming UDP packets on that port to the Asterisk system. This worked fine, but now all of the original phones behind the router stopped working because they were configured to use the default port of 5060.

Rather than re-configure all of the phones in the organization, [Stephen] made one change on the Asterisk system. He setup an iptables rule to forward all incoming traffic on UDP port 5060 to the new SIP port. Now all of the phones are working with minimal changes across the organization. It’s a lot of hassle to go through just because the router couldn’t handle SIP correctly, but it gets the job done.

Grinding A Bicycle Crank For Power Analysis

For [Mark] and [Brian]’s final project for [Bruce Land]’s ECE class at Cornell, they decided to replicate a commercial product. It’s a dashboard for a bicycle that displays distance, cadence, speed, and the power being generated by the cyclist. Computing distance, cadence and speed is pretty easy, but calculating power is another matter entirely.

The guys are using an ATMega1284 to drive an LCD, listen in on some Hall Effect sensors, and do a few calculations. That takes care of measuring everything except power. A quick search of relevant intellectual property gave then the idea of measuring torque at the pedal crank. For that, [Mark] and [Brian] are using a strain gauge on a pedal crank, carefully modified to be stiff enough to work, but flexible enough to measure.

A custom board was constructed for the pedal crank that measures a strain gauge and sends the measurements through a wireless connection to the rest of the bicycle dashboard. It works, and the measurements in the classroom show [Brian] is generating about 450 W when pedaling at 33 mph.

Video below.

Continue reading “Grinding A Bicycle Crank For Power Analysis”