Extreme Repair Of A Burnt PCB

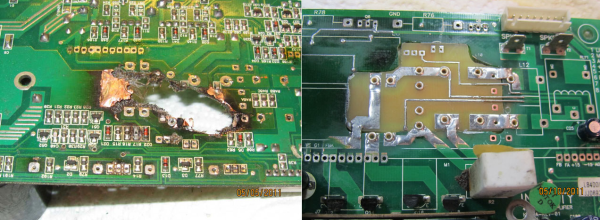
[xsdb] had a real problem. His JBL L8400P 600 watt subwoofer went up in flames – literally. Four of the large capacitors on the board had bulged and leaked. The electrolyte then caused a short in the mains AC section of the board, resulting in a flare up. Thankfully the flames were contained to the amplifier board. [xsdb’s] house, possessions, and subwoofer enclosure were all safe. The amplifier board however, had seen better days. Most of us would have cut our losses and bought a new setup. Not [xsdb] he took on the most extreme PCB repair we’ve seen in a long time.

After removing the offending caps and a few other components, [xsdb] got a good look at the damage. the PCB was burned through. Charred PCB is conductive, so anything black had to be cut out. The result was a rather large hole in the middle of an otherwise serviceable board. [xsdb] had the service manual for the JBL sub. Amazingly, the manual included a board layout with traces. Some careful Photoshop work resulted in an image of the section of PCB to be repaired. [Xsdb] used this image to etch a small patch board.

The amplifier and patch were milled and sanded to match up nearly perfectly. Incredibly, all the traces aligned. [Xdsb] soldered the traces across the join with small sections of wire and solder wick. After soldering in some new high quality capacitors, the amplifier was back in action!

If you’re a big fan of burned PCB’s, check out Hackaday Prize Judge Dave Jones latest EEVblog video, where he works on a Ness home alarm panel with a similarly cooked section of FR4.

[Thanks for the link JohnS_AZ!]

Make A Capacitive Clothespin Keyboard For Your IPad

Even with all the optimization and style of new technology, the keyboard is a difficult thing to replace. Touch screens just don’t deliver the tactile feedback that connects us to the medium. [Adam Kumpf] remedies this by building his own keyboard interface to work with an iPad piano app, all from craft materials you’d likely find lying around in the kitchen.

To make your own, you’d first need a bunch of clothespins which will ultimately act as your keys. [Adam] shows how to stitch the separated halves of the clothespins onto a piece of cardboard with some basic rubber bands. These tension the keys so that they can rock back and forth over a pen or pencil placed beneath them. When you press down on one end, the other lifts causing an opposing pin to press the corresponding key of the iPad, just like a hammer inside a piano. With a little aluminum foil for conductivity wrapped around the side making contact, you’ve got yourself a quick solution for your itch to rock some Chopin.

You can see how well the project works in action below in his video:

Continue reading “Make A Capacitive Clothespin Keyboard For Your IPad”

Create A Buzz With The Mini Electric Ukulele

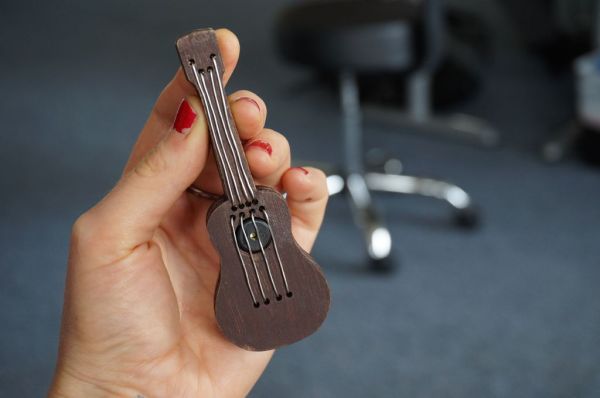
Everyone’s heard of the “World’s Smallest Violin,” but we think it’s time for something more upbeat. [Simone Giertz] of Punch Through Design has created a mini electric ukulele using a LightBlue Bean. The Bean is an Arduino-compatible microcontroller that you can wirelessly program using Bluetooth low energy (BLE).

The ukulele’s frame is made of laser-cut plywood.  Four 1M ohm resistors are soldered to individual wire strings. A different set of wire strings in the ukulele’s neck are connected to the same ground as the Bean. In order to play this tiny instrument, a finger must be kept on the “ground” strings while the other “tone” strings are touched by a different finger. [Simone] uses Arduino’s Capacitive Sensing Library to determine which string is being touched and what the tone will be (indicated in Hz). A piezo buzzer provides the sound. There is no need to fret when the battery is depleted from using this at an all-night luau: the frame can be unscrewed with easy access to the battery. [Simone] has uploaded the Bean’s code to GitHub.

There’s no shame going solo, but we’d enjoy a show of dueling mini-ukuleles. A duet with the 3D-printed ukulele is always a possibility. Or, play this little guy while running up and down some piano stairs while the kettle fife blows off some steam.  It’ll be a musical way to brighten anyone’s day. Check out the video of the mini ukelele after the break. You can also see more of [Simone’s] work at her website.

Continue reading “Create A Buzz With The Mini Electric Ukulele”

Light Up Component Bins And A Manual Pick And Place

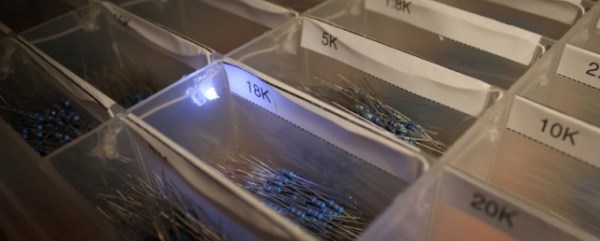
[Mike] makes some very niche musical instruments, and the production volume he’s looking at means there isn’t a need to farm out his assembly. This means doing everything by hand, including the annoying task of picking resistors and other components out of bins. After searching for a way to speed up his assembly process, he came up with the Stuffomatic, a device that locates the correct component at the press of a button.

The normal way of grabbing a part when assembling is reading the reference on the board, cross referencing the value on the BOM, and digging the correct part out of the bin. To speed this up, [Mike] put LEDs in each of the part bins, connected to a Teensy 2.0 that has the BOM stored in memory. Clicking a foot switch looks up the next component and lights up the LED in the associated part bin.

[Mike] says this invention has speeded up his assembly time by about 30%, a significant amount if you’re looking at hours to assemble one unit.

If you’re wondering exactly what [Mike] is assembling, check this out. It’s heavily inspired by the Ondes Martenot, an electronic musical instrument that’s about as old as the theremin, but a million times cooler. Video sample below.

Continue reading “Light Up Component Bins And A Manual Pick And Place”

Cassette Tape Hack Turns Scratching Into Sliding

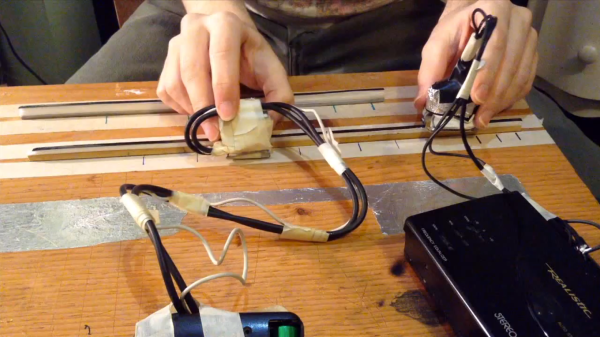
It’s common to see a DJ use a turntable as a musical instrument. Physically manipulating a record while its playing produces its own unique sound, but it takes some finesse and puts strain on the delicate workings of the player when you do it. With this in mind, [Jeremy Bell] has refreshed the notion of appropriating old technology to create new sound with his home-brewed scrubboard.

Making use of a cassette tape, [Jeremy] dissected samples from the reel and laid them out in horizontal strips over rails to hold their form. The pickup from the tape player has been hacked into a separate piece that glides smoothly over these rails, giving the user the ease of control. To produce the immediate cutting effect that is less easy to perform with his device than a record player, [Jeremy] created an on and off switch which is simply a close pin covered in foil that teeters over a metal contact (in this case a coin). The end product sounds exactly like scratching a record, but better because he’s doing it with hacker showmanship. One can only image the awesome potential for more elaborate setups having multiple tape samples and the like!

There are a few different videos of the scrubboard in use on [Jeremy’s] website. He is also running a Kickstarter right now in order to turn the project into a stand alone instrument with improved features.

Thanks Omar, for telling us about this cool re-envisionment!

Continue reading “Cassette Tape Hack Turns Scratching Into Sliding”

modded guitar pedal

Guitar Pedal Hack Via Manufacturer’s Shortcut

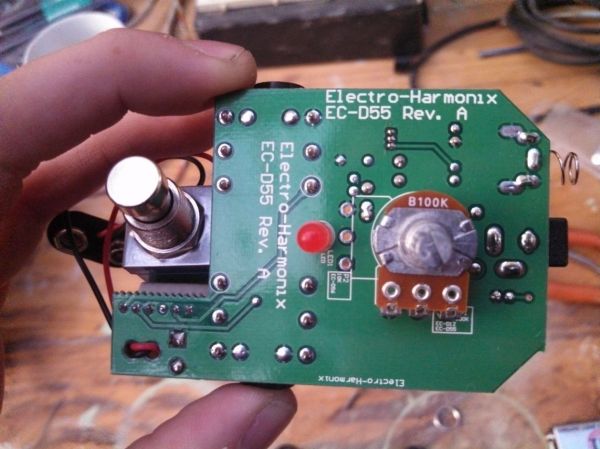
There seems to be no shortage of manufacturers that cut costs by using similar components across a wide range of products. This isn’t necessarily a bad thing though, since it makes it easier for someone with some know-how to quickly open up the product and figure out how to get more use out of it. [Lewin] noticed some peculiarities on the PCB of his EHX Screaming Bird guitar pedal, and used a manufacturer’s shortcut to turn this treble-boosting pedal into a flat booster.

Once [Lewin] removed the case, he noticed that there were some unpopulated pads on the PCB. Additionally, the potentiometer was labelled as 10k, but a 100k was actually installed. These were indications that something was awry, so after poking around on the internet, [Lewin] now believes that the same PCB was used to make at least three different effects pedals with similar internal structures.

The Screaming Bird pedal was a little harsh for [Lewin]’s taste, so he changed out some capacitors on the board to get it closer to the flat booster. There are some other things that could be changed, but now he has a pedal that suits his needs much more appropriately, thanks to the manufacturer making only minor changes across a range of similar products. Historically, guitar pedals are pretty easy to modify, but it’s nice that the manufacturer of these has made it so much simpler!

Arduino Floppy Music Shield

A Simple Floppy Music Controller

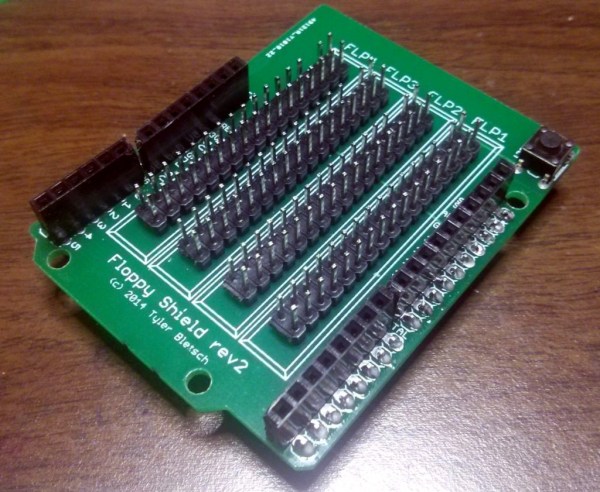
While playing music with floppy drives has been done many times over, making any device with a stepper motor play music still appeals to the hacker in all of us. [Tyler] designed an Arduino shield and a library which lets you get up and running in no time. [Tyler]’s shield includes pin headers to connect 4 floppy drives, which plug directly into the shield. The drives don’t need any modification before being used.

While you could simply wire a few floppy drives up to an Arduino with some jumpers, this breakout shield makes connecting your drives trivial. In addition to designing the shield, [Tyler] released an Arduino library to make things even easier. The library lets you simply set the frequency you want each drive to play, which saves a bit of legwork.

The floppy-controlling Arduino library is available on GitHub and a video of the controller is included after the break.

Continue reading “A Simple Floppy Music Controller”