Make Your Own MIDI Controller With An Arduino

Engineers create something out of nothing, and no where is this more apparent than in the creation of customized computer hardware. To make a simple MIDI controller, you need knowledge of firmware design and computer architecture, you need knowledge of mechanical design, and you need to know electronic design. And then you need the actual working knowledge and experience to wield a tool, be it a hammer, laser cutter, or an IDE. [Mega Das] brought together all of these skill to build a MIDI controller. Sure, it’s for bleeps and bloops coming out of a speaker, but take a step back and realize just how awesome it is that any one person could imagine, then implement such a device.

The electronics for this build include a printed circuit board that serves to break out the connections on an Arduino nano to a dozen arcade push buttons, four slide pots, two rotary pots, and a handful of screw terminals to connect everything together. Mechanically, this is a laser-cut box engraved with some fancy graphics and sized perfectly to put everything inside.

Yes, we’ve seen a lot of MIDI controllers built around the Arduino over the years, but this one is in a class by itself. This is taking off-the-shelf parts and customizing them to exactly what you want, and a prodigious example of what is possible with DIY hardware creation. You can check out the build video below.

Continue reading “Make Your Own MIDI Controller With An Arduino”

DIY Piano: Look, Ma, No Moving Parts

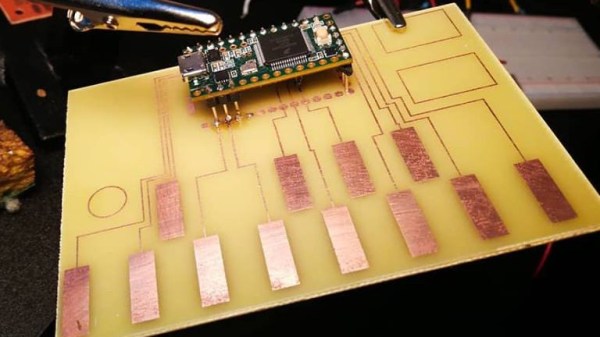
[Michael Sobolak] has a penchant for pianos, concern for capacitive touch, and special sentiment for solid state. This alliterate recipe results in a DIY PCB piano that leaves out the levers and is barren of buttons unless you count the stock RESET button on the Teensy. A real stickler might point out that speakers have moving cones. Beyond these tangential parts, which have motionless options, it is an electronic instrument with no moving parts.

The heart of the project is a Teensy 3.2 which natively supports twelve capacitive touch sensors. The infamous demo board is mounted to a homemade PCB featuring twelve keys but is actually an incomplete octave plus another key one octave above the first. If you look sharp, you already noticed the missing and extra touchpads. PCB traces were made in Illustrator because if you have a familiar tool, you use what you know and you cannot argue that it works. The design was transferred to a copper board using the old magazine page trick that we love and reliable old ferric acid.

We couldn’t help but notice that the posts of the Teensy were soldered to the top of the board, rather than drilling through, IMT-style. Again, the results speak, even if there is room for improvement. Reportedly, there is a second version on the way which includes every expected key.

Continue reading “DIY Piano: Look, Ma, No Moving Parts”

Fizzle Loop Synth Does It With 555 Timers

For every project that uses an Arduino to make soup or an ESP8266 to hash bitcoin, there’s always someone out there uttering the same old refrain. I could have done it with a 555. More often than not, this is true, even if it is tangential to the discussion being had. In this case however, such a statement is moot. [lonesoulsurfer] has built the Fizzle Loop Synth, featuring not one, but three triple-nickel timers.

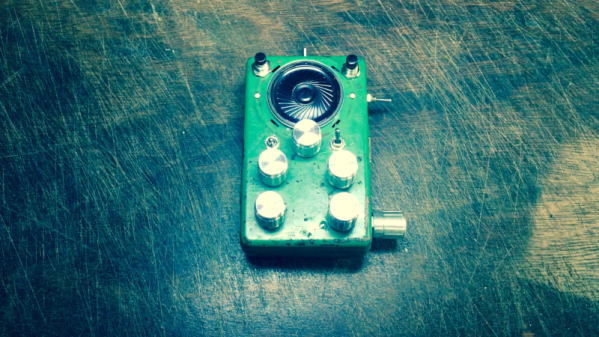
It’s a build that delights in both presentation and performance. The hardware is elegantly slotted into a vintage metal flashlight case, which is absolutely covered in controls. It’s an aesthetic that gives us an irresistible urge to start twiddling knobs and flicking switches. Inside, two 555s are set up as basic flasher circuits, each feeding a vactrol – essentially a resistive optoisolater. Inside is an LED, which is optically coupled to a light-dependent resistor. The LEDs are flashed by the 555s, and this creates a varying resistance which is used to feed a third 555 which generates the tones.

The final result is a fun little noisebox that’s capable of generating quite the variety of bleeps, bloops and blops. There’s an onboard speaker for noodling on the go, as well as a line-out if you need to record your work on external hardware. It would be great fun to hear this circuit hooked up to a modular synth, too.

For a history lesson on the venerable 555, we’ve got you covered. Video after the break.

Continue reading “Fizzle Loop Synth Does It With 555 Timers”

The Only Cassette Player Worth Owning In 2019

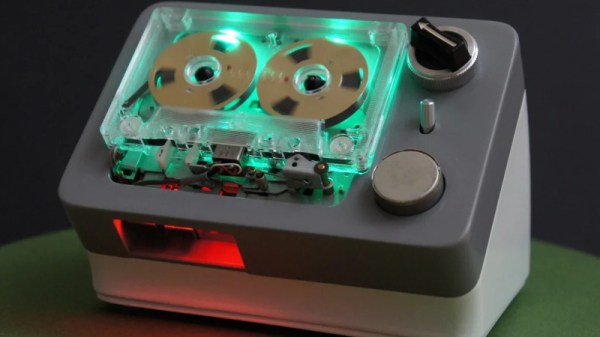
Vinyl has the audiophiles to keep it relevant, and CDs still have the people who are scared of streaming music, but who mourns for the cassette tape? Yesterday we would have said nobody, but now that [Igor Afanasyev] has unleashed his latest creation onto an unsuspecting world, we aren’t so sure anymore. A portable tape player that started as a $5 find from the Goodwill is now an outrageously gorgeous piece of electronic art thanks to 3D printing and a liberal application of LEDs.

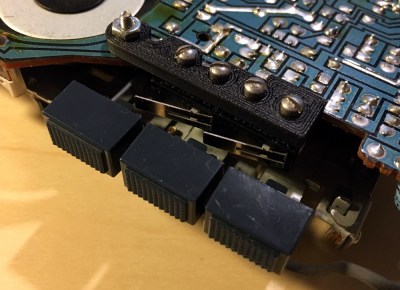
After freeing the tape mechanism from the original enclosure and extraneous electronics like the AM/FM tuner, [Igor] got to work designing a retro styled enclosure for the hardware which would show off the complex electromechanical bits which would traditionally be hidden. With the addition of a clever 3D printed holder, he was even able to add microswitches under the original player’s buttons so he could detect the player’s current state without having to modify the electronics. This lets the finished player change the color of the RGB LEDs based on what it’s currently doing.

[Igor] came up with a very clever way of integrating light-up icons into the case by placing bright LEDs behind specially crafted thin sections of the print. It looked awesome in his tests, but after the considerable sanding, priming, and painting it took to turn the 3D printed parts into a production-quality enclosure, the LEDs are no longer visible on the final product. Even though they didn’t work in this particular case, we think it’s a brilliant technique worthy of stealing further research.

The detail that [Igor] but into this build is phenomenal. Seeing all the individual components he had to design and print to make the final product come together is really nothing short of inspirational. Projects like these are where 3D printing really shines, as trying to replicate this build with traditional manufacturing techniques would be an absolute nightmare.

If you can’t quite shake the feeling that you’ve seen this name or attention to detail before, it’s for good reason. Last year we covered another build showing the knack [Igor] has for turning the ordinary into the extraordinary.

Continue reading “The Only Cassette Player Worth Owning In 2019”

MIDI To CV The DIY Way

MIDI has been a remarkably popular interface since its inception way back in 1983. Based on existing serial interfaces, and with a broad enough set of features, it remains the defacto standard for communication between musical gear. However, older gear and many modular synths simply don’t grok digital data, instead using analog control voltages to get the job done. Never fear, though – you can convert from one to the other with the goMIDI2CV.

It’s a simple device, hewn from an ATTINY microcontroller. MIDI signals are received at TTL voltage levels, and converted to output voltages by the ATTINY via use of the PWM hardware. A lowpass filter is added to remove the high-frequency content from the output signal.  A 6N138 optocoupler completes the project, to comply with the MIDI standard and ensure the device is not subject to any dangerous voltages from the hardware plugged in.

It’s a simple way to control older non-MIDI compliant hardware, and might make an old modular rig just that much more useful in the studio of today. We’ve seen similar builds before, like this combined CV and Gate converter. 

The Multichannel Field Recorder You Can Build Right Now

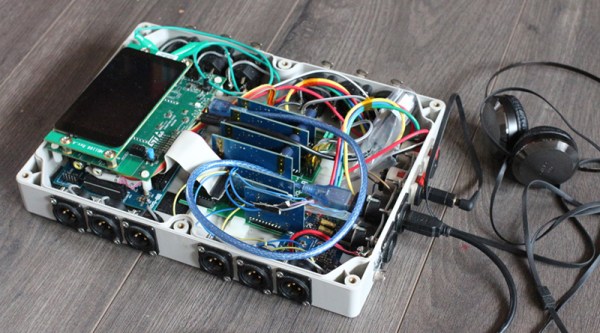
Field recorders, or backpackable audio recorders with a few XLR jacks and an SD card slot, are a niche device, and no matter what commercial field recorder you choose you’ll always compromise on what features you want versus what features you’ll get. [Ben Biles] didn’t feel like compromising so he built his own multichannel audio DSP field recorder. It has a four channel balanced master outputs, with two stereo headphone outputs, eight or more inputs, digital I/O, and enough routing for multitrack recording.

Mechanically, the design of the system is a 3D printed box studded on every side with various connectors and patch points. This is what you get when you want a lot of I/O, and yep, those are panel mount connectors so get ready to pony up on the price of your connectors. The analog front end is a backplane sort of thing on a piece of perfboard, containing an eight channel differential I/O.

Of course any audio recorder is awful to use unless there’s a great user interface, and for that you can’t get any better than a high-resolution touchscreen on a phone. This led [Ben] to use Bluetooth to connect to an app showing the gain, levels, a toggle for phantom power, and a checkbox for line or microphone. If that’s not enough there are also some MIDI knobs for volume, because MIDI is still great for user input. It’s everything you want in a portable recording rig, and yes, there is a soundcloud demo. You can also check out a demo video below.

Continue reading “The Multichannel Field Recorder You Can Build Right Now”

MIDI Grid Can Glow Up With The Best Of Them

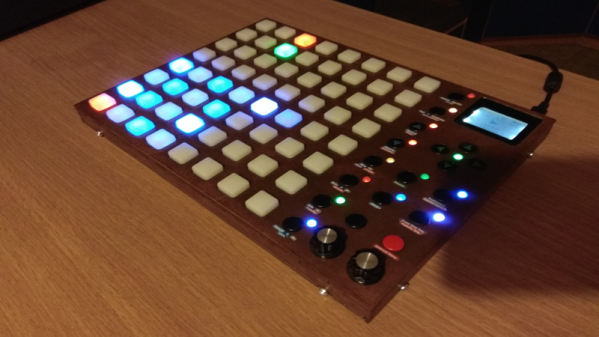
Traditional musical instruments have a variety of interfaces, some simple, some complex. The piano is a fairly intuitive machine with a key for every note and a couple of pedals you can ignore if you like. The saxophone is a little more complex, with its many interoperable keys used to produce varying pitches. However, modern electronic instruments are not constrained by physicalities, and there has been an explosion in such devices that simply present a MIDI interface and a big pile of glowing addressable buttons. [Gediminas]’s MIDI Grid build is a great example of the type.

The build relies on an STM32 to do the heavy lifting, talking to an 8×8 array of buttons, each with addressable RGB LEDs. These are combined with silicone pads for a wonderfully tactile feel. There are then a further 17 buttons on the side for various purposes, along with two rotary encoders – useful for implementing smooth fades and intoxicating filter sweeps. Unusually for this type of instrument, in addition to USB there’s also a hardware serial MIDI interface. Finally, a Nokia 5110 LCD is implemented to display relevant data.

There are precious few details on the case, but it appears to be made from lasercut wood pieces, with a nice stain giving it a rich color. Buttons also have printed labels for a more professional look.

The build has functionality most similar to Novation’s Launchpad line. [Gediminas] currently has it working primarily with Ableton Live, however there is scope for further work to integrate the device with other DAWs or MIDI hardware.

With electronic instruments such as these, it’s possible to make musical life more accessible through smart design choices – and the Kord Kontroller is another great example.