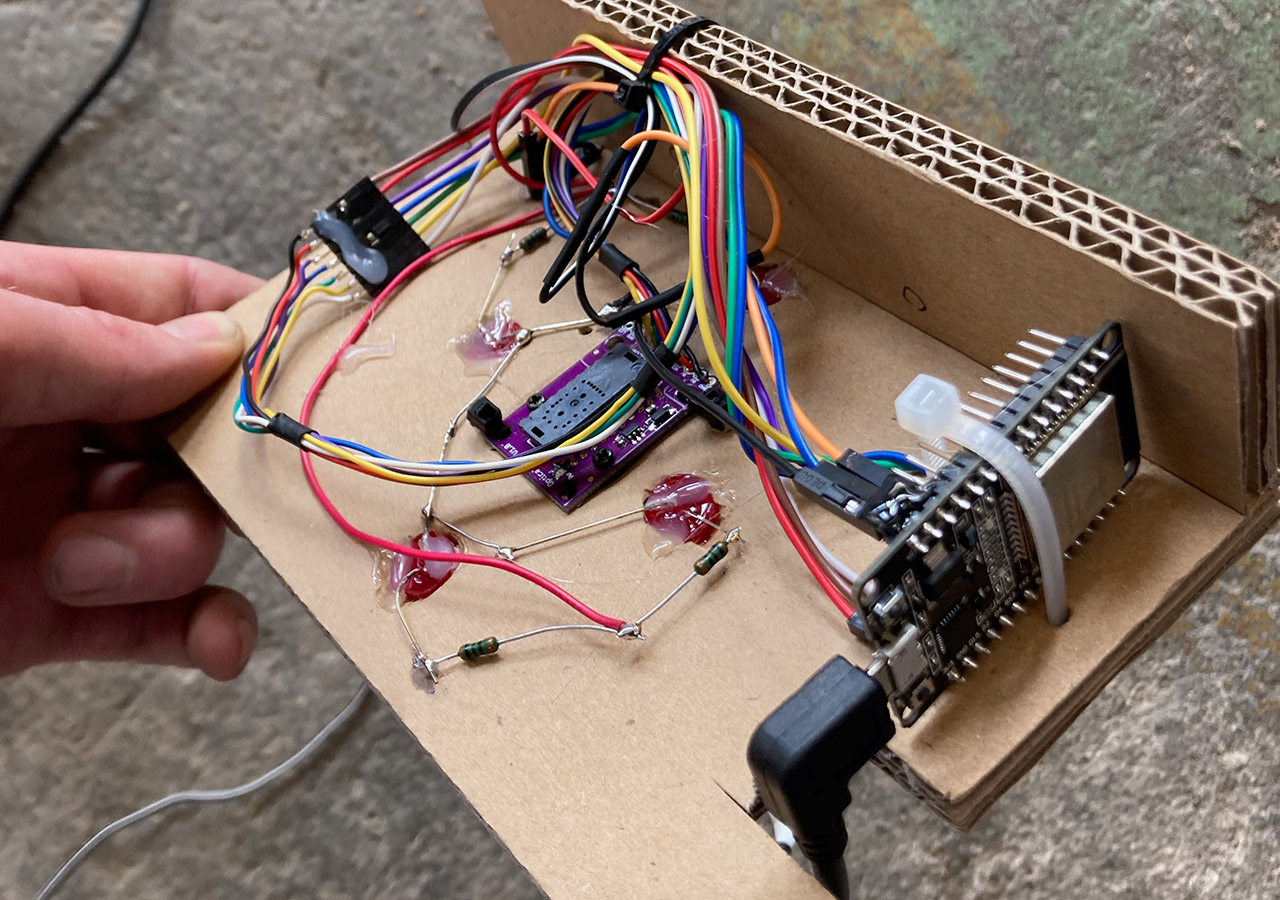
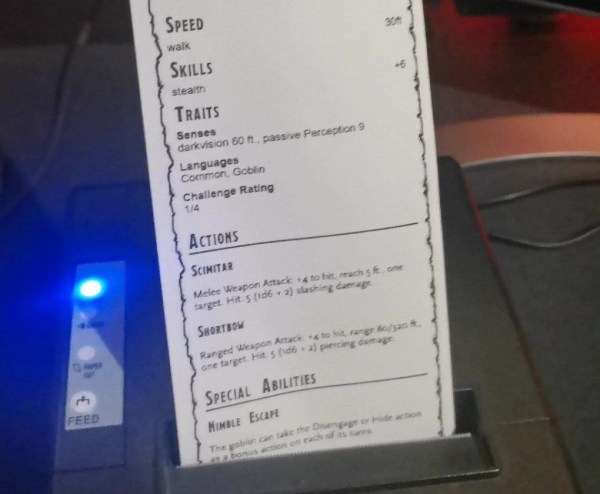
A clock with a VFD display in an orange TV-like case

Never Miss An Email With This 1970s Style Desktop Notifier

If you like the 1970s aesthetic but think bell-bottoms, big hair and psychedelic wallpaper are a bit too much in this day and age, you might want to have a look at [Pierre Muth]’s latest build, The Absurd Notifier. It’s a useful desk accessory that adds just a little bit of ’70s flair to your office: housed inside what looks like an orange TV standing on shiny metal feet is a little gadget that can tell you if you’ve got important email messages waiting or an appointment coming up.

[Pierre] built the system around a Garmin Vivosmart 3 smartwatch that he bought very cheaply because it had a broken display. The display’s pinout and protocol were of course undocumented, so [Pierre] hooked up his logic analyzer to try and figure out how it worked. It turned out to be a simple SPI setup, and with a bit of trial and error he was able to extract the images that the watch was sending out.

To replace the broken screen, [Pierre] turned to some 128×64 pixel VFD displays that he had left over from an earlier project. Their resolution was exactly the same as the Garmin’s original OLED display, but their interface wasn’t: the VFDs expected 115k2 serial data. Programming a PIC microcontroller with an SPI port on one side and a UART port on the other made for a simple bridge between the two.

[Pierre] then designed and 3D printed a case reminiscent of a 1970s TV, with matching bright orange color. The end result is a funky little retro clock that shows notifications on a vintage green display. If you like desktop notifiers, we seen several neat ones alerting their owners about things ranging from new YouTube subscribers to the ISS passing by.

Continue reading “Never Miss An Email With This 1970s Style Desktop Notifier”

It’s RAID. With Floppy Drives.

There are some tings that should be possible, so just have to be tried. [Action Retro] has a great video showing just such an escapade, the creation of a large RAID 0 array using a pile of USB floppy drives. Yes, taking one of the smallest and most unreliable pieces of data storage media and combining a load of them together such that all the data is lost if just one of them fails.

Surprisingly the process of creation is quicker and simplier than we expected, with a slightly long-in-the-tooth version of Mac OS X making short work of the process. Starting with 30 USB floppies and a pair of large USB hubs, he whittled the pile down to 13 drives that would play nicely and RAID together. The sight of so many drives all lighting up together as the precious megabytes are filled with data is probably not one seen outside the realm of floppy duplication machines, which brings back bad memories for those of us in the consumer software business in years past.

Would you do this? Probably, but should you do it? Of course not, but then again he’s done it so the rest of us don’t have to. Here in 2022 maybe there are better uses for a brace of floppy drives. Continue reading “It’s RAID. With Floppy Drives.”

A plastic steel drum toy

Odd Inputs And Peculiar Peripherals: Miniature Steel Drums Become Rotary Mouse Controllers

When [bornach] browsed through his office’s free-cycling box he found an old novelty toy that lets you play simple tunes on miniature steel drums. Such a thing is probably fun for about five minutes – if it’s working, which this one wasn’t. But instead of throwing it away, [bornach] spotted an opportunity in the capacitive touch pads on top of those little drums: they looked perfect to be modified into an unusual mouse cursor controller.

A steel drum toy being used to control a mouse cursorThe operation started with [bornach] ripping out the original PCB and replacing it with an ESP32 D1 Mini. That board has a handy stack of touch-sensitive pins which could interface directly with the drums’ touch pads. He then programmed the ESP32 to interpret the signals as mouse movements and button presses, and send the results to a computer through a BlueTooth connection.

Operating the mouse drums is so straightforward that they almost appear made for this purpose: you slide your finger in circles along the touch pads to move the cursor in the X or Y direction, and touch the center pad to click. The left drum moves the cursor horizontally while the right one moves it vertically, but there’s also a mode to use the right drum as a scroll wheel.

The rotary X/Y controls are reminiscent of an Etch-a-Sketch; while probably too clumsy for everyday use, they might come in handy in some circumstances where you need to make single-pixel-accurate motions, if only to click those miniscule “close” buttons on some online ads.

Amazingly, this isn’t the first Etch-a-Sketch style mouse we’ve featured: this cute little wooden device works in a similar way.

Continue reading “Odd Inputs And Peculiar Peripherals: Miniature Steel Drums Become Rotary Mouse Controllers”

a 3D-rendered image of a PCB with several knobs and buttons

Odd Inputs And Peculiar Peripherals: The LowPow ShortKeyboard Can Work On Your Desk Or Out In The Field

For some power users, the one-hundred-and-something keys on regular keyboards just aren’t enough for their everyday tasks. Macro keypads are a popular way of extending one’s input capabilities, and there are almost as many examples as there are power users. [Ulrich]’s latest project, dubbed the LowPow E-Ink ShortKeyboard, is a beautiful and meticulously documented design for a macro pad that includes several unusual features.

Built around an ESP32-S3 microcontroller, the ShortKeyboard features nine programmable function keys plus an analog joystick and a rotary encoder. The keys are based on Cherry MX RED types commonly seen in mechanical keyboards, illuminated from below by by miniature RGB LEDs. A big e-ink display in the middle can be used to show the function of each key.

Continue reading “Odd Inputs And Peculiar Peripherals: The LowPow ShortKeyboard Can Work On Your Desk Or Out In The Field”

Odd Inputs And Peculiar Peripherals: RoenDi Smart Knob Thinks Outside The Box

When it comes to design decisions, we’re often advised to “think outside the box.” It’s generally good advice, if a bit abstract — it could really mean anything. But it appears that someone took it quite literally with this nifty little smart knob display and input device.

[Dimitar]’s inspiration for RoenDi — for “rotary encoder and display” — came from an unusual source: a car dashboard, and specifically, the multipurpose knobs that often crop up in a car’s climate control cluster. Designed for ease of use while driving while causing as little distraction as possible, such knobs often combine a rotary encoder with one or more indicators or buttons. RoenDi builds on that theme by putting a 1.7″ round LCD display in the middle of a ring attached to an Alps rotary encoder, allowing the knob to be customized for whatever you want it to represent. The backplane sports a powerful STM32 microcontroller with a lot of the GPIO pins broken out, so customization and interfacing are limited only by your imagination. The design is open source, so you can either build your own or support the project via Crowd Supply.

Unlike the haptic smart knob we’ve been seeing a bit about lately, which also features a round LCD at its center, RoenDi’s feedback is via the physical detents on the encoder. We think both devices are great, and they fill different niches in the novel input ecosystem.

Continue reading “Odd Inputs And Peculiar Peripherals: RoenDi Smart Knob Thinks Outside The Box”

A 3D-printed five-key chorded keyboard

Odd Inputs And Peculiar Peripherals: Chorded Keyset Recreates Engelbart’s Vision

Douglas Engelbart’s 1968 “Mother of all Demos” introduced the world to a whole range of technologies we take for granted today, the most prominent being his great invention, the computer mouse. However, the MOAD also showcased things like cut-and-paste text editing, a point-and-click interface, video conferencing, and even online collaboration à la Google Docs. One of the innovations shown that for some reason didn’t stand the test of time was the chorded keyboard: an input device with five keys that can be pressed simultaneously in different combinations, the same way you would play chords on a piano.

A 3D-printed five-key chorded keyboard
The Engelbart Keyset comes with both USB host and USB client ports

While a handful of attempts have been made over the years to bring new life to the “chorder”, it failed to achieve mainstream appeal and remains a curiosity to this day. That makes it a natural fit for the Odd Inputs and Peculiar Peripherals contest, as we can see in [Russ Nelson]’s submission called the Engelbart Keyset, which aims to create a modern 3D printed chorder that works exactly as Engelbart intended it.

It’s important to note that the chorded keyboard was not meant to be just an additional set of five keys. Instead, Engelbart showed the clever interplay between the chorder and the mouse: the five keys under his left hand and the three mouse buttons under his right could be combined to create a full 8-bit input device. [Russ]’s device therefore includes a USB host interface to connect a USB mouse as well as a USB client interface that presents itself as a combination mouse/keyboard device to the PC.

The brains of the device are formed by a Teensy 4.1, which reads out the codes sent by the mouse as well as the five keys on top. If one or more of those keys are pressed together with a mouse button, then a keyboard code is generated corresponding to Engelbart’s original keycode mapping. We’re wondering how practical this whole setup would be in real life; it looks like something you’d have to try hands-on to find out. Fortunately, all the schematics, code and STL files are available on the project page, so with just a bit of work you can have your own MOAD setup on your desk today.

We’ve featured a couple of chorded keyboards on these pages; the Pico Chord, the Chordie and the BAT spring to mind. If you’re looking for a recap of Engelbart’s stunning presentation, check out our piece on the Mother of all Demos, 50 years on.

An In-Depth Look At The Haptic Smart Knob

At Hackaday, we love those times when we get a chance to follow up on a project that we’ve already featured. Generally, it’s because the project has advanced in some significant way, which is always great to see. Sometimes, though, new details on the original project are available, and that’s where we find ourselves with [Scott Bez] and his haptic smart knob project.

Alert readers may recall [Scott]’s announcement of this project back in March. It made quite a splash, with favorable comments and a general “Why didn’t I think of that?” vibe. And with good reason; the build quality is excellent, and the idea is simple yet powerful. By attaching a knob to the shaft of a brushless DC motor and mounting a small circular LCD screen in the middle, [Scott] came up with an input device that could be reprogrammed on the fly. The BLDC can provide virtual detents at any interval while generating haptic feedback for button pushes, and the LCD screen can provide user feedback.

But how is such a thing built? That’s the subject of the current video, which has a ton of neat design details and build insights. The big challenge for [Scott] was supporting the LCD screen in the middle of the knob while still allowing the knob — and the motor — to rotate. Part of the solution was, sadly, a hollow-shaft motor that was out of stock soon after he released this project; hopefully a suitable replacement will be available soon. Another neat feature is the way [Scott] built tiny strain gauges into the PCB itself, which pick up the knob presses that act as an input button. We also found the way button press haptics are provided by a quick jerk of the motor shaft very clever.

This is one of those projects that seems like a solution waiting for a problem, and something that you’d build just for the coolness factor. Hats off to [Scott] for following up a sweet build with equally juicy details.

Continue reading “An In-Depth Look At The Haptic Smart Knob”