Love ’em or hate ’em, you’ve got to hand it to Apple: they really know how to push people’s buttons with design. Their industrial designers can make a product so irresistible – and their marketing team can cannonball the hype train sufficiently – that people will stand in line for days to buy a new product, and shell out unfathomable amounts of money for the privilege.
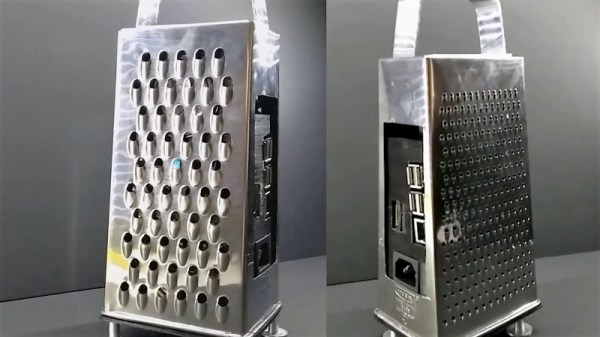
But what if you’re a poor college student without the budget for such treasures of industrial design? Simple – you take matters into your own hands and stuff a Raspberry Pi into a cheese grater. That’s what a group of engineering students from the University of Aveiro in Portugal called [NeRD-AETTUA] did, in obvious homage to the world’s most expensive cheese grater. The video below for the aptly named RasPro is somewhat less slick that Apple’s promos for the Mac Pro, but it still gets the basics across. Like the painstakingly machined brushed aluminum housing on the Mac, the IKEA cheese grater on the RasPro is just a skin. It covers a 3D-printed chassis that houses a beefy power supply and fan to go along with the Raspberry Pi 3. There’s also a speaker for blasting the tunes, which seems to be the primary use for the RasPro.
All things considered, the cheese grater design isn’t really that bad a form factor for a Pi case. If that doesn’t appeal, though, take your pick: laser-cut plywood, an Altoids tin, or even inside your PC.
Continue reading “Grate Design On This Cutting Edge Raspberry Pi Case”