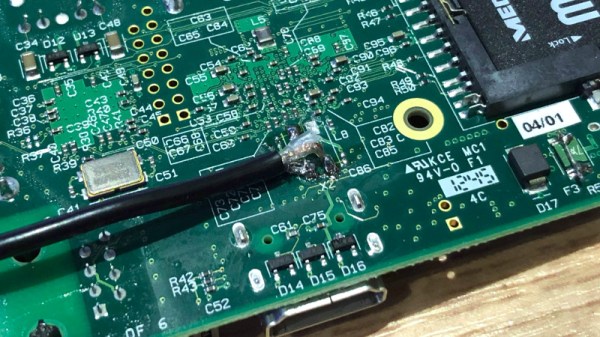
This Bitcoin Price Tracking Traffic Light Isn’t Just A Red LED

Quick, what’s the price of Bitcoin? Is it lower today than yesterday? Are you overdrafting your Lamborghini account? What if you had an easy way to tell at a glance how much you could have made if you sold in December of last year? That’s what this Bitcoin price tracking traffic light is all about, and it’s a great use of existing electronics.

The hardware for this build is a traffic light table lamp available on Amazon for twenty bucks. Inside this traffic light, you get a PCB with three LEDs and a small microcontroller to control the LEDs. The microcontroller isn’t used in this case, instead the microcontroller is removed and a few wires are soldered up to the base of the transistors used to drive the LEDs. The other ends of these wires are attached to a trio of pins on a Raspberry Pi Zero W, giving this traffic light table lamp Linux and a connection to the Internet.

On the software side of things, we’re looking at a Docker container running a Python script that fetches the latest Bitcoin price from Coindesk and calculates the change from the previous fetch of the price of Bitcoin. This data is shuffled off to another Python script that actually changes the LEDs on the lamp.

Sure, these days a ‘bitcoin price tracking traffic light’ is as simple as connecting a red LED to a battery, and if you’re feeling extra fancy you can add a 220 Ω resistor. But this is a project that’s so well executed that we’ve got to give it a tip ‘o our hat.

The Linux Throwie: A Non-Spacefaring Satellite

Throwies occupy a special place in hardware culture — a coin cell battery, LED, and a magnet that can be thrown into an inaccessible place and stick there as a little beacon of colored light. Many of us will fondly remember this as a first project. Alas, time marches inevitably on, and launching cheerful lights no longer teaches me new skills. With a nod to those simpler times, I’ve been working on the unusual idea of building a fully functional server that can be left in remote places and remain functional, like a throwie (please don’t actually throw it). It’s a little kooky, yet should still deliver a few years of occasional remote access if you leave it somewhere with sunlight.

A short while ago, I described the power stages for this solar-powered, cloud accessible Linux server. It only activates on demand, so a small solar cell and modest battery are sufficient to keep the whole show running.

Where we left off, I had a solar cell that could charge a battery, and provide regulated 12 V and 5 V output. For it to be a functional device, there are three high level problems to solve:

  1. It must be possible to set up the device without direct physical access
  2. You must be able to remotely turn it on and off as needed.
  3. It needs to be accessible from the Internet.

The funny thing is, this hardware reminds me of a satellite. Of course it’s not meant to go into space, but I do plan to put it somewhere not easy to get to again, it runs off of solar power, and there’s a special subsystem (ESP8266) to tend the power, check for remote activation, and turn the main computer (Raspberry Pi 3) on and off as necessary. This sounds a lot like space race tech, right?

As I have a bit more code than usual to share with you today, I’ll discuss the most interesting parts, and provide links to the full firmware files at the end of the article.

Continue reading “The Linux Throwie: A Non-Spacefaring Satellite”

It Might Be Possible To Build A Stingray With A Raspberry Pi

If there’s one thing that’s making you insecure, it’s your smartphone. Your smartphone is constantly pinging the cell towers, giving out your location and potentially leaking your private information to anyone with a radio. This is the idea behind an IMSI catcher, or Stingray in common parlance, and now you too can build one with parts you can buy off of Amazon.

The key to this hack is a software defined radio dongle, or RTL-SDR, that has been repurposed to listen in on a GSM network. Literally the only hardware required is an RTL-SDR that can be bought online for less than fifteen dollars, and you can identify the IMSI, or unique ID linked to every SIM card, in smartphones around you. The only bit of software required is a small Python script from [Oros42], freely available on GitHub.

Of course, building an IMSI catcher with a desktop is of limited utility, and using a laptop is still a bit too bulky to surreptitiously conceal in a public location. No, to really get the bang for your buck out of this, you need to do this with a small single-board computer running off a battery pack. Luckily, [Joseph Cox] over at Motherboard reports, “It is likely possible” to run this on a Raspberry-Pi. We’re guessing it’s even more than “likely” possible.

Meat-Seeking Raspberry Pi Leads You To Flavortown

[Patrick McDavid] and his wife had a legitimate work-related reason for writing some Python code that would pull the exact latitude and longitude of the individual locations within a national retain chain from Google’s Geocoding API. But don’t worry about that part of the story. What’s important now is that this simple concept was then expanded into a pocket-sized device that will lead the holder to the nearest White Castle or Five Guys location.

The device, which [Patrick] lovingly referrers to as the “Cheeseburger Compass”, uses a Raspberry Pi 3, an Adafruit 16×2 LCD with keypad, a GPS module, and the requisite battery and charger circuit to make it mobile. With the coordinates for the various places one can obtain glorious artery clogging meat circles loaded up, the device will give the user the cardinal direction and current distance from the nearest location of the currently selected chain.

[Patrick] has published the source code for this meat-seeking gadget on GitHub, but notes that most of it is just piecing together existing libraries and tools. As with many Python projects, it turns out there’s already a popular library to do whatever it is you were trying to do manually, so his early attempts at calculating distances and bearings were ultimately replaced with turn-key solutions. Though he did come up with a quick piece of code that would convert a compass heading in degrees to a cardinal direction that he couldn’t find a better solution for. Maybe he should make it a library…

Sadly the original Cheeseburger Compass got destroyed from being carried around so much, but at least it died doing what it loved. [Patrick] says a second version of the device would likely switch over to a microcontroller rather than the full Raspberry Pi experience, as it would make the device much smaller and greatly improve on the roughly two hour battery life.

This project reminds us of the various geocache devices we’ve covered in the past, but with the notable addition of hot sizzling meat. Talk about improving on a good thing.

Vintage Rotary Phone Turned Virtual Assistant

Like many of us, [Zoltan Toth-Czifra] has completely embraced 21st century living. His home is awash in smart gadgets and dodads, from color changing light bulbs to Internet-connected cameras. But he’s also got a soft spot for the look and feel of vintage hardware, like the rotary phone he keeps kicking around to remind him of the old days. He recently decided to bridge these two worlds by turning the rotary phone into a modern voice controlled assistant.

The first piece of the puzzle was getting the old school phone connected to something a bit more modern, namely a Raspberry Pi. He didn’t want to hack the vintage phone apart, so he picked up a Grandstream HT801, an adapter that’s used to convert analog telephones to VoIP. [Zoltan] says this model specifically fit the bill as it had a function that allows you to configure a number to dial as soon the phone is lifted off the hook. This allows the user to just pick up the phone and start talking without having to dial anything manually. If you’re looking to pull off a similar setup, you should check to make sure the adapter has this function before pulling the trigger.

With the rotary phone now talking a more modern protocol, [Zoltan] just needed to get the Raspberry Pi side sorted out. He installed a SIP server so it could communicate with the HT801 adapter, and then got to work putting together his virtual assistant. Rather than plug into an existing system, he rolled his own by combining open source packages for controlling his various smart devices with the aptly named SpeechRecognition library for Python.

Right now he’s only programmed a few commands that his system can respond to for controlling his lights and music, but mentions that the system is modular enough that he can add new functions easily. He’s put the source for his virtual assistant framework up on GitHub, which he notes was written in less than 200 lines of original code by virtue of utilizing existing libraries for a lot of the heavy lifting. Open source is a beautiful thing.

In the past we’ve seen rotary phones go mobile thanks to GSM upgrades and dragged kicking and screaming onto the modern phone network with a built-in Raspberry Pi. But we think there’s something especially appealing about the approach [Zoltan] took which preserves the phone’s original hardware.

Continue reading “Vintage Rotary Phone Turned Virtual Assistant”

SNES Controller Has A Pi Zero In The Trunk

We’re no stranger to seeing people jam a Raspberry Pi into an old gaming console to turn it into a RetroPie system. Frankly, at this point it seems like we’ve got to be getting close to seeing all possible permutations of the concept. According to the bingo card we keep here at Hackaday HQ we’re just waiting for somebody to put one into an Apple Bandai Pippin, creating the PiPi and achieving singularity. Get it done, people.

That being said, we’re still occasionally surprised by what people come up with. The Super GamePad Zero by [Zach Levine] is a fairly compelling take on the Pi-in-the-controller theme that we haven’t seen before, adding a 3D printed “caboose” to the stock Super Nintendo controller. The printed case extension, designed by Thingiverse user [Sigismond0], makes the controller about twice as thick, but that’s still not bad compared to modern game controllers.

In his guide [Zach] walks the reader through installing the Raspberry Pi running RetroPie in the expanded case. This includes putting a power LED where the controller’s cable used to go, and connecting the stock controller PCB to the Pi’s GPIO pins. This is an especially nice touch that not only saves you time and effort, but retains the original feel of the D-Pad and buttons. Just make sure the buttons on your donor controller aren’t shot before you start the build.

Adding a little more breathing room for your wiring isn’t the only reason to use the 3D printed bottom, either. It implements a very clever “shelf” design that exposes the Pi’s USB and HDMI ports on the rear of the controller. This allows you to easily connect power and video to the device without spoiling the overall look. With integrated labels for the connectors and a suitably matching filament color, the overall effect really does look like it could be a commercial product.

The SNES controller is an especially popular target for hacks and modifications. From commercially available kits to the wide array of homebrew builds, it there’s plenty of people who want to keep this legendary piece of gaming gear going strong into the 21st century

Continue reading “SNES Controller Has A Pi Zero In The Trunk”

The Smaller, More Powerful Raspberry Pi 3 Model A+

It’s that time of year again, and the Raspberry Pi Foundation has some new hardware for you. This time, it’s an improved version of the Raspberry Pi Model A, bringing it the speed and power of its bigger brother, the Raspberry Pi Model 3 B+.

The Raspberry Pi Model A is the weird middle child of the Raspberry Pi lineup, or maybe it’s the Goldilocks choice. It’s not as powerful and doesn’t have the USB ports or Ethernet jack found in the latest revision of the family, the Raspberry Pi Model 3 B+, and it’s not as small or as cheap as the Raspberry Pi Zero W. If you’re running a Pi as just something that takes in power and spits out data on the GPIO pins, the Model A might be all you need.

The full specs include:

  • Broadcom BCM2837B0 Cortex A-53 running at 1.4GHz
  • 512 MB of LPDDR2 SRAM
  • 2.4 GHz and 5 GHz 802.11 b/g/n/ac wireless LAN, Bluetooth 4.2/BLE
  • Full size HDMI
  • MIPI DSI display port / CSI camera port
  • Stereo Output and composite video port

In short, we’re looking at a cut-down version of the Raspberry Pi Model 3 B+ released earlier this year, without an Ethernet port and only one USB port. The wireless chipset is hidden under a lovely embossed can, and until we get our hands on this new model and a pair of pliers, we’re assuming this is a CYW43455, the Cypress chipset found in the Pi 3 B+.

The price of the Raspberry Pi 3 Model A+ will be $25 USD, with availability soon at the usual retailers. Since there’s no such thing as a Pi Zero 3 yet, if you’re looking for a powerful Linux computer, with wireless, in a small form factor, you’re not going to do much better than this little guy. You could of course desolder a Pi 3 B+, but for now this is the smallest, most powerful single board computer with good software support.