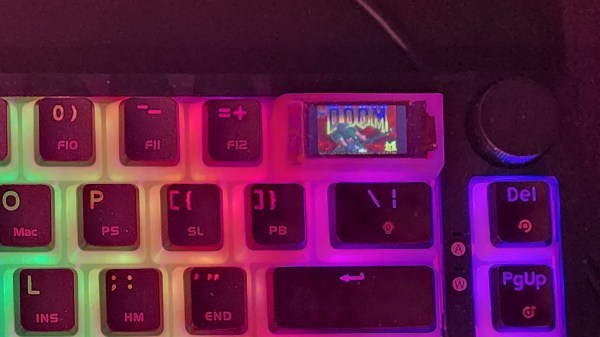
Another Rubik’s Cube Robot Is Simple But Slow

[AndreaFavero] says that the CuboTino emphasizes simplicity and cost-savings over speed. However, solving the puzzle in about 90 seconds is still better than we can do. The plucky solver uses a Pi and a camera to understand what the cube looks like and then runs it through a solver to determine how to move.

Watching the video below, we were impressed with the mechanics. The titled surface solves a few problems and makes manipulation easier. The way the mechanics are arranged, it only takes a pair of servos to flip the cube around as you like. Continue reading “Another Rubik’s Cube Robot Is Simple But Slow”

A Breath Of Fresh Air For Some Arcade Classics

It’s said that good things come in small packages, which is hard to deny when we look at all the nifty projects out there that were built into an Altoids tin. Now, if that’s already true for the regular sized box, we can be doubly excited for anything crammed into their Smalls variety ones, which is what [Kayden Kehe] decided to use as housing for his mintyPico, a tiny gaming console running homebrew versions of Snake, Breakout, Pong, and a few more.

As the “Pico” might have already given away, the project is built around a Raspberry Pi Pico board, and being intended as portable device, [Kayden] went with a version that also houses LiPo battery charging circuitry. A set of 3d-printed parts pack the board along with a matching battery and a button panel neatly into the tin itself, while a size-appropriate SSH1106 OLED goes into the lid. All design files along with the MicroPython code of the games can be found on the project’s GitHub page.

You may have felt this strange sense of familiarity when you read the project’s name, and indeed, the mintyPi gaming console was a major inspiration for [Kayden] here, as was the Pico Snake project. Considering this was his junior year high school project, this is certainly an impressive and nice mash-up of those two projects.

Continue reading “A Breath Of Fresh Air For Some Arcade Classics”

Console Macropad Uses SD Cards For Stylin’ And Profilin’

Macropads are great to have around for hotkey input, but things can get out of hand pretty quickly when you realize just how many shortcuts are in your life. To avoid ending up with another keyboard-sized keyboard, some hackers will use a handful of switches and a lot of layers to turn a few keys into many. And instead of worrying about legends, they use blank keys and leave the labels to be displayed on some kind of screen.

Among them is [QCJ3], who built this nifty little console-style macropad. Uninterested in managing microcontroller memory, [QCJ3] went the tangible route and loaded various profiles onto a micro SD card. Each text file on a given card holds a label, a color for the keyswitch LED, and of course, the keystrokes that make up the macro itself.

There are myriad ways to build a macro pad, from designing with bare chips (if you can get them) to programming a pre-built key matrix.  Grab the files if you like the console look and call it a day, or build a completely new enclosure that fits your hand exactly. Whatever you build, consider entering it in our brand spankin’ new Odd Inputs and Peculiar Peripherals Contest, which runs now through July 4th. If you need more inspiration, just peep the projects under macropad tag, or peruse the much heftier keyboard tag.

Via KBD

HAL 9000 Becomes A Helpful Voice Assistant

There have been many robots and AIs in science fiction over the years, from Astro Boy to Cortana, or even Virgil for fans of the long-forgotten Crash Zone. However, all these pale into insignificance in front of the cold, uncaring persona of the HAL 9000. Thus, [Jürgen Pabel] thought the imposing AI would make the perfect home assistant.

The build is based on a Raspberry Pi Zero 2, which boasts more grunt than the original Pi Zero while still retaining good battery life and a compact form factor. It’s hooked up with a 1.28″ round TFT display which acts as the creepy glowing eye through which HAL is supposed to perceive the world. There’s naturally a speaker on board to deliver HAL’s haunting monotone, and it’s all wrapped up in an tidy case that really looks the part. It runs on the open-source voice assistant Kalliope to help out with tasks around the home.

[Jürgen]’s page shares all the details you need to make your own, from the enclosure construction to the code that laces everything together. It’s not the first HAL 9000 we’ve seen around these parts, either. Video after the break.

Continue reading “HAL 9000 Becomes A Helpful Voice Assistant”

A Raspberry Pi As An Offboard Display Adapter

The humble USB-C port has brought us so many advantages over its USB ancestors, one of which is as a handy display output for laptops. Simply add an inexpensive adapter and you can hook up everything from a mobile phone upwards to an HDMI display or projector. There’s a snag though, merely having USB-C is not enough as the device has to support the display feature. It’s a problem [Gunnar Wolf] had to face with a Lenovo ARM laptop, and his solution is unexpected. Instead of an adapter, he’s used a Raspberry Pi 3 and some software tricks.

The obvious route to an off-board Pi mirroring onboard video is to use VNC, which he tried but found wanting due to lagginess. As a user of the Wayland compositor he found he could instead use wf-recorder and send its output to a stream, and thus capture his screen in a way that the Pi could read over the network. It’s not quite as convenient a solution as a pure-hardware adapter, but at least it allowed him to share the screen.

It’s surprising how often we find projects needing to mirror the display of a computer using what hardware is to hand, at least this one is more elegant than some others.

Free Your Pi With This Bare Metal Programming Environment

[Rene Strange] has graced these fair pages a short while ago with a sweet Raspberry Pi software based poly synth, with a tantalising reference to it being a bare metal application. So now, we’ll look into circle, the bare metal programming environment that it is based upon. The platform consists of a large set of C++ classes to access the hardware as well as perform tasks such as task creation and scheduling in the cooperative multitasking, multicore environment. Supporting all Raspberry Pi boards from version 2 onwards (not including the Pico!) in both 32-bit and 64-bit flavours, the environment is pretty complete. Classes are provided for USB, networking, FatFS, as well as more mundane tasks such as dealing with interrupts. On top of these classes there are a pile of application-specific libraries, covering functions such as display interfacing, GUIs using a variety of frameworks, and some more esoteric applications such as interfacing to a Pico, and even sending the system log to a remote web browser!

Classes and libraries however, don’t always help by themselves, which is where the 42 (yes, we know) code examples come in very handy. They’ve provided example applications for some fun stuff like drawing Mandelbrot fractals to the display, as well as some more mundane tasks that we have to deal with such as getting that pesky DMA controller to play nice with the SPI hardware. All-in-all, this looks like a great set of tools for taking full advantage of some fairly beefy hardware for your next embedded project that needs plenty of resources, but not all that unnecessary operating system stuff.

Perhaps not quite as complete as circle, but we’ve seen a fair few Raspberry Pi Bare metal projects over the years, like the Nerdsynth, based on the PiZero, and this neat little bare metal assembly language clone of starfox.

Thanks [Ruhan] for the tip!

Header: Aryan Patidar, CC BY 4.0/Evan-Amos, Public domain.

Pico Chording Keyboard Is Simultaneously Vintage And New

On paper, chording — that’s pressing multiple keys to create either a single character or a whole word — looks like one of the best possible input methods. Maybe not the best for speed, at least for a while, but definitely good for conserving the total number of keys. Of course, fewer keys also makes for an easier time when it comes to building keyboards (as long as you don’t have to code the chording software). In fact, we would venture to guess that the hardest part of building your own version of [CrazyRobMiles]’s Pico Chord Keyboard would be teaching your fingers how to work together to chord instead of typing one at a time.

[CrazyRobMiles] took inspiration from the Cykey chording design used for the Microwriter and later, the Microwriter Agenda that also featured a qwerty blister keyboard. Both featured small screens above the six keys — one for each finger, and two for the thumb. While the original Microwriter ran on an 8-bit microprocessor, Pico Chord Keyboard uses — you guessed it — the Raspberry Pi Pico.

We love that [CrazyRobMiles] went with four 14-segment displays, which gives it a nice old school feel, but used transparent keycaps over Kailh switches. This is actually important, because not only do the LEDs show what mode you’re in (alpha vs. numeric vs. symbols), they also teach you how to chord each letter in the special training game mode. Be sure to check it out in the video after the break.

Isn’t it cool that we live in a world of relatively big keyboards with few keys and tiny keyboards with all the keys?

Continue reading “Pico Chording Keyboard Is Simultaneously Vintage And New”