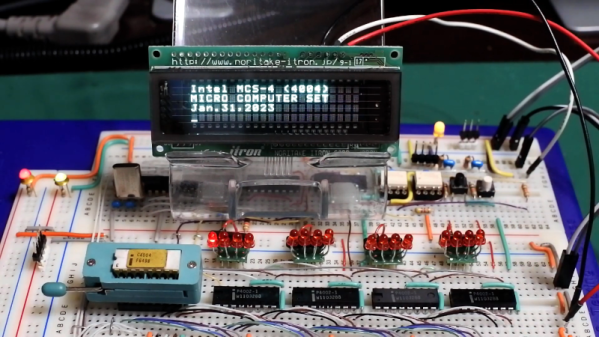
Improving OLED VU Meters With A Little Physics

Last month we featured a project that aimed to recreate the iconic mechanical VU meter with an Arduino and a common OLED display. It was cheap and easy to implement, and promised to bring a little retro style to your otherwise thoroughly modern project.

[sjm4306] liked the idea, but thought it was a tad too stiff. So he’s been experimenting with adding some physics to the meter’s virtual needle to better approximate the distinctive lag and overshoot that’s part and parcel of analog indicators. Obviously it’s something that can only be appreciated in motion, so check out the video below for an up-close look at his quasi-retro indicator.

Unfortunately there’s no code for you to play with right now, but [sjm4306] says he’ll release it on the project’s Hackaday.IO page once he’s cleaned things up a bit. We know it will take more than a few wiggling pixels to pry real analog indicators out of some hacker’s tool boxes, but anything that helps improve the digital approximation of this sort of vintage hardware is a win in our book. Continue reading “Improving OLED VU Meters With A Little Physics”

Tool Generates Interactive PCB Diagrams From KiCAD

Nearly everyone likes nice pinout diagrams, but the more pins and functions are involved, the more cluttered and less useful the diagram becomes. To address this, [Jan Mrázek] created Pinion, a tool to help generate interactive diagrams from KiCad design files.

The result is an interactive diagram that can be viewed in any web browser. Hovering over a pin or pad highlights those signals with a callout for the name, and clicking makes it stay highlighted for easier reference. Further information can be as detailed or as brief as needed.

Interestingly, Pinion isn’t a web service that relies on any kind of backend. The diagrams are static HTML and JavaScript only, easily included in web pages or embedded in GitHub documentation.

If you think Pinion looks a bit familiar, you’re probably remembering that we covered [Jan]’s much earlier PcbDraw tool, which turned KiCad board files into SVG renderings but had no ability to add labels or interactivity. Pinion is an evolution of that earlier idea, and its diagrams are able to act as both documentation and interactive reference, with no reliance on any kind of external service.

Interested? Pinion has a full tutorial and demo and a growing library of parts, so check it out.

Custom RISC-V Processor Built In VHDL

While ARM continues to make inroads into the personal computing market against traditional chip makers like Intel and AMD, it’s not a perfect architecture and does have some disadvantages. While it’s a great step on the road to software and hardware freedom, it’s not completely free as it requires a license to build. There is one completely open-source and free architecture though, known as RISC-V, and its design and philosophy allow anyone to build and experiment with it, like this build which implements a RISC-V processor in VHDL.

Since the processor is built in VHDL, a language which allows the design and simulation of integrated circuits, it is possible to download the code for the processor and then program it into virtually any FPGA. The processor itself, called NEORV32, is designed as a system-on-chip complete with GPIO capabilities and of course the full RISC-V processor implementation. The project’s creator, [Stephan], also struggled when first learning about RISC-V so he went to great lengths to make sure that this project is fully documented, easy to set up, and that it would work out-of-the-box.

Of course, since it’s completely open-source and requires no pesky licensing agreements like an ARM platform might, it is capable of being easily modified or augmented in any way that one might need. All of the code and documentation is available on the project’s GitHub page. This is the real benefit of fully open-source hardware (or software) which we can all get behind, even if there are still limited options available for RISC-V personal computers for the time being.

How does this compare to VexRISC or PicoSOC? We don’t know yet, but we’re always psyched to have choices.

New Video Series: Designing With Complex Geometry

Whether it’s a 3D printed robot chassis or a stained glass window, looking at a completed object and trying to understand how it was designed and put together can be intimidating. But upon closer examination, you can often identify the repeating shapes and substructures that were combined to create the final piece. Soon you might find that the design that seemed incredibly intricate when taken as a whole is actually an amalgamation of simple geometric elements.

This skill, the ability to see an object for its principle components, is just as important for designing new objects as it is for understanding existing ones. As James McBennett explains in his HackadayU course Designing with Complex Geometry, if you want to master computer-aided design (CAD) and start creating your own intricate designs, you’d do well to start with a toolbox of relatively straightforward geometric primitives that you can quickly modify and reuse. With time, your bag of tricks will be overflowing with parametric structures that can be reshaped on the fly to fit into whatever you’re currently working on.

His tool of choice is Grasshopper, a visual programming language that’s part of Rhino. Designs are created using an interface reminiscent of Node-RED or even GNU Radio, with each interconnected block representing a primitive shape or function that can be configured through static variables, interactive sliders, conditional operations, and even mathematical expressions. By linking these modules together complex structures can be generated and manipulated programmatically, greatly reducing the time and effort required compared to a manual approach.

As with many powerful tools, there’s certainly a learning curve for Grasshopper. But over the course of this five part series, James does a great job of breaking things down into easily digestible pieces that build onto each other. By the final class you’ll be dealing with physics and pushing your designs into the third dimension, producing elaborate designs with almost biological qualities.

Of course, Rhino isn’t for everyone. The $995 program is closed source and officially only runs on Windows and Mac OS. But the modular design concepts that James introduces, as well as the technique of looking at large complex objects as a collection of substructures, can be applied to other parametric CAD packages such as FreeCAD and OpenSCAD.

Designing with Complex Geometry is just one of the incredible courses offered through HackadayU, our pay-as-you-wish grad school for hardware hackers. From drones to quantum computing, the current list of courses has something for everyone.

Continue reading “New Video Series: Designing With Complex Geometry”

What Exactly Is A Gaussian Blur?

Blurring is a commonly used visual effect when digitally editing photos and videos. One of the most common blurs used in these fields is the Gaussian blur. You may have used this tool thousands of times without ever giving it greater thought. After all, it does a nice job and does indeed make things blurrier.

Of course, we often like to dig deeper here at Hackaday, so here’s our crash course on what’s going on when you run a Gaussian blur operation. Continue reading “What Exactly Is A Gaussian Blur?”

It’s Linux – But On An ESP32

GNU/Linux is an open-source marvel that has over the past three decades given us an almost infinitely versatile and powerful UNIX-like operating system. But even it has its limitations, particularly at the lower end of the hardware scale where less fully-featured processors often lack the prerequisites such as a memory management unit. Thus [JuiceRV]’s feat of booting a Linux kernel on an ESP32 microcontroller seems impossible, what’s happening?

The ESP’s dual 32-bit Xtensa cores are no slouch in the processing power department, but without that MMU it’s not an obvious Linux candidate platform. The solution to this problem comes in the form of an emulated RISC-V virtual machine which provides just enough grunt for a Linux 5.0.0 kernel to boot.

By any measure this represents an impressive piece of work, but will this new-found ability to run Linux on a microcontroller take the world by storm? Of course not, unless your tastes run to the very slowest of computing experiences. It is however the essence of the hack, and for that we salute it.

It’s not the first time Linux has run on a microcontroller, in the past someone hooked up a 30 pin SIMM and an SD card to an 8-bit Atmel chip and did it in a similar way with an ARM emulator.

Via CNX Software.

Header image: Ubahnverleih, CC0.

An OLED Photo Frame Powered By The ATtiny85

Rolling your own digital picture frame that loads images from an SD card and displays them on an LCD with a modern microcontroller like the ESP32 is an afternoon project, even less if you pull in somebody else’s code. But what if you don’t have the latest and greatest hardware to work with?

Whether you look at it as a practical application or an interesting experiment in wringing more performance out of low-end hardware, [Assad Ebrahim]’s demonstration of displaying digital photographs on an OLED using the ATtiny85 is well worth a look. The whole thing can put put together on a scrap of perfboard with a handful of common components, and can cycle through the five images stored on the chip’s flash memory for up to 20 hours on a CR2032 coin cell.

As you might expect, the biggest challenge in this project is getting all the code and data to fit onto the ATtiny85. To that end [Assad] wrote his own minimal driver for the SSD1306 OLED display, as the traditional Adafruit code took up too much space. The driver is a pretty bare bones implementation, but it’s enough to initialize the screen and get it ready for incoming data. His code also handles emulating I2C over Atmel’s Universal Serial Interface (USI) at an acceptable clip, so long as you bump the chip up to 8 MHz.

For the images, [Assad] details the workflow he uses to take the high-resolution color files and turn them into an array of bytes for the display. Part of that it just scaling down and converting to 1-bit color, but there’s also a bit of custom Forth code in the mix that converts the resulting data into the format his code expects.

This isn’t the first time we’ve seen somebody use one of these common OLED displays in conjunction with the ATtiny85, and it’s interesting to see how their techniques compare. It’s not a combination we’d necessarily chose willingly, but sometimes you’ve got to work with whats available.