Automating The Design Of Word Clocks

Word clocks, or a matrix of light-up letters that spell out the time, are a standard build for all enterprising electronics enthusiasts. The trouble is finding the right way to drive a matrix of LEDs and the significant amount of brainpower that goes into creating a matrix of letters that will spell out the time without making it look like it’s supposed to spell out the time.

For his Hackaday Prize entry this year, [Stephen Legge] is creating a standard toolkit that makes word clocks easier to build. It’s a hardware and software project, allowing for LED matrices of any reasonable size, and the software to make a grid of letters that only spells out the words you want and not the four-letter ones you don’t.

The hardware for this project is built around the IS31FL3733 LED driver from ISSI. This is an interesting chip that takes I2C in and spits out a LED matrix with very few additional support components. This chip provides [Stephen] with a 12×16 single-color LED matrix, which is more than enough for a word clock.

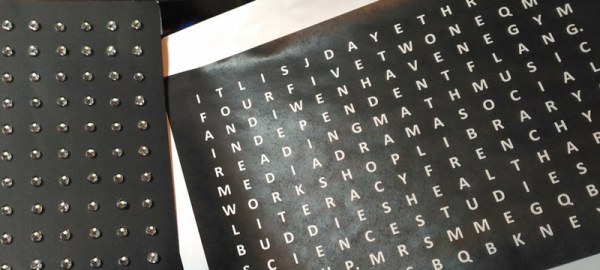
Where this build gets slightly more interesting is the creation of a custom matrix of letters that will still spell out ‘quarter to noon’ when lit in the appropriate way. This is a big challenge in creating a customized word clock; you could always borrow the layout of the letters from another word clock, but if you want customized phrases, you’ll either have to sit down with a pencil and graph paper, or write some software to do it automatically.

It’s a great project, and since all of [Stephen]’s work is being released under Open Source licenses, it’s a great entry to the first portion of the Hackaday Prize where we’re challenging hardware creators to build Open Hardware.

Medium Machine Mediates Microcontroller Messages

Connecting computers to human brains is currently limited to the scope of science fiction and a few cutting-edge laboratories. Tapping into some nerves farther from our central wetware is possible and [Peter Buczkowski] shows us his stylish machine for implanting a pattern into our brains without actively having to memorize anything.

His Medium Machine leverages a TENS unit to activate forearm muscles in a pattern programmed into an Arduino. Users place their forearm across two aluminum electrodes mounted on a tasteful wooden platform and extend a single finger over a button. Electrical impulses trigger the muscles which press the button. That’s all. After repeating the pattern a few times, the users should be able to recite it back on command even if they aren’t aware of what it means. If this sounds like some [Johnny Mnemonic] memory cache, you are absolutely correct. This project draws inspiration from the [William Gibson] novel which became a [Keanu Reeves] movie.

Users can be programmed with a Morse code message or the secret knock to open an attic library or play a little tune. How about learning a piano song?

Continue reading “Medium Machine Mediates Microcontroller Messages”

Rotary Encoders Become I2C Devices

Rotary encoders are the bee’s knees. Not only do you get absolute positioning, you can also use a rotary encoder (with a fancy tact button underneath) for an easy UI for any electronics project. There’s a problem with rotary encoders, though: it’s going to use Gray code or something weird, and getting a rotary encoder to work with your code isn’t as easy as a simple button.

For his Hackaday Prize project, [fattore.saimon] has come up with the solution for using multiple rotary encoders in any project. It’s a board that turns a rotary encoder into an I2C device. Now, instead of counting rising and falling edges, adding a rotary encoder to a project is as easy as connecting four wires.

The project is built around the PIC16F18344, a small but surprisingly capable microcontroller that reads a rotary encoder and spits data out as an I2C slave device. Also on board are a few pins for an RGB LED, general purpose pins, the ability to set all seven bits of the I2C address (who wants 127 rotary encoders?), and castellated holes for connecting several boards together.

This project is an update of [fattore]’s earlier I2C Encoder, and there are a lot of improvements in the current version. It’s slightly smaller, has better connectors, and uses a more powerful microcontroller. That’s just what you need if you want a ton of rotary encoders for all those cool interactive projects.

Resuming Failed 3D Prints Automatically

What happens to your 3D printer if the power goes out? What happens if there’s a jam in the nozzle? What happens if your filament breaks, runs out, or turns into a plate of spaghetti? For all these situations, the print fails, wasting plastic and time. For his Hackaday Prize entry, [robert] has come up with a tiny device that saves all those failed prints, and it does it without batteries or a UPS.

The idea behind [robert]’s box is to monitor all the G-code being sent to the printer, and allow a print to be resumed after a failure. The design is simple enough — just a USB mini port on one end, a USB A port on the other, and three buttons in between. This box logs the G-code, and if the printer happens to fail, the box will spring into life allowing you to resume a print from any Z position.

Already [robert] has tested this box on a number of printers including the Prusa i3, the Creality CR-10, and the ever-popular, explodey Anet A8. The project has already gone through a few hardware revisions and there is, of course, a fancy 3D printed enclosure for the board. It’s a great project, and one of the more interesting 3D printing tools we’ve seen in this year’s Hackaday Prize.

Up, Up, Up: $2,000 More Seed Funding For Hackaday Prize Entries

Getting a project off the ground often means an up-front investment in parts. Hackaday is upping our efforts to smooth out that obstacle for those who want to Build Something That Matters. Seed funding for the 2018 Hackaday Prize is simple, enter your Open Hardware design, share it far and wide so that a lot of people will show their admiration with a ‘like’ on the project page. If you’re in the Prize competition, you get a dollar for each like to help jump-start the build phase. If you haven’t entered, you get to encourage and reward the projects that inspire you most.

This year has started off like a rocket. We’ve already passed the $4,000 seed funding limit and you still have until a week from Monday to take part in this seed funding. With so much excitement around this first challenge, Supplyframe, Hackaday’s parent company, is raising the pot to a total of $6,000. That means there’s more up for grabs. Enter your project now. If you’ve already done that, polish up your presentation and show it around to your friends and on social media. Entries with the most likes will get a dollar for every like up to $200 max, or until we undoubtedly reach the new limit once again. Don’t delay, it’s time to Build Something that Matters!

Seed funding is a big deal as we found out with Alex Williams, the 2018 Grand Prize Winner. He mentioned that the money really helped him with early build costs, and the interest from the community inspired him to keep up development throughout the contest. Help us give away this extra funding and inspire the next generation of finalists by commenting on and upvoting great entries!

Recharging Drones On The Go With A Supercharger

If Techcrunch is to be believed, our skies will soon be filled with delivery robots, ferrying tacos and Chinese food and Amazon purchases from neighborhood-area dispatch stations to your front door. All of this is predicated on the ability of quadcopters to rapidly recharge their batteries, or at the very least swap out batteries automatically.

For their Hackaday Prize entry, [frasanz], [ferminduaso], and [david canas] are building the infrastructure that will make delivery drones possible. It’s a drone supercharger, or a robot that grabs a drone, swaps out the battery, and sends it off to deliver whatever is in its cargo compartment.

This build is a droneport of sorts, designed to have a drone land on it, have a few stepper motors and movable arms spring into action, and replace the battery with a quick-change mechanism. This can be significantly more difficult than it sounds — you need to grab the drone and replace the battery, something that’s easy for human eyes and hands, but much harder for a few sensors and aluminum extrusion.

To change batteries, the team is just letting the drone land somewhere on a platform that’s a few feet square. Arms then move it, pushing the drone to the center, and a second arm then moves in to swap the battery. The team is using an interesting locking cam solution to clamp the battery to the drone. It’s much easier for a machine to connect than the standard XT-60 connector found on race quads.

Is this the project the world needs? Quite possibly so. Drones are going to be awesome once battery life improves. Until then, we’ll have to live with limited flight times and drone superchargers.

Continue reading “Recharging Drones On The Go With A Supercharger”