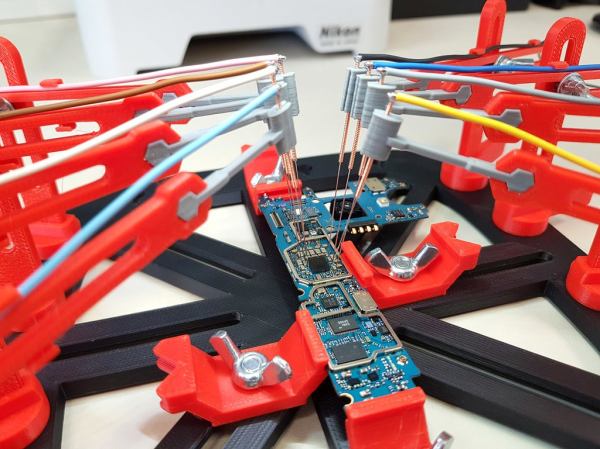
Adventures In Photopolymers With Ben Krasnow

There is a technology that will allow you to add inks, resins, and paints to any flat surface. Screen printing has been around since forever, and although most of the tutorials and guides out there will tell you how to screen print onto t-shirts, [Ben Krasnow] had the idea of putting patterns of paint on acrylic, metal, or even ITO glass for electroluminescent displays. With screen printing, the devil is in the details, but lucky enough for all of us, [Ben] figured everything out and is sharing his knowledge with us.

The ten thousand foot view of screen printing is simple enough — put some ink on a screen that has some photoemulsion, and squeegee it through onto a t-shirt. While this isn’t wrong, there’s a lot of technique, and things will go wrong if this is your first time doing it. Screens are easy, and the best way to get those is by buying a pre-stretched frame. The photoemulsion is a bit different. The old way of applying a photoemulsion is by squeegeeing it on with a bizarre tool. It’s almost impossible to get a thin consistent layer with this technique, so [Ben] recommends just buying some photoemulsion film.

Once the photoemulsion is on the screen and dry, you need to put an image on this. The photoemulsion cures hard with UV, so the traditional technique is using transparency (actually, the real old-school way is using a camera obscura…). Transparency sheets for laser printers work, butĀ 30-lb vellum is actually more transparent to UV light than clear acetate sheets. This is then applied print side down to the dry screen, and believe me when I say this is the most important part. You will not get a good screen print if there is not direct contact between your photomask and your photoemulsion. This is so important, it may be worth considering some experiments in vinyl cutting to create the photomask.

With the screen developed, it’s simply a matter of globbing on some ink and pressing it onto a piece of acrylic. [Ben] used regular oil paints, an unmixed artists’ oil paint, and the professional solution, epoxy-based screenprinting paint. By far, the epoxy paint gave the best finish, but it’s a stinky mess that is nearly impossible to clean.

With a somewhat successful screenprinting setup, what will [Ben] be able to do? Well, he’s been working on electroluminescent displays, and the first EL displays were screenprinted anyway. More than that, you could use screen printing to create a resist for copper etching for creating your own PCBs. There’s a lot you can do when you can put epoxy down in a thin layer, like make a blockchain of Tide pods, and this is the best tutorial we’ve ever seen on using photoemulsions.

Continue reading “Adventures In Photopolymers With Ben Krasnow”

Understanding Modulated RF With [W2AEW]

There was a time — not long ago — when radio and even wired communications depended solely upon Morse code with OOK (on off keying). Modulating RF signals led to practical commercial radio stations and even modern cell phones. Although there are many ways to modulate an RF carrier with voice AM or amplitude modulation is the oldest method. A recent video from [W2AEW] shows how this works and also how AM can be made more efficient by stripping the carrier and one sideband using SSB or single sideband modulation. You can see the video, below.

As is typical of a [W2AEW] video, there’s more than just theory. An Icom transmitter provides signals in the 40 meter band to demonstrate the real world case. There’s discussion about how to measure peak envelope power (PEP) and comparison to average power and other measurements, as well.

Continue reading “Understanding Modulated RF With [W2AEW]”

Lathe’s Tool Holder Holds A Rotary Tool

What is better than a tool? Two. What is better than two? Two tools tooling together. [tintek33] wanted a rotary tool to become an attachment on his mini lathe, the video is also below the break. Fortunately, Dremels and Proxxons are built to receive accessories, or in this case, become one. Even if the exact measurements do not apply to your specific hardware, we get to see the meat of the procedure from concept to use.

We start with where the rotary tool should be and get an idea of what type of bracket will be necessary. The design phase examines the important dimensions with a sketch and then a CAD mock-up. Suitably thick material is selected, and the steps for pulling the tool from the raw stock are shown with enough detail to replicate everything yet there is no wasted time in this video. That is important if you are making a quick decision as to whether or not this is worth your hard work. Once the brace is fully functional and tested, it is anodized for the “summer ocean” blue color to make it easy to spot in the tool heap. Some complex cuts are made and shown close-up.

Thank you [jafinch78] for your comment on Take a Mini Lathe for a Spin and check out [tintek33] using his mini lathe to make a hydraulic cylinder for an RC snow plow.

Continue reading “Lathe’s Tool Holder Holds A Rotary Tool”

Strobe For Wood Turning Makes Inspection Easy

The lathe is a simple enough tool to understand, but requires much practice to truly master. During the turning process, it’s often necessary to inspect the workpiece. This generally necessitates stopping the lathe, waiting for everything to spin down, and then starting again. This can be a major time sink when added up across the full scope of a project. However, the magic of strobes can help.

The basics of [Darcy]’s project will be familiar to any hacker who has worked with rotating machinery before. The rotational speed of the lathe is measured, in this case using a reed switch and a magnet. This signal is fed to a microcontroller, which controls the strobing of an LED lamp. By synchronizing the flashes to the speed of the lathe, it’s possible to view the workpiece as if it were standing still. By adjusting the offset of the flashes to the position of the lathe, it’s also possible to rotate this view to see the entire workpiece – all while the lathe remains spinning.

Further photos and videos are available in the Reddit thread. [Darcy] reports that despite his best efforts, he couldn’t quite find a business case for producing the hardware commercially, but the idea was too useful to leave languishing in a notebook. We’d love to hear your ideas on how this could improve turning projects, so be sure to let us know in the comments. If you’re just getting started with turning, it might be worth cutting a test bar to make sure your rig is up to snuff.

Sharpest Color CRT Display Is Monochrome Plus A Trick

I recently came across the most peculiar way to make a color CRT monitor. More than a few oscilloscopes have found their way on to my bench over the years, but I was particularly struck with a find from eBay. A quick look at the display reveals something a little alien. The sharpness is fantastic: each pixel is a perfect, uniform-colored little dot, a feat unequaled even by today’s best LCDs. The designers seem to have chosen a somewhat odd set of pastels for the UI though, and if you move your head just right, you can catch flashes of pure red, green, and blue. It turns out, this Tektronix TDS-754D sports a very peculiar display technology called NuColor — an evolutionary dead-end that was once touted as a superior alternative to traditional color CRTs.

Join me for a look inside to figure out what’s different from those old, heavy TVs that have gone the way of the dodo.

Continue reading “Sharpest Color CRT Display Is Monochrome Plus A Trick”

Cutting Wit And Plastic

If you have ever used a scalpel to cut something tougher than an eraser, you can appreciate a hot knife or better yet, an ultrasonic cutter. Saws work too, but they have their own issues. [This Old Tony] uses a hobby store tool to cut some plastic and wood, then demos a commercial ultrasonic cutter to show how a blade can sail through with less brute force. The previous requires some muscle, finesse, and eventually a splash of Bactine antiseptic. The video can also be seen after the break.

This is more than a tool review, [Tony] takes it apart with a screwdriver and offers his snarky comments. On the plus side is that it cuts polystyrene well where a regular knife won’t do more than scratch or shatter it. Meanwhile in the negative category we don’t hear a definitive price, but they seem to cost half as much as his mini-lathe. If you need an estimated return on investment, consider the price of two-thousand X-acto blades, but you may also wish to factor in the reduced hand calluses. While you are shopping, maybe also think about a set of earplugs; when the video gets to 17:30 he tries to cut a ceramic fitting and manages to make a child-deafening screech instead. We warned you.

This is a fitting follow-up to hisĀ unsuccessful attempt to turn an ultrasonic cleaner into an ultrasonic cutter, but we have seen success converting a tooth scaler into a cutter.

Continue reading “Cutting Wit And Plastic”

The Coco-Nutcracker

Coconut is a delicious and versatile food but if you’ve ever tried to open one you know they can be a hard nut to crack. Those of us who live in the tropics where they are common might reach for a machete, drill, or saw to open them, which is often a messy and sometimes dangerous ordeal. Realizing that a coconut is just a large nut with a shell like any other, [Paul] of [Jackman Works] decided to build a nutcracker big enough to crack a coconut, which turns out to be almost exactly human-sized.

The nutcracker is built almost entirely out of reclaimed wood. Several rings made of many blocks of wood were constructed on the table saw before being glued and clamped together. Once the rings were stacked and glued to each other, [Paul] put them on a lathe to get a smooth finish. Then the arms, legs, body, and head were all assembled. The actual nutcracking mechanism is one of the few metal parts in this build, a long threaded rod which is needed to handle the large forces required for cracking the coconut.

Once the finishing touches were put on the nutcracker, including boots, a beard, some hair, and of course a pom-pom for his hat, [Paul] successfully tested it by cracking a coconut open. This build is exceptionally high quality and is definitely worth scrolling through. He runs a wood shop in DC where he builds all sorts of interesting things like this, including a giant wooden utility knife.