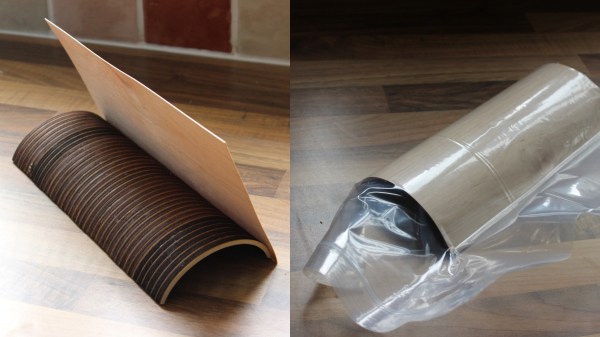
Electronifying A Horror Fraught Hydraulic Press

[Josh] is replacing the springs in his car’s suspension. He wanted to know the travel rates of these springs, but apparently, this is a closely guarded trade secret in the industry. One company did manage to publish the spring rates, but they weren’t believable. Instead of taking this company’s word, [Josh] built a spring tester.

The theory behind a spring tester is pretty simple: apply a force to a spring, measure it, then measure how much the spring has traveled. Or compress a spring an inch or so, measure the force, and compress it some more. Either gets you the same data.

This spring tester is built around a Harbor Freight hydraulic press. Yes, the spring is completely captured and won’t fly out of the jig if you look at it wrong. The bottom of the press contains a few load cells, fed into an ATmega8, which displays a value on an LCD. For the displacement measurement, a ruler taped to the side of the press will suffice, but [Josh] used a Mitutoyo linear scale.

What were the results of these tests? You shouldn’t buy coils from Bilstein if these results are correct. The rates for these springs were off by 70%. Other springs fared better and won’t bind when going over bigger bumps. That’s great work, and an excellent application of Horror Fraught gear.

A Tiny Bench Power Supply

One of the more popular projects for beginners in electronics is a power supply. Yes, you can always go to Amazon and buy a nice power supply, but unfortunately, we haven’t set up our Amazon affiliate links yet. Instead, we’ll have to go with the next best thing and check out [Tron900]’s mini bench power supply build. It’s extremely capable and cute as a button.

The design goals for this project were to build a small and compact unit using mostly salvaged and recycled components, with all through-hole circuitry. The best guide you’ll ever find for a DIY power supply is one of [Dave Jones]’ earlier video series going over the construction of an adjustable power supply based on an LT3080. [Tron] didn’t have this regulator on hand and wanted to base his design around an op-amp instead. After rummaging through his parts, he found what he was looking for: a TIP3055 power transistor, a neat enclosure that could double as a heatsink and an AD680 voltage reference.

The design of this power supply was simulated in SIMETRIX, and after a few revisions [Tron] had a circuit that worked reasonably well. The circuit was populated on a piece of perfboard, a fantastic front panel was constructed, and one of those ubiquitous volt/ammeter panels added.

This is just a one-off project, but the results are fantastic. This is a very small, very capable power supply that does everything [Tron] needs. It’s accurate enough, at least when measured with a fancy benchtop HP meter, and looks adorable. What more could you want in a benchtop power supply?

Hacking A Vintage TV Into An Oscilloscope

Do you still have an old analog CRT  television lying around? With the advent of digital signals, analog TV´s are going to the dumpster or the recycling center. But you can still put them to good use, just as [GreatScott!] did, by converting the TV into a crude oscilloscope.

The trick is to take control of the two deflection coils that move the electron beam inside the CRT in the horizontal and vertical directions. The video describes in detail the process of identifying the coils and using an Arduino nano in combination with a DAC to amplify the input signal in order to get the waveform in the TV screen. Step by step explanations and great editing make this project delightful to watch.

Even if you do not follow [GreatScott!]´s steps to build a simple oscilloscope, don´t throw away that vintage TV!, it is a great source of analog parts. The flyback transformer can be used to make a high voltage power supply, and you also get some nice high voltage capacitors (both electrolytic and mylar ones), the horizontal output transistor which is a high voltage one, ferrite transformers, magnet wire, plus a lot of other small parts. Other uses for old TV sets that you may want to try is to convert your TV into a gaming console, or  an audio synthesizer controlled by drawing with a light-sensitive pen on a CRT television.

Continue reading “Hacking A Vintage TV Into An Oscilloscope”

EDM For The Cheap And Adventurous

Laser cutters, waterjets, plasma cutters, CNC routers – most hackerspaces and even many dedicated home-gamers seem to have some kind of fancy tool for cutting sheet goods into intricate shapes. But with no access to a CNC machine and a need to cut a complex shape from sheet metal, [AlchemistDagger] cooked up this bare-bones and somewhat dangerous EDM rig to get the job done.

Electric discharge machining has been around for decades and is used a lot for harder metals like titanium and tool steel. The process makes sense to anyone who has seen contacts pitted and corroded by repeated arcing – an electric arc is used to remove metal from the workpiece, with a dielectric fluid used to cool the workpiece and flush away debris. For [AlchemistDagger]’s purposes, a lot of the complicated refinements, like high-frequency power supplies and precise tool positioning, were ignored. He built a simple linear slide to manually control the tool position, and the power supply was just a bridge rectifier connected to the 120-volt mains with some filter capacitors and a big light bulb as a ballast resistor. While the video below shows electrical conduit being notched, [AlchemistDagger] also made a brass cookie-cutter style tool to cut the Instructables logo from steel.

Obviously, mixing water and electricity is a recipe for disaster is you’re not careful, but this low-end EDM technique is a good one to file away for a rainy day. And if you’re looking for a little more sophistication in your homebrew EDM rig, we’ve got you covered there too. Continue reading “EDM For The Cheap And Adventurous”

Have You Ever Tried Desoldering Needles?

If you are an electronics enthusiast who has a tendency to hoard junk because it Might Be Useful Someday, you may well have a significant experience when it comes to desoldering. Why order that component, when you’ve got one on this old board?

So we’ve become experts in removing old components from dead PCBs, so when it comes to desoldering techniques you might think we’ve seen it all, there’s nothing new to learn. Then along comes [fede.tft], with a tip of a desoldering tool that’s new to us. The video below the break from [MSylvain59] demonstrates the needles in action, what do you think? Have any of you used a desoldering needle?

This is a set of tools you might use to desolder a through-hole component with a wire-end poking out beneath the board. The idea is that as stainless steel needles the solder won’t adhere to them, so you can select the appropriate size and use it to push out the lead from below.

We remain to be convinced, as it seems to be a slightly more fiddly way to do what we’ve used a small screwdriver for to lever from above the board for years, but it’s always worth talking about a tool that could be a useful new weapon in our armoury.

Continue reading “Have You Ever Tried Desoldering Needles?”

Cordless Water Pump!

A water pump is one of those items that are uncommonly used, but invaluable when needed. Rarer still are cordless versions that can be deployed at speed. Enter [DIY King 00], who has shared his build of a cordless water pump!

The pump uses an 18 volt brushed motor and is powered by an AEG 18V LiPo battery. That’s the same battery as the rest of [DIY King]’s power tools, making it convenient to use. UPVC pipe was used for the impeller — with a pipe end cap for a housing. A window of plexiglass to view the pump in motion adds a nice touch.

A bit of woodworking resulted in the mount for the pump and battery pack, while a notch on the underside allows the battery to lock into place. Some simple alligator clips on the battery contacts and the motor connected through a switch are all one needs to get this thing running.

Continue reading “Cordless Water Pump!”

New Wisdom On Old Practices

Getting into machining is hard. From high-speed seel versus carbide to “old US iron” versus “new Asian manufacture” to simply choosing which drill bits to buy, many hard decisions must be made before one even has a chance to gain experience. Fear not, [Quinn Dunki] has created “a roadmap for how to get involved in this hobby.

We saw [Quinn’s] first entry in her lathe series back in January, and now the series is complete! Starting with the definition of a machine tool and ending with the famous Clickspring scriber and a multi-material pen, [Quinn] leaves no stone unturned. [Quinn’s] style contrasts with the likes of [ThisOldTony], [AvE] or [Clickspring], as she makes sure to include the gory details of everything, citing her dissatisfaction with most YouTube machinists as motivation:

they’re all about the money shots of chips flying, but thin on the actual work of machining, which is mostly work-holding setups, changing bits and dies around, etc. That’s where all the knowledge is. The machine does the work once you spend 20 minutes setting it up properly for the operation. Everyone skips that part. I scour Tubalcain videos for details like the angle of the compound for a facing operation, or how to drill a deep hole with a short tail stock without the carriage getting in the way. Simple things like that get glossed over, but stump a beginner.

Of the series, our favorite part was “Grinding tool bits.” When combined with [ThisOldTony’s] Grinding HSS Tools, the two form an education in high-speed steel tool grinding fit for a hacker. Need more than high-speed steel? We’ve got you covered.