A Modern Day PDP-11 Front End

Hands up if you feel your spiritual home is in front of a terminal with a “DIGITAL” logo on it.  It’s a name that has long ago been subsumed into first Compaq and then by extension HP, but it’s one with a lot of history when it comes to computing.

From the start of the electronic computing age, there were the computers we’d probably now describe as mainframes. Big computers that cost the GDP of a small country, filled an entire floor of a building, and could only be found in government departments, universities, and large companies. By the 1960s, the technologies existed to build computers that broke this mould, could be bought within the budget of a smaller organisation, and for which you didn’t need a huge air-conditioned basement to house. These so-called minicomputers were the great revolution of that era because they bought the fruits of computing into everyday business, and probably the most successful of the companies that produced them was the Maynard, Massachusetts-based Digital Equipment Corporation, or DEC.

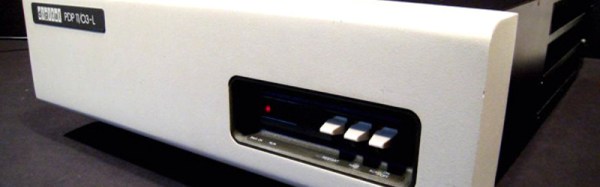
DEC produced a succession of minicomputers in their PDP line, of which the most successful was their PDP-11 series. These were 16-bit minicomputers that remained in their product line from their launch in 1970 through to the early 1990s, and were available in a succession of configurations and physical form factors. The famous view of a PDP-11 is of a set of floor-to-ceiling racks, but there were also standalone terminal models, and desktop models. One of these, a PDP-11/03 from 1975, has come into the hands of [Joerg], and he’s used it to craft his LSIbox, the PDP11/03 card frame packaged with a BeagleBone for access via a modern-day interface. It’s a build in the vein of modern tube audio amplifiers that feature the retro hardware on the top of their cases, the card frame is exposed as a feature on top of a white case that is featureless except for a genuine PDP-11/03 front panel.

You might ask why anyone would do this in order to run PDP-11 software when the BeagleBone could almost certainly emulate the vintage hardware much faster than the real thing. But to take that view is to miss the point; the PDP-11 series are a seminal part of computing history, and to have genuine PDP-11 hardware on your desk is quite an achievement.

We’ve shown you a few PDP-11 projects in the past. There was this minimalist PDP-11 implementation using one of the later integrated PDP-11 processors, and we’ve seen a faithful reproduction of an earlier PDP-11 front panel powered by a Raspberry Pi.

FPGAs In C With Cynth

Programming an FPGA with Verilog looks a lot like programming. But it isn’t, at least not in the traditional sense. There have been several systems that aim to take C code and convert it into a hardware description language. One of these, cynth, is simple to use and available on GitHub. You will need to install scala and a build system called sbt, if you want to try it.

There are limitations, of course. If you want a preprocessor, you’ll have to run it separately. You can’t use global variables, multiplication, floats, and many other pieces of C. The compiler generates a Verilog file for each C function.
Continue reading “FPGAs In C With Cynth”

Wherein The Mechanical Keyboard Community Discovers Motorized Linear Potentiometers

Deep in the bowels of the Digikey and Mouser databases, you’ll find the coolest component ever. Motorized linear potentiometers are a rare, exotic, and just plain neat input device most commonly found on gigantic audio mixing boards and other equipment that costs as much as a car. They’re slider potentiometers with a trick up their sleeve: there’s a motor inside that can set the slider to any position.

The mechanical keyboard community has been pushing the boundaries of input devices for the last few years, and it looks like they just discovered motorized linear pots. [Jack] created a motorized sliding keycap for his keyboard. It’s like a scroll wheel, but for a keyboard. It’s beautiful, functional, and awesome.

The hardware for this build is just about what you would expect. A 60 mm motorized linear pot for the side-mount, or 100 mm mounted to the top of the keyboard, is controlled by an Arduino clone and a small motor driver. That’s just the hardware; the real trick here is the software. So far, [Jack] has implemented a plugin system, configuration software, and force feedback. Now, messing with the timeline in any Adobe product is easy and intuitive. This device also has a ‘not quite vibration’ mode for whenever [Jack] gets a notification on his desktop.

Right now, [Jack] is running a group buy for this in a reddit thread, with the cost somewhere between $55 and $75, depending on how many people want one. This is a really awesome product, and we can’t wait for Corsair to come out with a version sporting innumerable RGB LEDs. Until then, we’ll just have to drool over the video [Jack] posted below.

Continue reading “Wherein The Mechanical Keyboard Community Discovers Motorized Linear Potentiometers”

Replicating A Victorian Era Console

[Dt99jay] lives in a historic Victorian-era district in the UK.  Most homes in the area have ornate exterior window dressings with stone consoles holding up heavy stone hood molding.

The window hood molding turned out to be wood — most likely the result of damage repaired after the blitzkrieg bombings of WWII. The 1940’s era work is now rotting away, so it was time for a repair. When the hood was pulled away from the window, disaster struck. One console completely crumbled, while the other lost large chunks of material. The They weren’t solid stone after all, but replacements most likely molded with Coade stone.

There are no ready replacements for consoles like this. [dt99jay] couldn’t just swap them out for modern looking replacements, so he set about replicating the consoles. The remaining console was much too delicate to remove from the building, so [dt99jay] glued the missing pieces back on. He then filled any missing parts and carefully scraped way all the loose paint. Then came the difficult part — making a mold while the console was still mounted on the house.

Room Temperature Vulcanizing (RTV) silicone rubber was carefully applied to the console. The RTV is thick enough to stay on while it dries. After several thick layers of RTV, the console was covered. [Dt99jay] then covered the mold with plaster of Paris bandages to support it. The finished mold was carefully removed from the house, and [dt99jay] filled all the low spots and air bubbles with RTV.

New castings were made using a mixture of cement and playground sand. Once painted, the results matched perfectly. The historic conservation committee was pleased, and the window was once again structurally sound.

Hackaday Prize Entry: HID Dial

Microsoft has introduced a few interesting bits of hardware recently, and the most drool worthy by far is the Microsoft Surface Dial. What is this magical input device that will revolutionize creative work on a computer? Basically, it’s a Griffin PowerMate — a rotary encoder and button — an interface that really hasn’t changed in a decade and a half.

[K.C. Lee] figures a device this simple would make for a great Hackaday Prize entry, so he built a USB HID multimedia dial. It’s a rotary encoder and a button. This one lights up, though, making this a gamer USB HID multimedia dial.

The electronics for this build are based around the STM8S003, an extraordinarily cheap microcontroller that will work well enough in this application. The mechanical part of this build is a little more interesting; [K.C.] says not everyone has access to fancy CNC or 3D printing equipment, so he built this model out of bits of plastic, metal, and superglue. This enclosure is literally an old superglue bottle cap, an empty dental floss spool, and bits of metal. It works, and took less time to build than it would take to design in a CAD program.

Right now, [K.C.] is working through some USB issues with the STM8 microcontroller. Once those issues are behind him, he’ll have a very cool and very useful input device sitting on his desk. It might look like parts waiting for the recycling bin, but it will be at least as useful as the fancy Microsoft version.

Making A Solar-Cell Tester With Mecrisp-Stellaris Forth

In the last two articles on Forth, I’ve ranted about how it’s beautiful but strange, and then gotten you set up on a basic system and blinked some LEDs. And while I’ve pointed you at the multitasker, we haven’t made much real use of it yet. Getting started on a Forth system like this is about half the battle. Working inside the microcontroller is different from compiling for the microcontroller, and figuring out the workflow, how to approach problems, and where the useful resources are isn’t necessarily obvious. Plus, there’s some wonderful features of Mecrisp-Stellaris Forth that you might not notice until you’ve hacked on the system for a while.

Ideally, you’d peek over the shoulder of someone doing their thing, and you’d see some of how they work. That’s the aim of this piece. If you’ve already flashed in our version of Mecrisp-Stellaris-plus-Embello, you’re ready to follow along. If not, go back and do your homework real quick. We’ll still be here when you’re done. A lot of this article will be very specific to the Mecrisp-Stellaris flavor of Forth, but given that it runs on tons of ARM chips out there, this isn’t a bad place to be.

Continue reading “Making A Solar-Cell Tester With Mecrisp-Stellaris Forth”

Hack Your Own Samsung TV With The CIA’s Weeping Angel Exploit

[Wikileaks] has just published the CIA’s engineering notes for Weeping Angel Samsung TV Exploit. This dump includes information for field agents on how to exploit the Samsung’s F-series TVs, turning them into remotely controlled spy microphones that can send audio back to their HQ.

An attacker needs physical access to exploit the Smart TV, because they need to insert a USB drive and press keys on the remote to update the firmware, so this isn’t something that you’re likely to suffer personally. The exploit works by pretending to turn off the TV when the user puts the TV into standby. In reality, it’s sitting there recording all the audio it can, and then sending it back to the attacker once it comes out of “fake off mode”.

It is still unclear if this type of vulnerability could be fully patched without a product recall, although firmware version 1118+ eliminates the USB installation method.

The hack comes along with a few bugs that most people probably wouldn’t notice, but we are willing to bet that your average Hackaday reader would. For instance, a blue LED stays on during “fake off mode” and the Samsung and SmartHub logos don’t appear when you turn the TV back on. The leaked document is from 2014, though, so maybe they’ve “fixed” them by now.

Do you own a Samsung F-series TV? If you do, we wouldn’t worry too much about it unless you are tailed by spies on a regular basis. Don’t trust the TV repairman!