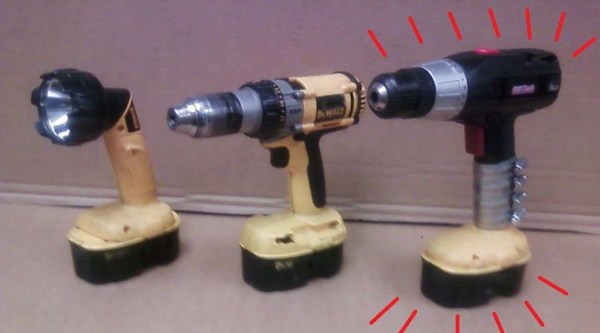
With tools, especially cordless tools, you’re going to pay now or pay later. On one hand, you can spend a bunch of money up front and get a quality tool that will last a long time. The other option is purchasing a cheap cordless tool that won’t last long, having to replace it later and thus spending more money. With cheap cordless tools it is common for the battery to fail before the physical tool making that tool completely unusable. Sure, another battery could be purchased but sometimes they cost just as much as the tool and battery combo originally did. So what’s a cordless tool user to do?
[EngergySaver] had a set of DeWalt cordless tools with a bunch of working batteries. He also had a cheap drill where the battery had died. His bundle of tools included two flashlights, one of which the case physically broke in half, probably from a clumsy drop. Instead of tossing the broken flashlight pieces in the garbage, [EngergySaver] kept them around for a while. Then one day he had the idea of combining the base of the broken DeWalt flashlight with the top of the old battery-less drill. He had the parts so why not?
The battery pack was 18 volt and the cheap drill expected 16.8 volts. [EngergySaver] figured the voltages were close enough and decided not to worry about the difference during his hack. He started by disassembling both the drill and flashlight down to the bare plastic housings. He marked an appropriate place to splice the handles and made some cuts. After the wiring was spliced together and the tool casings reassembled, a piece of sheet metal was cut and bent around the handle at the joint between flashlight and drill. Hose clamps hold the sheet metal tight around the handles, keeping the new hybrid tool together. And although we’re not crazy about the sheet metal and hose clamp method, it seems to be working just fine. With a little work and ingenuity [EngergySaver] resurrected an old tool for our favorite price; $0.
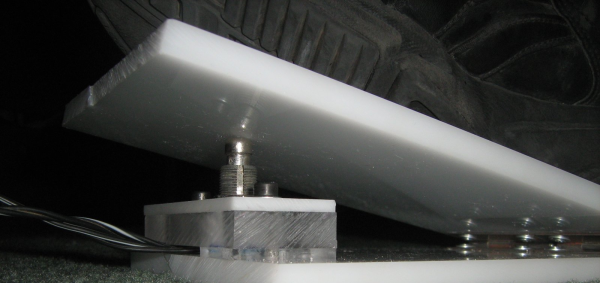

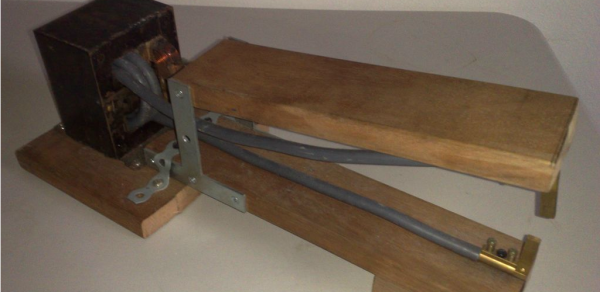
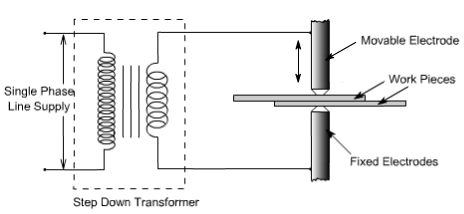 A spot welder works by passing an electric current through two thin pieces of metal. The resistance of the metal work pieces and the current passed though them creates enough heat to melt and join the two together at a single spot. To be able to get the high current needed for this project, [mrjohngoh] started with an old microwave transformer. He removed the standard secondary coil and re-wrapped it with 1cm thick wiring to get maximum current out of the transformer. The ends of the coil wire attach to electrodes, which are made from a high-current electrical plug. The electrodes are mounted at the ends of a pair of hinged arms. The weld is made when the two pieces of metal are sandwiched between the electrodes and power is applied.


