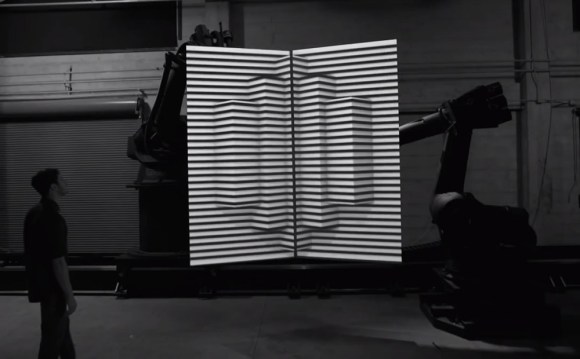
Stereoscopic Display Art Installation

stereoscopic-display

This rig is something of a museum or art installation, but the concept is so simple we thought it could easily inspire your next project. The two mirrors and two video sources make up a stereoscopic display.

The user sits between two displays (computer monitors shown here, but the post also shows images projected on two walls of a room). A pair of mirrors mounted at forty-five degrees form the eye pieces. It’s a V-shaped mirror assembly in which the narrow end pointing toward the bridge of the user’s nose. The mirrors reflect the images from the monitors, giving a different view for each eye.

In this case each monitor is playing back a video loop, but one is just slightly longer than the other. Each monitor has a potentiometer in front of it. The user can turn them to speed or slow the playback in an attempt to bring the video back into sync. We don’t think we’d replicate that portion of the project. But it might be fun to view some stereoscopic clips in this way. There’s even instructions on how two cameras were used to record the scenes.

You can get a closer view of the test apparatus in the clip after the jump.

Continue reading “Stereoscopic Display Art Installation”

Camera Adapter For A Microscope

camera-adapter-for-stereo-microscope

[Steve] really has a nice microscope setup in his lab now that he built a video camera adapter for his stereo microscope. The image above shows the magnified view of the circuit board on the LCD screen behind it. This lets him work without needing to be in position to look through the eye pieces. The hack is a perfect complement to the custom stand he fabricated for the scope.

The camera attachment can be seen attached to the right lens of the scope. It’s an old security camera which he already had on hand. The stock lens wasn’t going to bring the picture into focus, but he had some different optics on hand and one of them fit the bill perfectly. The rest of the project involves fabricating the adapter ring on his lathe. It slips perfectly over the eyepiece and even allows him a bit of adjustment to get the focal length right. The best view of this is shown off in the video after the break.

Continue reading “Camera Adapter For A Microscope”

Launching A Glider From Space

We get a ton of tips about weather balloon launches taking hobby electronics into space. But every once in a while one of them stands out from the rest. This project does send an electronic payload into space, but it also lets [David] fly his hardware back from near-space using an RC airplane.

The return vehicle is unpowered, but that shouldn’t be a problem as launching from a weather balloon will provide plenty of altitude for the flight. Because the temperature experienced in that part of the atmosphere is so cold [David] had to take several things into account. Obviously you want your batteries and control electronics to be insulated from the cold. But something that doesn’t usually pop into mind are issues with the servo motors which run the glider’s flaps. They usually have some white grease on the gears. At temps as low as -50C that grease will harden and make the servo stop working so he made sure to clean the gears thoroughly before the flight.

Unfortunately [David] had several problems capturing images and recorded video from the ground station. But his write up is still a fun read and the clip after the break gives a general overview of the entire project from the nose camera of the glider.

Continue reading “Launching A Glider From Space”

3D Display Controlled With The Leap Motion

3d-display-controlled-with-leap-motion

Touch screens are nice — we still can’t live without a keyboard but they suffice when on the go. But it is becoming obvious that the end goal with user interface techniques is to completely remove the need to touch a piece of hardware in order to interact with it. One avenue for this goal is the use of voice commands via software like Siri, but another is the use of 3D processing hardware like Kinect or Leap Motion. This project uses the latter to control the image shown on the 3D display.

[Robbie Tilton] generated a 3D image using Three.js, a JavaScript 3D library. The images are made to appear as if floating in air using a pyramid of acrylic which reflects the light toward the viewer’s eyes without blocking out ambient light in the room. In the past we’ve referred to this as a volumetric display. But [Robbie] points out that this actually uses the illusion called Pepper’s Ghost. It’s not really volumetric because the depth is merely an illusion. Moving your point of view won’t change your perspective unless you go around the corner to the next piece of acrylic. But it’s still a nice effect. See for yourself in the demo after the jump.

Continue reading “3D Display Controlled With The Leap Motion”

Pumping 1080p Video Out Of An FPGA

fpga-pumping-1080p

[Hamster] admits this 1080p HDMI hack for an FPGA doesn’t put a signal that’s fully up to specifications. But as you can see in the image above it does output a 1920×1080 image at 60 Hz, which is the size and frequency of full HD video. It falls just short due to some jitter, which may be just fine if this is only being used for early prototyping and will be replaced with a dedicated encoder later in the design process.

Here he’s chosen a Pipistrello board but thinks that any device which has a Spartan 6 chip with the differential pairs connected to an HDMI socket will work. The difficulty of the task comes in serializing four output channels at 1500 Mb/s each. Because of this just coding your logic isn’t going to work. After roughing out the design [Hamster] went back in and chose to manually place some of the components to ensure that data from each channel arrives at the same time.

While you’re messing with HDMI you may also want to give this overlay hack a try.

Dynamic Bicycle Headlight Uses The Open Road As A Display

This thing is so cool it almost looks fake. But [Matt Richardson] isn’t a hoaxster. He actually built what might be called a heads-down display for your bicycle. He refers to it as a headlight because it borrows a similar function. It mounts on the handlebars and shoots light off the front of the bike. But it’s more than just a battery and a bulb, this uses a pico-projector to give that light some meaning. In the video after the break he shows it off on the streets of NYC.

So far he’s only displaying information that has to do with the speed of travel, but the proof is there just waiting for a brilliant new use. Feeding the projector is a Raspberry Pi board. For this prototype [Matt] mounted it, along with the portable cellphone charger which plays the role of the power source, on a hunk of hardboard strapped inside the bike frame.

If you’re thinking of doing this one yourself beware of the BOM price tag. That projector he’s using runs upwards of $400. We wonder if you could hack together a rudimentary replacement with an old cellphone screen and this diy film projector?

Continue reading “Dynamic Bicycle Headlight Uses The Open Road As A Display”

Soldering Small Components For A Video DA

Video DA Board

Video distribution amplifiers are used to amplify a video signal and split it into multiple outputs so multiple displays can be driven. They are also used to correct the gain of an incoming video signal. [Andrew] was having trouble with the video signal from an interferometer, and found the issue was caused by a low output gain. His solution was to build his own video distribution amplifier.

The THS7374 appeared to be the perfect chip for this application. It’s a four channel video amplifier IC, and only requires a few passive components to run. The only problem was the package: a 14 pin TSSOP with 0.65 mm pitch. Not fun to solder by hand, especially if you don’t have a PCB.

[Andrew]’s solution was to build his own breakout out of copper-clad board. He worked under a microscope and cut out a pattern for the part, then soldered 30 AWG wire to the pins to make connections. After cleaning off any copper that could cause a short, the board was working, and the video waveform looked great on an oscilloscope.

After testing, even more gain was needed. [Andrew] ended up cascading two of the amplifiers. This method of prototyping doesn’t look easy, but could be worth it when you need a single board.