Remote Tester

A Simple Circuit For Testing Infrared Remote Controls

Every now and then a remote control acts up. Maybe you are trying to change the channel on your television and it’s just not working. A quick way to determine if the remote control is still working is by using a cell phone camera to try to see if the IR LED is still lighting up. That can work sometimes but not always. [Rui] had this problem and he decided to build his own circuit to make it easier to tell if a remote control was having problems.

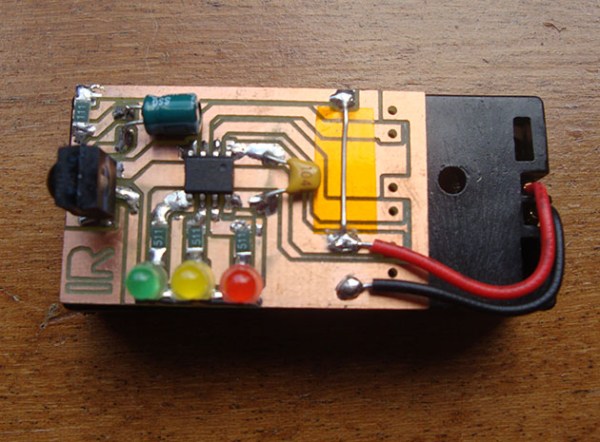
The circuit uses a Vishay V34836 infrared receiver to pick up the invisible signals that are sent from a remote control. A Microchip 12F683 processes the data and has two main output modes. If the remote control is receiving data continuously, then a green LED lights up to indicate that the remote is functioning properly. If some data is received but not in a continuous stream, then a yellow LED lights up instead. This indicates that the batteries on the remote need to be replaced.

The circuit also includes a red LED as a power indicator as well as RS232 output of the actual received data. The PCB was cut using a milling machine. It’s glued to the top of a dual AAA battery holder, which provides plenty of current to run the circuit.

Building Your Own LED-based Home Lighting

We see LEDs used in all kinds of projects but rarely does someone build a home lighting system from scratch with them. [Paulo Oliveira] decided to give the idea a try, included a fading power supply for the LEDs which he built himself. Here you can see the installation at full brightness, but his controller also offers a single lower setting.

We saw [Sprite_TM] use an RGB LED strip to light up his living room. [Paulo] went with individual LED modules instead, all the same color. They are Cree XM-L power LEDs so some thought needs to be put into heat dissipation. All six are mounted along an aluminum strip which serves as the heat sink. They’re wired in series and powered by an old laptop power supply. A PIC 12F683 uses PWM to dim the string via a MOSFET.

The control system for the two brightness levels uses the wall switch. When turned on, the LEDs fade in to full brightness. If you turn the switch off and back on before they are all the way on, the dimmed setting takes over. This was complicated by the capacitance of the PSU but [Paulo] solved that by adding a power resistor.

Getting Connected With Your Home Security System

This simple device, paired with some creating code will let you become your own home security monitoring service. It’s called the PhantomLink and [Adam] started the project as a commercial venture. He recently decided to go open source with the hardware and will soon be posting a guide on how to program your own web interface too.

We just looked in on a project which takes control of a security panel using an Arduino. The PhantomLink is focused on not just reusing the input hardware, but monitoring the whole system. It sounds like several different protocols are supported.

The DB9 jack is intended for use with an adapter you can wire yourself. Basically just tap into the terminal block on the alarm controller for your house, then route those connections to the proper pins. A PIC 12F683 monitors the alarm system, pushing data via the WiFi module mounted on the board. With that web connection you can do anything you want by catching and formatting the data.

Monitoring A Clothes Washer With An Accelerometer

[Viktor’s] washing machine did a good job of cleaning his clothes, but it kept a bit too quiet about it. The machine doesn’t have an audible alert to let him know the cycle has finished. He decided to build his own alarm which can just be slapped on the side of the machine.

You can see that a couple of magnets hold the board to the metal housing of the washer. The board doesn’t actually connect to any of the machine’s circuitry so this should work about equally as well for any unit. The detection is based on motion, thanks to a Freescale MMA7361 3-axis accelerometer. When he starts a load of wash he flips the power switch for the board on. The PIC 12F683 that drives the device starts monitoring the accelerometer for changes. If it goes for more than about one minute without reading motion the piezo buzzer starts beeping. It’s a fun and easy solution along the same line of this oven pre-heat alarm add-on.

Metal Detection Using An Inductor Instead Of A Clock Crystal.

This project from a few years back is an interesting take on a metal detector. Instead of building a detection circuit, [Bruno Gavand] replaced the external clock crystal with an inductor. Here you can see the inductor coil next to the PIC 12F683. You can see two components jumping from one breadboard to the other. These are smoothing capacitors on the inductor lines.

The watchdog timer for the chip is run by the internal RC oscillator. When the external crystal receives a pulse due to metal inducing a current in the coil, the value of the watchdog timer is compared to it. This data is filtered and if the proper parameters are present the green LED blinks. This is bicolor LED. If the inductor circuit is functioning properly it will blink red at power up. [Bruno] says that results will vary based on that inductor so you may need to try a few to get the calibration light to blink.

We’re thinking this would make a simple stud finder (by detecting where the nails/screws are in the wall). Check out the demo after the break, then let us know what you would use this for by leaving a comment.

Continue reading “Metal Detection Using An Inductor Instead Of A Clock Crystal.”

DIY Intervalometer Uses A Great Looking Enclosure

That finished look for your project is all about the enclosure you find to host it. We think [Punge] really did a great job with the case for this DIY intervalometer. The build section of the project page links to the company that makes the enclosures. They’re meant to host round PCBs with several options for button configuration. Combine this with enough space for a coin cell and you’ve got a great looking custom device.

The intervalometer itself is much like others we’ve seen. It uses an audio-jack connector to control the camera. You have the option of using a three or four contact version depending on what your camera supports. The PIC 12F683 uses an optocoupler with a built-in transistor to do the switching. A single button seen at nine o’clock on the board above is all it takes to start the device off. Press and hold once to wake it up, then wait for your desired interval and press the button again to start the timed shots.

You’ll notice that there is no programming head in this design. A separate board was etched to attach the PicKit, with the surface mount chip just held in place during programming.

Electronic Candle Protects Sleeping Infant

[William] developed this temperature candle as a tool to help keep babies safe as they sleep. It seems that ambient temperature has an effect on Sudden Infant Death Syndrome (SIDS). This device is meant to alert you when room temperature is outside of the recommended envelope.

The board hosts an eight-pin PIC microcontroller (12F683P), a temperature sensor, RGB LED, and a push button. The round PCB is the same size as a votive candle, which is nice except that you’re going to have to drill a hole in your candle holder to accommodate that barrel jack.

The temperature sensor is read by the microcontroller and used to determine the color of the LED. Red is hot, blue is cold, and just right is somewhere in between. But if you’d rather know the exact current temperature you can press the button and it’ll blink out the Celsius reading using blue for 10 degree increments (three blinks is 30 degrees, etc.) and red for single degrees. Don’t miss the demo of the candle in the video after the break.

Continue reading “Electronic Candle Protects Sleeping Infant”