Say What You Will, A Fursuit Is A Lot Of Work.

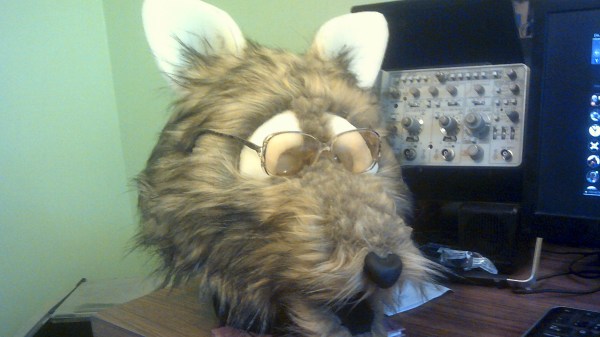
One thing [Dr. Cockroach]’s build log shows is that a fursuit isn’t an easy thing to make.

Furries came out of early American comics and grew into the subculture the internet just can’t leave alone today. Many people take on an avatar of their furry self when participating in this subculture, and one of the prize achievements is to design, commission, or build a fur suit. What [Dr. Cockroach]’s build shows is why some of these suits can easily fetch 10,000USD. It really is a labor of love. It’s also brings up one of his goals in this project, to discover cheaper ways to construct these suits, so other people who share his hobby have a more financially accessible process to join in.

We were fascinated at the construction process. A base was built out of soft foam around a mock head. On this base more foam was layered and carved before the shape of his avatar, Marcus, started to take form. His wife found the testing process particularly humorous, but when he was happy with the arrangement and the movable jaw he began working on the pattern.

The pattern making process is very clever. He layers the foam base with masking tape and then peels it off. It’s easy to then cut the tape strategically until it lays flat. We can definitely see ourselves using this trick to do anything from sheet metal to duplicating plastic forms.

Then comes quite a lot of difficult stitching. We’d never thought about it before, but if you’re trying to simulate fur a lot of attention has to be paid tot he direction the fur lays; further increasing the difficulty.

Wherever your opinion lies, no hacker can turn down a detailed build log, and there are tricks to be learned anywhere if enough attention is paid.

An Arduino And An Enigma All Rolled Into One

This hacker has been wanting to design an Enigma machine simulator for a while, but didn’t take the leap until they realized there was a compact Arduino with a surplus of I/O.

The logs go through all sort of variations on the machine. Everything from a plug board variation similar to the original to a 16 segment LED tester are covered. In one of the posts you can even see it decode a real U-Boat message. 

The earlier revisions are housed in very attractive laser cut cases but the latest designs employ an even more elegant casing solution. The simulator uses 16 segment displays and momentary push buttons for the keys. At its core is a 2560 Pro mini. The write-up contains a lot of detail about the code behind the Enigma and is interesting to read.  Interestingly, the PCB was designed in Fritzing, the EDA software many love to hate.

We love the craftsmanship and attention going into this project and can see it turning into a very appealing kit as it goes through its design cycles.

With PowerCore And FluxLamp, Reflow Is Possible

[nathan] sends in this combo of projects which combine to make a very interesting reflow oven.

First is PowerCore which has two microcontrollers, an ATmega and a ESP8366 working in tandem to turn the AC on and off at set intervals. A GLCD displays the current profiles and WiFi allows for remote control as well. Input is handled by a momentary switch rotary controller. He decided to go this route after reading forums on the commercial controllers and deciding they needed too much fiddling and weren’t hacker friendly enough.

The PowerCore then attaches to a halogen work light. He took the front glass off the halogen light and covered it in aluminum foil. This becomes the base of the oven. The PowerCore and a sensor are attached to the back. Using the lighting element as a heating one makes sense and, as we can see from the curves, appears to provide a very accurate response.

On top of all this [nathan] has documented the project beautifully. The small size and great control bump it way up in our list of reflow builds to recommend.

This FPV Tank Explores The Lawn

Radio control is good and all, and it’s always fun to watch a little vehicle scoot about the backyard. But there’s always something to be said for feeling as though you’re really in control. First person view, or FPV, is the way to do it, and [Brian] has gone down that route with this tidy tank build.

The tank is 3D printed, from the chassis right down to the wheels. There’s even a moving “eye” up front containing the FPV camera, controlled by a servo, allowing the driver to look up and down. A 5.8 GHz transmitter is used to send the signal back to the driver’s goggles. The tracks are a snap-together design that are fully 3D printed, requiring no additional metal links or hardware. Forward propulsion is courtesy of a pair of 12 volt gear motors, driven from an L298N motor driver. An Arduino Nano is used in conjunction with Spektrum RC gear to receive signals and tell the tank where to go.

It’s a tidy build that would be great fun to drive through the bushes or through the house. We’ve seen even tinier builds used to inspect crawlspaces. If you build one of your own, be sure to let us know.

Learn Water Purification Techniques With This STEM Learning Kit

We see a lot of great STEM education projects. These projects have a way of turning into something much larger. How many commercial devices and machines are built on Raspberry Pi’s and Arduinos? [Ryan Beltrán] is using common materials to teach people how to clean water. This particular kit demonstrates a water purification process called electro-coagulation.

When current is passed through two electrodes suspended in water it changes the surface charge on the suspended solids. This causes the solids, metals, and oils to clump together which makes them considerably easier to treat and clean.

The kit consists of a jar, electrodes, some 3D printed parts, and a pre-flashed Arduino. There’s also salts and filters to finalize the purification process. Students can start the experiment right away and if they’re inspired they’ll have all the tools to try more advanced techniques.

Often STEM kits lean heavily to robotics or computer science, but there are so many vast and interesting fields out there with problems that need to be solved.

Don’t Forget The Baby!

It must be a common worry among parents, that they might forget their offspring and leave them in the car where they would succumb to excessive heat. So much so that [Matt Meerian] has produced an alarm that issues a verbal reminder to check for the youngster when the vehicle is turned off.

It’s a simple enough device, with an ATmega328, an off-the-shelf MP3 module, and a power supply regulator to deliver 5 V into a pair of supercapacitors from the vehicle accessory socket’s 12 V. The idea is that the  power is cut when the vehicle ignition is turned off, and that the supercaps have enough energy within them to play the reminder sample for the driver to check for forgotten children.

We can’t help remarking that a percentage of cars leave their accessory sockets turned on all the time, so it would be interesting to ponder how one might detect the car being turned off in that case. He muses about using a surplus cell phone instead of his ATmega328, perhaps the MEMS sensor on a phone could also be used to detect the vibrations of the engine stopping as it was turned off. Such cars notwithstanding, this unit is a straightforward solution to the problem in hand.

A Mini Vending Machine To Ramp Up Your Sales

A common sight in the world of hackerspaces is an old vending machine repurposed from hawking soda cans into a one-stop shop for Arduinos or other useful components. [Gabriel D’Espindula]’s mini vending machine may have been originally designed as an exercise for his students and may not be full sized, but we can see it or machines like it taking away some of the demand for those surplus models.

Its construction mimics that of some older 3D printers in using laser-cut ply to form the components of a box. Behind a clear lockable door are the shelves containing the products, at the back of which are continuous rotation servos that will drive the spiral Archimedes screws that eject the products. To the side is a membrane keypad and display, and the whole is drawn together with an STM32 board and an Arduino. It supports both RFID card login and keyboard login, and though it’s not finished we can see it forming the basis of a very useful system.

He’s posted the most recent progress in the form of a video that we’ve placed below the break. All the various files are available for download, so should you fancy one yourself then you have a good chance of success.

Continue reading “A Mini Vending Machine To Ramp Up Your Sales”