Go Back In Time With A Laser Cut Wood 3D Printer Kit

About a decade ago, the only way the average hacker was getting their hands on a desktop 3D printer was by building it themselves from a kit. Even then, to keep costs down, many of these kits were made out of laser cut wood. For a few years, wooden printers from companies like MakerBot and PrintrBot were a common sight in particularly well equipped hackerspaces. But as the market expanded and production went up, companies could afford to bend metal and get parts injection molded; the era of the wooden 3D printer was over nearly as soon as it had started.
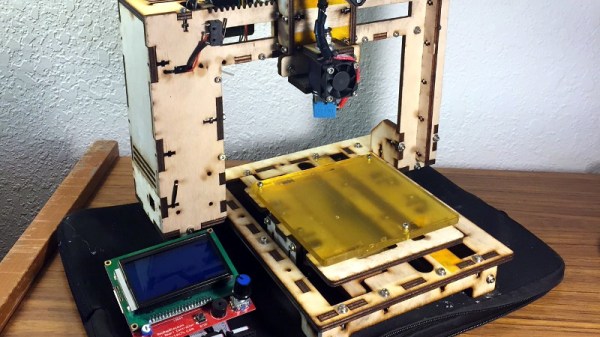
But [Luke Wallace] thinks there’s still some life left in the idea. For his entry into the 2019 Hackaday Prize, he’s proposing a revival of the classic laser cut 3D printer kit. But this time, things are a bit different. Today, laser cutters are cheap enough that these kits could conceivably be manufactured at your local hackerspace. With a total bill of materials under $100 USD, these kits could be pumped out for less than the cheapest imports, potentially driving adoption in areas where the current options are too expensive or unavailable.

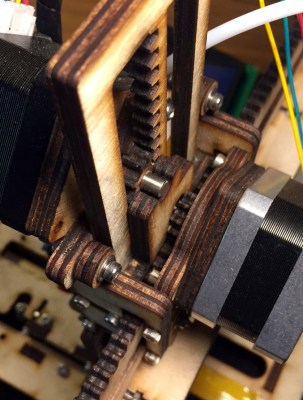
Of course, just a laser cut wood frame wouldn’t be enough to break the fabled $100 barrier. To drive the cost down even farther, [Luke] has redesigned essentially every component so it could be made out of wood. If its not electronic, there’s a good chance its going to be cut out of the same material the frame is made out of. Probably the biggest change is that the traditional belt and pulley system has been replaced with rack and pinion arrangements.

After cutting all the pieces, essentially all you need to provide is the stepper motors, a RAMPS controller, the hotend, and the extruder. He’s even got a design for a laser cut wood extruder if you want to go back to the real olden days and save yourself another few bucks. Or skip the LCD controller and just run it over USB.

But what do the prints look like? [Luke] has posted a few pictures of early test pieces on the project’s Hackaday.io page, and to be honest, they’re pretty rough. But they don’t look entirely unlike the kind of prints you’d get on one of those early printers before you really got it dialed in, so we’re interested in seeing how the results improve with further refinements and calibration. (Editor’s note: Since writing this, he got backlash compensation up and running, and it looks a ton better already. Very impressive for something running on wooden gears!)

Hackaday Prize Mentor Session: Product Engineering With Giovanni Salinas

This year we’ve added something new and exciting to the Hackaday Prize mix. Mentor sessions link up hardware teams with experts from backgrounds useful in moving their product development forward. We’ve assembled a dream team of mentors, and today we’re excited to publish video of the first mentor session which you’ll find embedded below. It’s a great chance to hear about the engineering going into each entry, and to learn from these back and forth conversations that help move the effort forward. We encourage you to sign up for an upcoming session!

Giovanni Salinas, the Product Development Engineer at Supplyframe’s DesignLab, is the mentor for this session. He has a huge breadth of experience in product development, and in today’s installment he’s working with four different product teams.

Continue reading “Hackaday Prize Mentor Session: Product Engineering With Giovanni Salinas”

Modern Evolution Of The Classic Water Rocket

Whether it was home-built from scraps or one of the various commercial versions that have popped over up over the years, there’s an excellent chance that the average Hackaday reader spent at least a couple of their more formative summers flying water rockets. You might not have realized it at the time, but with shirt soaked and head craned skywards, you were getting a practical physics lesson that was more relatable than anything out of a textbook. Water rockets are a great STEM tool for young people, but in a post-Fortnite world, the idea could use a little modernization to help keep kids engaged.

With his entry into the 2019 Hackaday Prize, [Darian Johnson] hopes to breathe some new life into this classic physics toy. His open source kit would provide a modular water rocket intended for a wide range of ages thanks to various payloads and upgrade options. The younger players would be content to simply see it take off, but high school students could outfit the craft with an electronic payload to capture performance data or an automatic parachute.

[Darian] has been building and flying rockets with his own children and other youth in community for years now, and has found them to be a huge hit. They became so popular that he started thinking of a way to not produce them in larger quantities, but make them stronger so they would survive more flights.

Of course, the fuselages are easy enough; there’s no shortage of one-liter bottles you can recycle. But for the nose cone, fins, and ultimately even the launch pad, [Darian] turned to 3D printing. This allows him to continually optimize the design while delivering repeatable performance. When he had a semi-printable water rocket on his hands, he started to wonder if he could get older kids interested by adding some electronics into the mix.

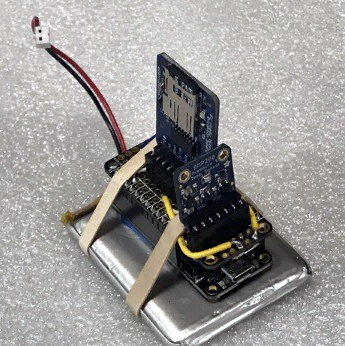
His current proof of concept is a flight data recorder using a Adafruit nRF52 Bluefruit LE Feather, a BMP280 sensor to determine altitude via barometric pressure, and an SD card breakout for local data storage. Long term, [Darian] wants to be able to stream flight data to student’s phones over Bluetooth, with the SD card providing a local copy which can be analyzed after the flight.

[Darian] has leaned heavily on the open source community for the various components of his water rocket kit, and is dedicated to giving back. He hopes that his final kit will allow communities to create engaging STEM activities at little to no cost. This includes creating a repository of lesson plans and designs contributed from others experimenting with water rockets. It’s a noble goal, and we’re excited to see how the project progresses.

Bringing Battle Bots Into The Modern Classroom

With the wide array of digital entertainment that’s available to young students, it can be difficult for educators to capture their imagination. In decades past, a “volcano” made with baking soda and vinegar would’ve been enough to put a class of 5th graders on the edge of their seats, but those projects don’t pack quite the same punch on students who may have prefaced their school day with a battle royale match. Today’s educators are tasked with inspiring kids who already have the world at their fingertips.

Hoping to rise to that challenge with her entry into the 2019 Hackaday Prize, [Misty Lackie] is putting together a kit which would allow elementary and middle school students to build their very own fighting robots. Thanks to the use of modular components, younger students don’t have to get bogged down with soldering or the intricacies of how all the hardware actually works. On the other hand, older kids will be able to extend the basic platform without having to start from scratch.

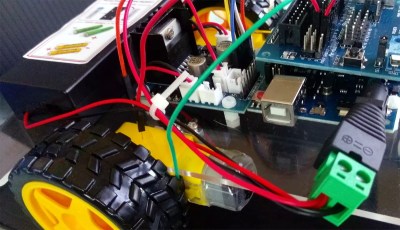
The electronics for the bot consist primarily of an Arduino Uno with Sensor Shield, a dual H-bridge motor controller, and a wireless receiver for a PS2 controller. This allows the students to control the bot’s dual drive motors with an input scheme that’s likely very familiar to them already. By mapping the controller’s face buttons to digital pins on the Arduino, additional functions such as the spinner seen in the bot after the break, easily be activated.

[Misty] has already done some test runs with an early version of the kit, and so far its been a huge success. Students were free to design their own bodies and add-ons for the remote controlled platform, and it’s fascinating to see how unique the final results turned out to be. We’ve seen in the past how excited students can be when tasked with customizing their own robots, so any entry into that field is a positive development in our book.

Continue reading “Bringing Battle Bots Into The Modern Classroom”

Tracking Stolen Bikes With Narrowband IoT

For his entry into the 2019 Hackaday Prize, [Marin Vukosav] is working on an ambitious project to create a small GPS tracking device which utilizes Narrowband IoT (NB-IoT) for long range communications. Rather than using a GSM modem which would suck the batteries dry in short order, NB-IoT can theoretically maintain a connection within a 10 to 15 kilometer range while keeping the energy consumption low enough that the tracker could go up to a year before needing to be recharged.

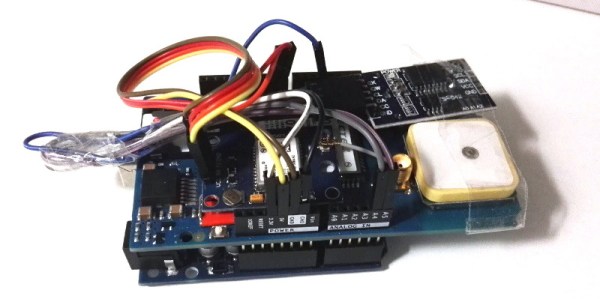
At this point, the hardware is still in the proof of concept phase. [Marin] is using an Arduino with a GPS shield and a SIM7000 NB-IoT module to experiment with the concept, but ultimately says he wants to shrink the hardware down to the point it could fit inside of a bike light. Looking even farther ahead, he’d like to make deals with bike manufacturers so the module could be integrated into the frame itself, where a thief wouldn’t be able to access it at all.

Of course, nothing says this technology has to be limited to bikes. If [Marin] can get it small enough, and reach even half of his goal battery life, he’d have a very compelling product on his hands. Who wouldn’t want to add something like this to their long-range drone in case it gets lost?

There’s still a long way to go on this project, and it’s not all hardware. [Marin] will also have to create the software side of things, a site where you can register your tracker and be able to view its near real-time position on the map. It’s a lot of work, especially if you’re planning on turning it into a commercial product, and we’re very interested to follow along and see where the project goes throughout the year.

A Cyclonic Vacuum Cleaner On A Hacker’s Budget

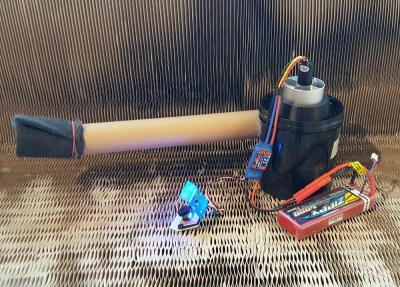
Have you ever seen a product in the store and been shocked at what the manufacturer was trying to charge for it? Since you’re reading Hackaday, we can safely assume the answer to that question; building a homebrew version of some commercial product for a fraction of its retail price is practically a rite of passage around these parts. So it’s fitting that for his entry into the 2019 Hackaday Prize, [Madaeon] submitted the “DIYson”, an open source version of a popular high-end vacuum made by a British company who’s name you can surely guess.

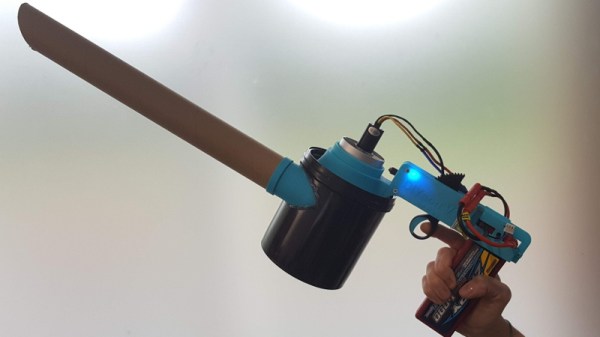
As [Madaeon] explains on the project’s Hackaday.io page, the idea behind “cyclonic” vacuums is not particularly complex. Essentially, with a powerful enough blower and carefully designed chamber, the incoming air will spin around so fast that dust is pulled out by centrifugal force. The trick is getting it working on a small enough scale to be a handheld device. Especially given the energy requirements for the blower motor.

Luckily for the modern hacker, we’re living in the “Golden Age” of DIY. With a 3D printer you can produce plastic components with complex geometry, and thanks to a resurgence in remote controlled aircraft, powerful motors and high capacity lithium-ion batteries are easily obtainable. Powered by what’s essentially the hardware that would go into an electric ducted fan plane, the total cost of all the electronics for the DIYson comes in right around $60 USD. Even with a roll of printer filament added to the mix, you’re still comfortably at half the cost of the “name brand” alternative.

With some refinements, [Madaeon] hopes that this open source dust-buster will be a staple of labs and hackerspaces all over the world. Judging by the performance his early prototype shows in the video after the break, we know we wouldn’t mind having one.

Continue reading “A Cyclonic Vacuum Cleaner On A Hacker’s Budget”

The Raspberry Pi Portable Console You Wish You Had

A retro game console is a fun all-arounder project. You’ve got electronics, mechanical design, and software considerations. For this year’s Hackaday Prize, is going all in. The Portable Retro Game Console with 7.9-inch Display is a work of art, and everything that a retro console could be.

This build is based on the Raspberry Pi 3 A+ instead of the B model for space-saving considerations. The screen is a beautiful 7.9 inch IPS panel with 2048 x 1536 resolution. Stereo 3 W speakers pump out the tunes, and an 8000 mAh provides somewhere between 3 and 6 hours of play time.

While using a Raspberry Pi 3 for retro gaming is fun, there’s a world of oppurtunity for emulating bigger and badder consoles thanks to more powerful single board computers. The Nvidia Jetson Nano is far more powerful than the Raspberry Pi 3, and could conceivably emulate N64 and PlayStation games. The Atomic Pi, the fantastic computer that totally isn’t industrial surplus repackaged as an educational computer, already is proven to emulate N64 games. Imagine taking a portable console out of your backpack and playing Conker’s Bad Fur Day on the bus. Oh, that’s cheeky, but it is possible thanks to the amazing work of hardware creators.