3D Printed Singularity Drive Platform

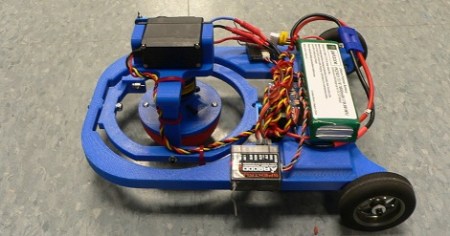
[Silas] is a student at Olin College and came up with a platform using the singularity drive system in his spare time.

We covered a LEGO build of a singularity drive earlier this month. Instead of wheels, treads or legs, this drive system has a hemisphere spinning along its vertical axis. Interestingly, the robot does not change the speed or direction of its drive motor at all. IEEE is now calling this drive system a “singularity drive,” because math.

Continue reading “3D Printed Singularity Drive Platform”

Re-manufacturing Inkjet Cartridges For 3d Printing


[Nullset] uses inkjet printer technology for his 3D printing needs. We usually think of hot-plastic printing like the RepRap or Makerbot when we hear about rapid prototyping, but this setup uses a liquid bonding agent to turn powder into a solid structure. Standard inkjet cartridges can be used to precisely place the bonding agent, but it’s hard on the heads and you have to replace them often. [Nullset] is getting pretty good at it, and decided to write a tutorial on the modifications necessary to print with bonding liquid.

At its core, the method injects binder into the cartridge through one port while using a second for drainage. [Nullset] found that the needle fittings used to inflate a basketball work great for this. He drills a couple of holes that the threaded end of the needles fit into. That connection is sealed with some epoxy, and the tubing that delivers the binder is zip-tied to the needles. A bit of purging is necessary to get rid of any old ink, but after the initial flush you’ll be up and running pretty quickly. He figures the whole process can be one in around 10 minutes once you get the hang of it.

Building A Stepper Driver

[TBJ] is building what he calls a junkbox 3D printer. You can probably guess that he’s trying to salvage most of the parts for the device, and after pulling a stepper motor from an old printer he was in need of a way to control it. What he came up with is a stepper driver that uses discrete components that are easy to acquire and inexpensive. The design calls for two inputs, one that toggles the direction in which the motor will spin, and the other that triggers one step of the motor. A CD4013 dual flip-flop takes care of both of these inputs in one chip package.

The motor is driven by a pair of H-bridges that he built using six transistors each. The trick with a stepper motor is that you need to drive the four poles of the motor to a specific logic level at a specific time. For this [TBJ] uses a CD4017 decade counter. A network of diodes grounds half of the output lines based on the flip-flop that controls direction. Our friend the 555 timer provides a clock for the circuit, keeping everything moving at a predefined rate. Check out the video after the break for an explanation and demonstration.

Continue reading “Building A Stepper Driver”

Minecraft Is Now A 3d Design Tool

[Cody Sumter] and [Jason Boggess] are students at the MIT Media Lab, and they just came up with Minecraft.Print(), an attempt to create a bridge between Minecraft and the real world via 3D Printers.

The print is first prepared by placing obsidian, diamond, gold, and iron blocks on opposite corners of the model in Minecraft. From there, a Python script takes over and parses the world map to generate an .STL file for a RepRap or MakerBot.

So far, [Cody] and [Jason] have printed a few Companion Cubes and the model of the Enterprise D. We’re pretty impressed with the resolution of the prints, especially considering the original model is voxelated. The prints look very nice, and right now we really want to print out all the cool stuff we’ve seen, like Isengardgigantic CPU, or maybe a Minecraft 3D printer.

Minecraft.Print() sure is a nice program [Cody] and [Jason] have there. It would be a shame if anything happened to it. Check out a video demo after the break.

Continue reading “Minecraft Is Now A 3d Design Tool”

3D Printer Looks Factory Made

[Richard Sum] came up with a great looking 3D printer and put his project up as a campaign on IndieGoGo.

[Richard]’s ‘SUMPOD’ is based off the reprap like a lot of other 3D printers, but the SUMPOD has a look of professionalism to it; the printer looks like something that would come from a factory. We think a lot of thought went into the design and fabrication of this printer.

The specs of the machine aren’t too bad either. It’s build area is 150x150x100 mm, or nearly 2 inches than the Makerbot Thing-O-Matic. We asked [Richard] about the drive system of the machine, and he told us there is a linear bearing/belt setup for the x and y axes with a screw drive for the z axis. The electronics are standard NEMA 17 motors and reprap RAMPS fare, so everything electrical is tried and true.

[Richard] plans on adding a Dremel attachment for pcb and lithophane milling. We hope that some design files of the SUMPOD released, but in the mean time we’re really looking forward to seeing the progress of this project.

Making A 3D Printer Work Wirelessly

Looking for more ways to enhance his 3D printer, [JJ] decided to make it wireless. He got his hands on some $10 Bluetooth modules and figured this would be just the thing to make the link with his laptop.

They came as surface mount modules, so the first thing he had to do was develop a breakout board that he could patch into his Ultimaker 3D printer. This provided a nice opportunity as he needed to do some level converting to make the 3.3V module play nicely with his 5V CNC electronics. The first version of the board turned out well but he had really a poor communications range. The second version, which is pictured above, hangs the module’s antenna off the edge of the breakout board and works a lot better.

We’ve embedded a clip after the break that walks through the development of this board. [JJ] shared the Eagle CAD files as a megaupload link, but we’ve also mirrored the file after the break for your convenience.

Continue reading “Making A 3D Printer Work Wirelessly”

Print Your Own Header Shrouds

Don’t get us wrong, printable whistles are cool and all, but these printable header shrouds make us think that filament printers like the Makerbot and RepRap might just be worth their salt. This utilitarian purpose is a departure from the souvenirs, toys, and art that we’re used to seeing from the expensive development toys tools.

The six and ten pin header shrouds are designed for a snug fit that makes it easy to glue them onto the plastic spacers of male pin headers. We use IDC plugs and ribbon cable all the time in our projects, but never seem to order shrouded connectors; this is perfect for us. It makes us wonder what other PCB-friendly printable designs we’ve been missing out on? Surely someone’s been printing stand-offs with threaded inserts, right? If you know of something useful that we can share with the rest of the readers, don’t hesitate to send in a tip.

[via Dangerous Prototypes]