Autonomous Air Boat Vs Lake Washington

Autonomous vehicles make a regular appearance around here, as does [Daniel Riley] aka [rctestflight]. His fascination with building long-endurance autonomous vehicles continues, and this time he built an autonomous air boat.

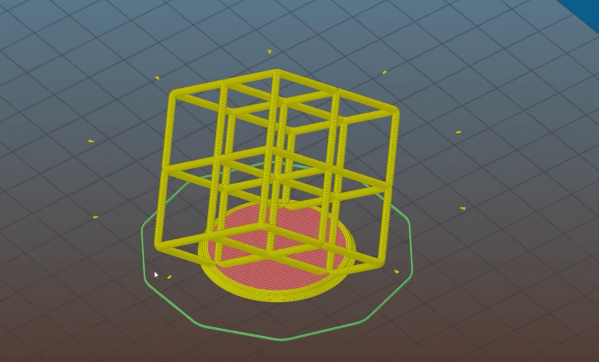
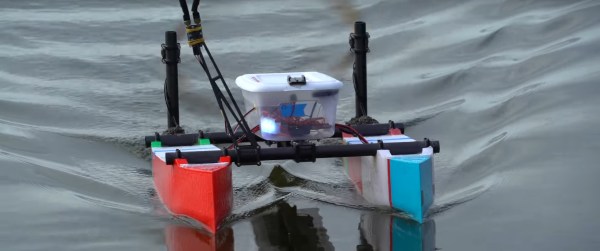
This craft incorporates a lot of the lessons learnt from his autonomous boat that used a plastic food container. One of the biggest issues was the submerged propellers kept getting tangled in weeds. This led [Daniel] to move his props above water, sacrificing some efficiency for reliability, and turning it into an air boat. The boat itself is catamaran design with separate 3D printed hulls connected by carbon fibre tubes. As with the tupperware boat, autonomous control is done by the open source Ardupilot software.

During testing [Daniel] had another run in with his old arch-nemesis, seaweed. It turns out the sharp vertical bow is a nice edge for weeds to hook on to, create drag, and screw up the craft’s control. [Daniel]’s workaround involved moving the big batteries to the rear, causing the bows lift almost completely out of the water.

With a long endurance in mind right from the start of the project, [Daniel] put it to the test with a 13 km mission on Lake Washington very early one morning. For most of the mission the boat was completely on its own, with [Daniel] stopping at various points along the lake shore to check on its progress. Everything went smoothly until 10 km into the mission when the telemetry showed it slowing down and angling off course, after which is started going in circles. Lucky for Daniel he was offered a kayak by a lakeside resident, and he managed to recover the half sunken vessel. He suspects the cause of the failure was a slowly leaking hull. [Daniel] is already working on the next version, and were looking forward to seeing what he comes up with. Check out the video after the break. Continue reading “Autonomous Air Boat Vs Lake Washington”

3D Printing Batteries

We’ve all gotten pretty adept at 3D printing keychains and enclosures. Some people can even 3D print circuit boards to an extent. But the real goal is a Star Trek-style replicator that just pushes out finished products. Printing different components would be a key technology and unless you want to supply external power, one of those components better be a battery or other power source like a solar cell. A recent paper entitled Additive Manufacturing of Batteries explores this technology. The paper is behind a paywall, but you can probably find a copy if you are persistent.

Some of the techniques are pretty exotic. For example, holographic lithography can produce high-performance lithium-ion batteries. However, some of the processes didn’t sound much different than some of the more common printing techniques employed by desktop printers, although with more exotic materials. For example, some batteries can be made with inkjet printing and even fused deposition printing. Continue reading “3D Printing Batteries”

Rarely Adjusted Slicer Setting Makes A Difference

When you 3D print something, you probably adjust the layer height based on your desired print quality. Speed is another parameter that many people adjust. But what about extrusion width? The parameter is there, but most people leave it at the defaults. [Stephan] wondered about it, and after running some tests, made a video you can see below trying to determine if it affected strength and print quality.

The tests were pretty straightforward. Some Benchys and other test pieces at each setting were observed and — in some cases — destroyed. He ranged the width from 90% to 250% of a 0.4mm nozzle. Important to note, his results are from a nozzle that has a flat lip around the aperture. If yours doesn’t look like that, you will see different results.

Continue reading “Rarely Adjusted Slicer Setting Makes A Difference”

Josef Prusa Wants You To Change File Formats

We’ve all been there. You find that cool cat model on Thingiverse — we won’t judge. You download the STL, all ready to watch the magic of having it materialize on your print bed. But the slicer complains it isn’t manifold or watertight or something like that. What a let down. Part of this is due to shortcomings in the STL file format. There’s a newer format available, 3MF, and Josef Prusa and Jakub Kočí would like you to start using it.

STL — short for stereolithography — is a simple format that just holds a bunch of triangles. If you need any information about the part — like colors or materials. Worse still, as in our hypothetical example, there are no definition about how the triangles relate so you can create “bad” STL files. Even properly formed files can be tough to work with. You might scale for inches and the file is set for millimeters, for example.

Turns out 3MF is actually a ZIP archive and it can contain lots of information. The file can contain one or more models, colors, slicing data, copyrights, images, and lots more. The ZIP file is often shorter, too because of the compression. The big deal, though, is that the file format won’t allow nonmanifold models and removes ambiguity so that everything nicely prints. If your slicer stores data into the file — as the Prusa one does — other people using the same software can grab your settings, too.

The format isn’t really that new — it appeared around 2015 — but it hasn’t seen widespread adoption yet. Prusa encourages you to upload models in 3MF even if you also add an STL copy for people who haven’t made the switch yet.

So will you start using 3MF? Or are you already? The file format is open, they say. So if your favorite tool doesn’t like 3MF, you could always add support for it yourself.

Continue reading “Josef Prusa Wants You To Change File Formats”

Stereolithography Goes Big

When it comes to hobby-level 3D printing, most of us use plastic filament deposited by a hot end. Nearly all the rest are using stereolithography — projecting light into a photosensitive resin. Filament printers have typical build volumes ranging from 1,000 to 10,000 cubic centimeters and even larger isn’t unusual. By contrast, SLA printers are often much smaller. A 1,200 CC SLA printer is typical and the cheaper printers are sometimes as little as 800 CCs. Perhaps that’s why [3D Printing Nerd] (otherwise known as [Joel]) was excited to get his hands on a Peopoly Phenom which has a build area of over 17,000 CCs. You can see the video review, below.

He claims that it is even bigger than a Formilab 3L, although by our math that has a build volume of around 20,000 CCs. On the other hand, the longest dimension on the Peopoly is 40 cm which is 6.5 cm longer than the 3L, so maybe that’s what he means. Either way, the printer is huge. That’s nearly 16 inches which is big even for a filament printer. Regardless of which one is bigger, the Peopoly is certainly much less expensive coming in at around $1,800 versus the 3L’s almost $10,000 price tag.

Continue reading “Stereolithography Goes Big”

There’s More To The 3D Print Than The Eye Can See

If you thought CADing designs for 3D printing was hard enough, wait until you hear about this .stl trick.

[Angus] of Maker’s Muse recently demoed a method for creating hidden geometries in .stl files that are only revealed during the slicing process before a 3D print. (Video, embedded below.) The process involves creating geometries with a thickness smaller than the size of the 3D printer’s nozzle that still appear to be solid in a .stl editor, but will not be rendered by a FDM slicer.

Most 3D printers have 0.4 mm thickness nozzle, so creating geometries with a wall thinner than this value will result in the effect that you’re looking for. Some possible uses for this trick are to create easter eggs or even to mess with other 3D printing enthusiasts. Of course, [Angus] recommends not to use this “deception for criminal or malicious intent” and I’d have to agree.

There’s a few other tricks that he reveals as well, including a way to create a body that’s actually a thin shell but appears to be solid: great for making unprintable letters that reveal hidden messages.

Nevertheless, it’s a cool trick and maybe one of those “features not bugs” in the slicer software.

Continue reading “There’s More To The 3D Print Than The Eye Can See”

3D-Printed Transformer Disappoints, But Enlightens

Transformers are deceptively simple devices. Just coils of wire sharing a common core, they tempt you into thinking you can make your own, and in many cases you can. But DIY transformers have their limits, as [Great Scott!] learned when he tried to 3D-print his own power transformer.

To be fair, the bulk of the video below has nothing to do with 3D-printing of transformer coils. The first part concentrates on building transformer cores up from scratch with commercially available punched steel laminations, in much the same way that manufacturers do it. Going through that exercise and the calculations it requires is a great intro to transformer design, and worth the price of admission alone. With the proper number of turns wound onto a bobbin, the laminated E and I pieces were woven together into a core, and the resulting transformer worked pretty much as expected.

The 3D-printed core was another story, though. [Great Scott!] printed E and I pieces from the same iron-infused PLA filament that he used when he 3D-printed a brushless DC motor. The laminations had nowhere near the magnetic flux density of the commercial stampings, though, completely changing the characteristics of the transformer. His conclusion is that a printed transformer isn’t possible, at least not at 50-Hz mains frequency. Printed cores might have a place at RF frequencies, though.

In the end, it wasn’t too surprising a result, but the video is a great intro to transformer design. And we always appreciate the “DIY or Buy” style videos that [Great Scott!] does, like his home-brew DC inverter or build vs. buy lithium-ion battery packs.

Continue reading “3D-Printed Transformer Disappoints, But Enlightens”