Heated Aluminum Bed For MakerBot

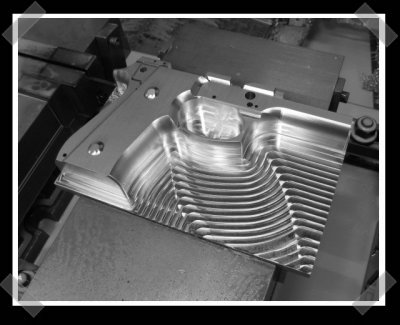
[Keith] built this aluminum-plate heated build stage for his MakerBot 3D printer. We just saw a different MakerBot heated build stage yesterday that relied on glass as the printing surface. Keith’s design is similar to the aluminum RepRap bed but scaled down for the MakerBot. He had a piece of aluminum machined the to correct dimensions, and perfectly flat to use as the printing surface. The yellow surface is caused by Kapton tape applied to the top of the plate. This heat-resistant covering is perfect to print on, resulting in glossy smooth surfaces that are easy to remove once the printed part has cooled. He’s working on improving his mounting technique to achieve prefect level so that he can print without a raft.

[Keith’s] writeup is phenomenal. He’s sharing knowledge in a way that is useful even if you’re not building the exact same kind of project. Follow his lead with your own write-ups, then let us know once you’ve posted them.

[Thanks Marty]

DIY Aluminum Heat Sink Casting

[Peter Wirasnik] has been casting his own aluminum heat sinks. He’s working on capturing the heat from a car’s exhaust system and turning it into electricity, kind of like the candle generator. In the photo above a standard heat sink is bolted to one side of a Peltier cooler with [Peter’s] own casting on the bottom. That casting will connect to the exhaust pipe and transfer heat to the Peltier while the other heat sink keeps the opposite side relatively cool. What results is a voltage between 600mV and 1V.

We’re not quite sure what the end product will be but the casting process is fascinating. He carves the shape of the piece he wants to cast from Styrofoam and embeds it in a box of sand. He then melts salvaged aluminum in a cast iron frying pan using what looks like a propane torch. Once molten, he pours the aluminum into the mold and it burns away the Styrofoam as it fills the void. A little cleanup and he’s got the heat conductive mounting bracket he was after.

CNC Project Roundup

We asked for CNC projects, and wow did you guys deliver!

First up is [J-J Shortcut’s] MDF based CNC. He’s made three thus far, with the most recent costing about 180 euro and taking 2 months to build.

[Qwindelzorf] has also constructed a multitude of CNC machines including this industrial size router and this smaller miller.

Finally, [Mick’s] large steel CNC which just made its first cut only a week ago!

Keep up the great work guys, CNC machines are not easy to build and your accomplishments are ones for the record books.

Aluminum IPhone Dock

finished_dock_with_iphone

Last week we mentioned an article to cover up that ugly iPod dock; [Jozerworx] did one better by creating his own iPhone dock entirely. He had access to a machine shop where he combined some spare aluminum with an existing iPhone connection cable, but mentions the dock could probably be created with basic hand tools and a power drill. The design is quite minimalist and we would go as far as to say it has that shiny-and-made-by-apple-so-I-have-to-buy-one look. Alternatively, frosted acrylic with some leds would probably look pretty cool too, maybe it would blink whenever there is activity. What kind of dock would you hack?

Etch Aluminum Control Panels

This clever Instructable demonstrates how to etch beautiful aluminum control panels for electronics projects. We like how similar this process is to DIY circuit board etching. Both abide by the same technique and use blue transfer paper. The primary difference is in the use of muriatic acid and hydrogen peroxide for etching aluminum.

Massive Etch A Sketch From TV Screen

[youtube=http://www.youtube.com/watch?v=Mhu3zojL5Y4]

[Jeri] put together an absolutely massive Etch A Sketch for The FatMan and Circuit Girl show. She had removed the DLP chip from an HD rear projection TV and decided to repurpose the 52inch screen. The movement mechanism uses pulleys from screen doors with nylon lines. The two sets of lines are fed in a criss cross pattern so that the parallel lines move in the same direction. The lines move tent poles in the x and y which controls the movements of the golf tee stylus. It’s driven by two high torque motors from $9 Harbor Freight 18V drills. They tried several different powders, but ended up using aluminum powder from an original Etch A Sketch because it sticks to everything. It will eventually be hooked up for IRC bot control once they get a large enough h-bridge.

[via adafruit]

CNC Milling Gun Parts


Gun issues aside, [Justin]’s been CNC milling his own gun parts for quite a while. We’ve been a fan of his work simply because of the technical challenge that this sort of milling presents. Even if you’re anti-gun, you should check out the work he’s been turning out. Pictured is one of his early projects: a 92fs Beretta frame in the process of being milled from a solid block of aluminum. Our friend the gun nut is insanely jealous of his AR45 lower project.