WS2812b Ambilight Clone For The Raspi

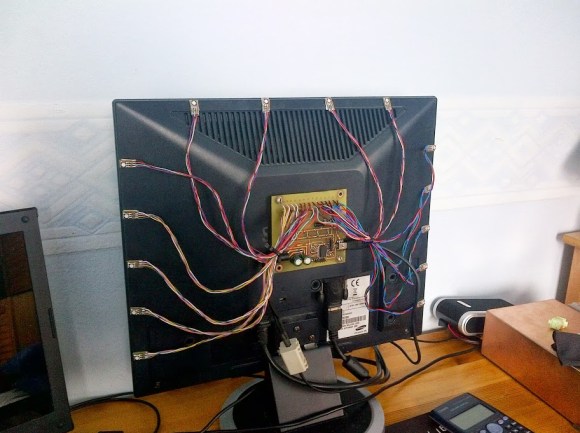
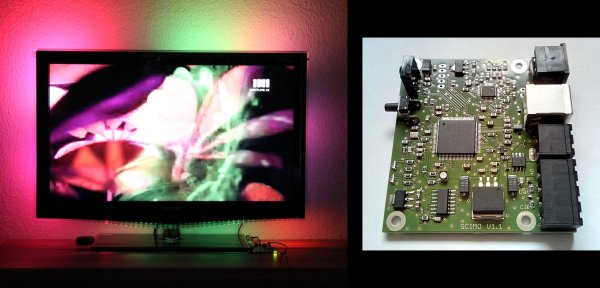
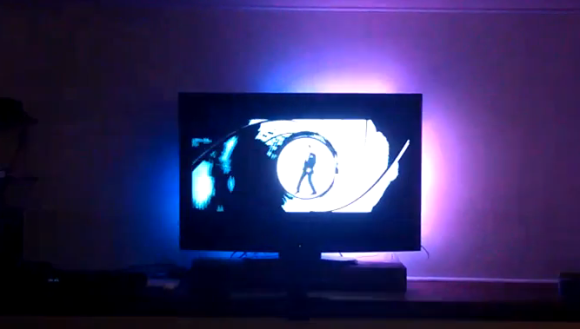
For how often the Raspberry Pi is used as a media server, and how easy it is to connect a bunch of LEDs to the GPIO pins on the Pi, we’re surprised we haven’t seen something like Hyperion before. It uses the extremely common WS2812b individually controllable RGB LEDs to surround the wall behind your TV with the colors on the edges of the screen.

One of the big features of Hyperion is the huge number of LEDs it’s able to control; a 50 LED strip only eats up about 1.5% of the Pi’s CPU. It does this with a “Mini UART” implemented on the Pi running at 2MHz.

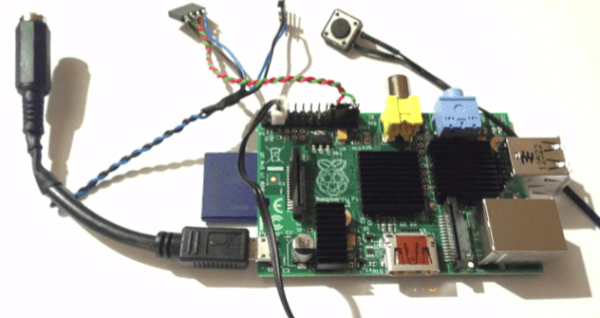
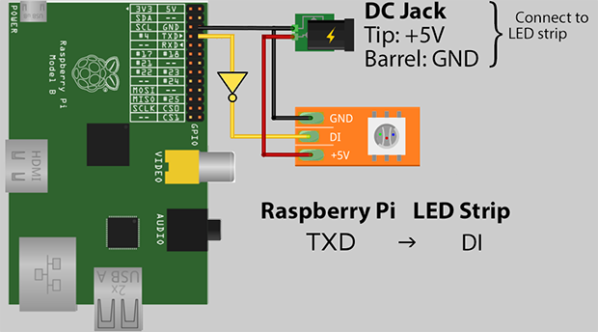
There’s only one additional component needed to run a gigantic strip of RGB LEDs with a Pi – an inverter of some sort made with an HCT-series logic chip. After that, you’ll only need to connect the power and enjoy a blinding display behind your TV or monitor.

Thanks [emuboy] for sending this one in.


No Computer Ambilight Clone Uses A Computer

It may seem confusing that you’re looking at a Raspberry Pi when this hack is about an Ambilight clone system that doesn’t need a computer. The point here is that this system works no matter what your video source is, where many projects in the past have required the video to be playing from a computer.

This hack follows in the same path of the ARM based custom job we was almost a month ago. Just like that project you use an HDMI splitter to gain access to the feed going to your television. The split signal is fed into an HDMI to composite video adapter. The composite signal is captured by a USB video encoder. The GPIO header drives a strip of addressable RGB LEDs. The whole thing is powered as one using a bit of cable hacking.

It’s slightly convoluted. But all of the components are easy to source and relatively cheap. The one caveat is that it works best if you are already using a hardware HDMI source selector instead of the one build into your TV. That way there is just one HDMI cable going to the television, and this can siphon off of that feed.

Continue reading “No Computer Ambilight Clone Uses A Computer”

Computer Monitor Ambilight Clone Shows Remarkable Performance

ambilight-project-discreet-led-boards

Check out this fantastic Ambilight clone for a computer monitor which [Brafilus] has been working on for a few years. It’s actually the third revision and watching the demo video below left our jaws agape.

Details are only available as comments on the YouTube page. But he’s given us just enough to be satisfied. His self-etched board hosts a PIC 18F14K50 microcontroller. It is talking to each of the 28 LED pixels which themselves live on tiny hunks of diy PCB as well. He wrote his own PC software in C# to capture the colors around the edges of the screen. He also worked hard to ensure there are plenty of tweaks available for true color matching between the monitor and what your eye sees bouncing off of the wall.

If you’re looking for something like this on your television set go back a couple of days and check out that standalone unit.

Continue reading “Computer Monitor Ambilight Clone Shows Remarkable Performance”

Ambilight Clone Uses Video Pass-through; Needs No Computer

To the best of our knowledge all of the Ambilight clones we’ve covered over the years have one thing in common. They need a computer to do the image processing. This one is different. The PCB seen on the left right is all you need for the video processing. The project is called SCIMO and is the handiwork of a hacker named [Keiang].

There are only few times that the DRM built into the HDMI standard has pissed us off. This is one of them. Because of HDCP and licensing issued revolving around HDMI [Keiang] didn’t use HDMI pass through. Instead he uses an HDMI to S-Video converter. This board acts as an S-Video pass through, analyzing the signal using an STM32 ARM chip before the video signal continues on to the television. It still produces a respectable picture, but wouldn’t it have been cleaner if he could have gone with the HDMI standard?

UPDATE: Thanks for the comments on this. It looks like the TV is getting an HDMI signal. The board is fed by the HDMI to S-Video converter which itself is getting HDMI in parallel with the television thanks to a splitter.

Where other examples use Boblight on a PC for processing this manages to do so as a standalone embedded system. It also offers quite a bit of flexibility when it comes to choosing the LEDs, supporting pixels that use DMX512, WS28xx, or TM18xx protocols.

Continue reading “Ambilight Clone Uses Video Pass-through; Needs No Computer”

Ambilight Clone Has Meaningful Amount Of Resolution

james-bond-ambilight-clone

We don’t have an Ambilight clone on our own home theater, but seeing this one in action makes us wonder if we shouldn’t add it to the ever-growing list of projects we need to tackle (right below that POV display we’ve been putting off for years). [Falldeaf] built the colored light augmentation system using a set of WS2801 controlled LED pixels. There are a lot of them, and this results in the ‘meaningful resolution’ we mentioned in the title. The image on the screen is the opening to a James Bond film. You’ll remember that the camera shot down a rifle barrel follows him as he walks across the screen. There’s enough LEDs here to have to the light follow him across the screen as well. This is a nice touch that we don’t see in every Ambilight clone project.

A frame of fake-wood angle bracket holds each LED pixel in place. The entire assembly attaches to the VESA mounting holes on the back of the television. An Arduino addresses the lights while the Boblight package processes the video to acquire the lighting instructions. We think the hue is a bit off, but otherwise it’s a solid offering.

We’re still hoping the Microsoft IllumiRoom becomes a thing.

Continue reading “Ambilight Clone Has Meaningful Amount Of Resolution”

Hacking The Oculus Rift: The Oculight

Our Oculus Rift finally arrived in the mail. I’ll spare you my thoughts on the item itself other than to say it is amazing. There are tons of videos to choose from that show people’s thoughts and reactions, and Ifixit has their usual detailed teardown as well.

The mod I decided to tackle first was the horizontal peripheral vision lights. The shape of the Oculus means that it feels like you are wearing a skii mask, or diving mask. There are big black borders at the far edges of the sides. It would seem that a simple mod would be to add some RGB LEDs and run a simple ambilight clone.

I downloaded the Adalight code and plugged in an RGB LED strip I had sitting around. The rift has some mesh areas at the 4 corners to allow air to move around in there. I took advantage of this so I didn’t even have to cut into the rift… yet. I simply strapped the strip to the rift with the proper LEDs shining through the holes.

The result was decent. Since the LEDs are further back in your peripheral vision than the edge of the screen, it looks like maybe a little light from the surroundings is just “leaking” into the headset. It gives the impression of seeing things that are far beyond the edge of the screen.  A better installation, allowing lights all the way up the left and right sides instead of just the corners might yield even better results.

Ikea Dioder Ambilight Hack

There are a lot of hacks out there for Ikea’s Dioder LED light set. [Lambertus] wanted to create an easy and affordable ambilight while keeping the hardware modifications to a minimum. He also wanted anyone to be able to easily duplicate his work. He recently wrote in to share his successful solution.

The customizations boil down to three main steps: solder the ICSP connector wires to the test points on the Dioder PCB, connect a PIC programmer to the ICSP port (and reprogram), and attach a 5V RS-232 device to the ICSP port. The software was the most difficult part of the procedure for [Lambertus]. The PIC16F684 didn’t contain the required UART and PWM controllers, so he had to get crafty. Fortunately he’s done all the work for us, and lists the necessary .hex file he created on his site.

By adding support to boblight, his new ambilight is working with his media center very nicely. There’s a little demo video after the break.

Continue reading “Ikea Dioder Ambilight Hack”