Mothbox Watches Bugs, So You — Or Your Grad Students — Don’t Have To

To the extent that one has strong feelings about insects, they tend toward the extremes of a spectrum that runs from a complete fascination with their diversity and the specializations they’ve evolved to exploit unique and ultra-narrow ecological niches, and “Eww, ick! Kill it!” It’s pretty clear that [Dr. Andy Quitmeyer] and his team tend toward the former, and while they love their bugs, spending all night watching them is a tough enough gig that they came up with Mothbox, the automated insect monitor.

Insect censuses are valuable tools for assessing the state of an ecosystem, especially insects’ vast numbers, short lifespan, and proximity to the base of the food chain. Mothbox is designed to be deployed in insect-rich environments and automatically recognize and tally the moths it sees. It uses an Arducam and Raspberry Pi for image capture, plus an array of UV and visible LEDs, all in a weatherproof enclosure. The moths are attracted to the light and fly between the camera and a plain white background, where an image is captured. YOLO v8 locates all the moths in the image, crops them out, and sends them to BioCLIP, a vision model for organismal biology that appears similar to something we’ve seen before. The model automatically sorts the moths by taxonomic features and keeps a running tally of which species it sees.

Mothbox is open source and the site has a ton of build information if you’re keen to start bug hunting, plus plenty of pictures of actual deployments, which should serve as nightmare fuel to the insectophobes out there.

Camera Zero Looks Cool, Runs Cool

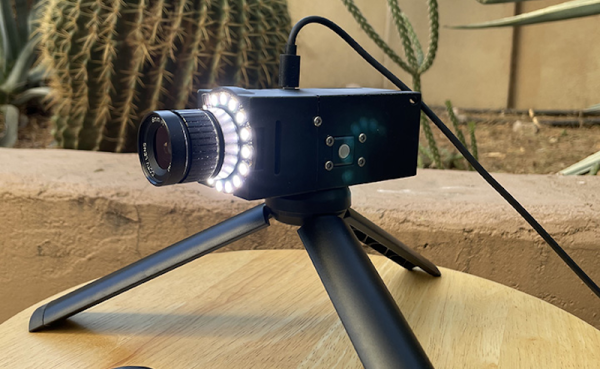
Security cameras are a commodity item these days, but that doesn’t mean [edgett’s] design using a Pi Zero, an Arducam, an LED ring, and active cooling isn’t worth a look. This is a great example of how integrating some off-the-shelf modules and 3D printing can create very professional-looking results. There’s also a trackball interface so you can control the camera. The software, written in Python, is available on GitHub.

The trackball doesn’t move the camera, but it does manage a menu system that lets you capture a photo or video, set the optical parameters like exposure, shutter, and ISO, and launch Camera Remote to offer a Web-based interface instead of the trackball.

If you add infrared illumination, you can swap out the camera for an IR version and have a nice-looking night vision camera, too. The camera is reasonably compact. Not including the lens and the tripod, the camera measures 100 by 44 by 44 mm. So under two inches square and about 4 inches long.

We worried a little about gluing the LED ring down, but then again our phones are all glued together these days, so maybe we should stop fretting. One thing we didn’t see on either site, though, was a picture taken with the camera itself. However, the 12-megapixel camera and quality lens should do a great job. We’ve even seen that particular camera module work with a much smaller computer recently.

Arducam Now Working With The RPi Pico

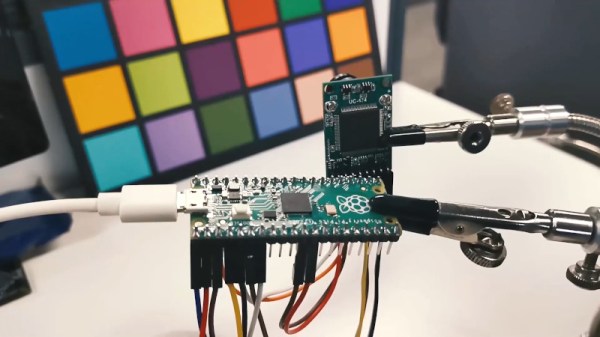
The Raspberry Pi Pico came out of absolutely nowhere, and has taken the maker world by storm. At the low, low cost of $4, packing some seriously grunty original silicon, and even available free on the cover of magazines, it’s already got a legion of fans. As with any new popular platform, there’s a scramble to get everything under the sun running on the hardware. Already, ArduCAM is up and running on the Raspberry Pi Pico!

Based on the OV2640 image sensor, the ArduCAM is useful for microcontroller applications thanks to its onboard JPEG encoder. This limits the amount of RAM needed onboard the microcontroller to deal with the images fed from the camera. With the Pico now on the market, the team behind ArduCAM set about writing a library to get everything playing nicely with the SPI camera. It’s available on Github, complete with an example program so you can check everything is functional right out of the box. The easiest way to get up and running is from a Raspberry Pi environment, but the Pico acts as a USB Mass Storage device so can be programmed from virtually anywhere.

We’ll likely see the whole cavalcade of microcontroller bits and pieces ported to the Pico in the coming months, along with plenty of interesting uses of the special IO features. Video after the break.

Continue reading “Arducam Now Working With The RPi Pico”

Make A Compatible Raspberry Pi Clone – But Your Pi Must Die

The world is awash with Raspberry Pi clones that boast fruity names, but those looking for a piece of the real thing will find their compatibility only goes so far. Shaky Linux distros abound and, with a few honourable exceptions, they are not for the faint-hearted. The reason that a market hasn’t emerged for fully-compatible clones is that the Pi people seem to have a monopoly on the world’s supply of the particular Broadcom SoCs that they use, forcing would-be competitors to source the brains of their outfit elsewhere.

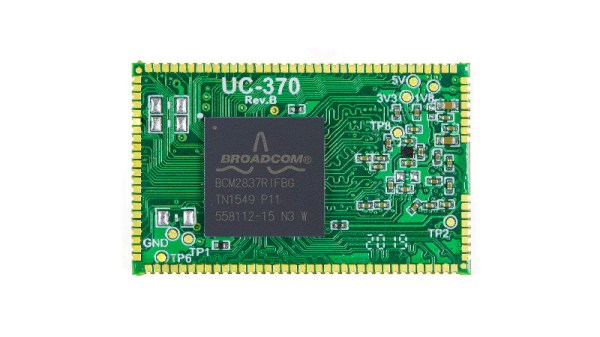
It’s easy to buy a Raspberry Pi SoC though, if you don’t mind receiving a Raspberry Pi along with it. So to make a compatible Pi clone for space-constrained applications, the folks at Arducam removed the SoC from a Pi 3 and designed a surface-mount module board for it, making a 40 mm x 25 mm postage-stamp style system-on-module. It’s not a Raspberry Pi, but it runs Raspbian.

Their board is not one that they will be selling, but it does open up interesting possibilities for others with an eye to creating Pi boards in different form factors. It would be fascinating for example were somebody to produce an open-source module board for a Pi SoC. Some of you might be asking why the existing Compute Module was not suitable for them; in the write-up they cite mechanical issues with the SODIMM socket.

This isn’t the first compatible Pi clone we’ve seen. Aside from the intriguing but short-lived Odroid W there was another even smaller Arducam offering that never made it to market.

ESP8266 Wi-Fi Instant Camera Is A Simple Shooter

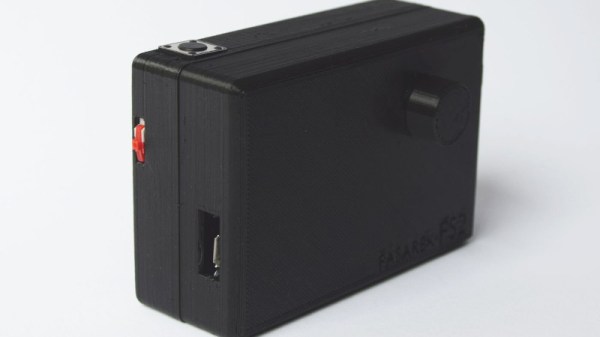
If a camera that combines the immediate gratification of a Polaroid with cloud hosting sounds like something that tickles your fancy, look no farther than this ESP-powered point and shoot camera created by [Martin Fasani]. There’s no screen or complicated configuration on this camera; just press the button and the raw picture pops up on the online gallery. Somehow it’s simultaneously one of the most simplistic and complex implementations of the classic “instant camera” concept, and we love it.

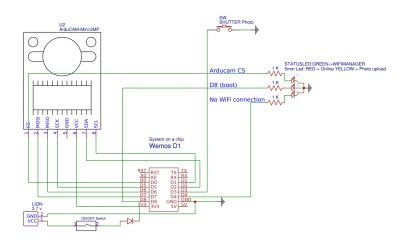
The electronics in the camera itself, which [Martin] calls the FS2, is quite simple. At the core, it’s nothing more than the ESP board, an ArduCAM camera module, and a momentary button for the shutter. To make it portable he added a 2000 mAh Li-ion battery and an Adafruit Micro Micro USB charger. [Martin] added support for an optional 128×64 OLED display for user feedback. Everything is housed in a relatively spacious 3D printed enclosure, leaving some room for possible future hardware.

There are firmware versions for both the ESP8266 and ESP32, so fans of either generation of the popular microcontroller are invited to the party. Processing images is obviously a bit faster if you go with the more powerful 32-bit chip, but on the flip side the ESP8266 uses 3MB of SPI flash as a local buffer for the images during upload, which helps prevent lost images if there’s a problem pushing them to the cloud. The camera is intended to be as simple as possible so right now the only option other than taking still images is a time-lapse mode. [Martin] hopes to implement some additional filters and effects in the future. He’s also hoping others might lend a hand with his firmware. He’s specifically looking for assistance getting autofocus working and implementing more robust error correction for image uploads.

We’ve seen some impressive DIY camera builds using everything from a salvaged thermal sensor to film and molten aluminum. But the quaint simplicity of what [Martin] has put together here really puts his project in a whole new category.

Continue reading “ESP8266 Wi-Fi Instant Camera Is A Simple Shooter”

Super squirter automatic water gun

Motion Activated Super-Squirter Stands Guard

Thieves beware. If you prowl around [Matthew Gaber]’s place, you get soaked by his motion activated super-squirter. Even if he’s not at home, he can aim and fire it remotely using an iPhone app. And for the record, a camera saves photos of your wetted-self to an SD card.

ESPino, ArduCAM UNO and voltage converter boards

The whole security system is handled by three subsystems for target acquisition, photo documentation, and communications. The first subsystem is centered around an ESPino which utilizes a PIR sensor to detect motion. It then turns on a windscreen washer pump and uses pan and tilt servos to squirt water in a pattern toward the victim.

The target acquisition hardware also sends a message to the second subsystem, an ArduCAM ESP8266 UNO board. It takes a burst of photos using an ArduCAM Mini Camera mounted beside the squirter outlet. The UNO can also serve up a webpage with a collection of the photos.

The final subsystem is an iPhone app which talks to both the ESPino and the UNO board. It can remotely control the squirter and provide a video feed of what the camera sees.

One detail of the build we really enjoyed is the vacuum relief valve he fabricated himself. It prevents siphoning through the pump when it’s not on. Don’t miss a demo of the squirter in action after the break.

Continue reading “Motion Activated Super-Squirter Stands Guard”

Zeroing CNC Mills With OpenCV

For [Jay] and [Ricardo]’s final project for [Dr. Bruce Land]’s ECE4760 course at Cornell, they tackled a problem that is the bane of all machinists. Their project finds the XY zero of a part in a CNC machine using computer vision, vastly reducing the time it take to set up a workpiece and giving us yet another reason to water down the phrase ‘Internet of Things’ by calling this the Internet of CNC Machines.

For the hardware, [Jay] and [Ricardo] used a PIC32 to interface with an Arducam module, a WiFi module, and an inductive sensor for measuring the distance to the workpiece. All of this was brought together on a PCB specifically designed to be single-sided (smart!), and tucked away in an enclosure that can be easily attached to the spindle of a CNC mill. This contraption looks down on a workpiece and uses OpenCV to find the center of a hole in a fixture. When the center is found, the mill is zeroed on its XY axis.

The software is a bit simpler than a device that has OpenCV processing running on a microcontroller. Detecting the center of the bore, for instance, happens on a laptop running a few Python scripts. The mill attachment communicates with the laptop over WiFi, and sends a few images of the downward-facing camera over to the laptop. From there, the laptop detects the center of the bore in the fixture plate and generates some G-code to send over to the mill.

While the device works remarkably well, and is able to center the mill fairly quickly and without a lot of user intervention, there were a few problems. The camera is not perfectly aligned with the axis of the spindle, making the math harder than it should be. Also, the enclosure isn’t rated for being an environment where coolant is sprayed everywhere. Those are small quibbles, and these problems could be fixed simply by designing and printing another enclosure. The device works, though, and really cuts down on the time it takes to zero out a mill.

You can check out the video description of the build below.

Continue reading “Zeroing CNC Mills With OpenCV”