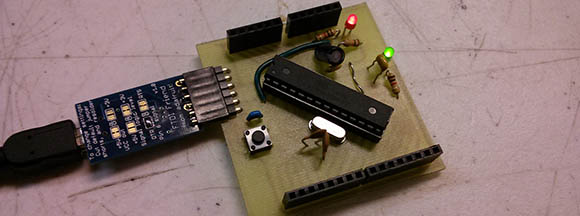
Printing Images With A Wood Burning CNC Machine

printing-images-with-a-wood-burning-cnc-machine

Just to clear up any confusion from the title, this wood burning CNC machine runs on electricity. The wood burner acts as the print head. It’s the thing in the upper right of the field that looks a bit like a soldering iron. In this case it’s being used like a dot matrix printer.

We suppose this is a form of halftone printing, although it doesn’t produce the uniformity we’ve seen with mill-based halftone techniques. [Random Sample] built the machine from wood, drawer sliders, and stepper motors with toothed belts. His Python script takes an image and transforms it into a file which can be used to guide each of the three axes of the machine. An Arduino receives these commands via the USB connection. Each image prints in a grid, with darker pixels created by leaving the hot tip in contact with the wood for a longer period of time.

Don’t miss the sample video embedded after the jump.

Continue reading “Printing Images With A Wood Burning CNC Machine”

Weather Station Graphs History On Webpage

weather-station

Kudos go out to [Jose] for his work getting so many different components to talk to each other in this Arduino weather station that using a Raspberry Pi to display the data online.

The components shown above make up the sensor package. There’s an Arduino with a custom shield that interfaces the barometric pressure sensor, real-time clock chip, a digital temperature sensor, and a humidity sensor. On top of that shield is an XBee shield that lets this push data back to the base station. [Jose] also rolled in an LCD character display and a few buttons so that the user may view weather data without heading to the web.

A Raspberry Pi board makes up the other half of the XBee pair. It harvests the incoming data from the radio module using a USB to Serial converter cable. You can see the data log on the webpage linked above. Just choose the “LIVE” menu option and click on “Daily” to get a better overview of humidity and pressure changes.

The PICnDuino Review

picnduino

For those of you that can’t make a decision between buying an Arduino and a PIC processor, [Brad] has come up with a novel solution, the PICnDuino. We’ve featured him before with his [Retroball] project, but this time Brad has been full funded on Kickstarter, and is pre-selling boards for delivery in March.

[HAD], specifically I, was fortunate enough to be sent one of the boards to try out early. I’ve worked with an Arduino before, but never a PIC processor, so read on to see if it was actually as easy as the tutorial video (at the end of the article) would have you believe it is to get started. Continue reading “The PICnDuino Review”

A Blinky Fedora To Ring In The New Year

[Garrett Mace] decided to dress festive for New Year’s Eve. What he came up with is a fedora ringed in LEDs that react to music. The hardware uses 5050 LEDs on strips. Three of them encircle the head-gear providing a total of 114 RGB pixels. Each is a WS2811 module — a part which we’re seeing more and more of lately.

The video clip after the break starts off with a few minutes of demonstration. [Garrett] managed to code all kinds of animations for the hardware including several different styles of color sweeps and fades. You may start to think that the three bands always display the same patterns but keep watching and you’ll see a sparkle pattern that proves each dot can be addressed individually.

About 2:20 seconds into the video [Garrett] explains how he pulled it off and shows off the driver hardware. The strips are glued to a band of webbing that slides over the hat. The wires that drive the lights were fed through the center of some paracord and connect to an Arduino housed in a 3D printed case. Power is provided by a portable USB battery with a ShiftBrite shield and an MSGEQ7 chip complete the parts list.

Continue reading “A Blinky Fedora To Ring In The New Year”

Versatile Motion Dolly For Time Lapse Photography

time-lapse-motion-system

This beautiful build is a motion dolly for making time-lapse videos. It is at a point where you could consider it complete. After all, the segments featured in the video after the break look marvelous. But [Scottpotamas] has a few additions planned and it sounds like it won’t belong before he accomplishes his goals.

The build is a linear rail on which the camera rides. In the image above you can see the stepper motor which moves the camera mounted at the far end of the rig. This is controlled by an Arduino. Currently the camera is responsible for timing the capture of the images, but [Scottpotamas] says the firmware is nearly ready to hand this responsiblity over to the Arduino. The system is modular, with a simple setting for the length of the track. This way he can swap out for a longer or shorter rail which only takes about five minutes. He also included support for a panning mount for the camera. It allows the control box can be programmed to keep the subject centered in the frame as the camera slides along the track.

Continue reading “Versatile Motion Dolly For Time Lapse Photography”

Arduino Using A Straight Key For Morse Code Assistance

arduino-morse-code-straight-key

For those unfamiliar with Ham Radio, there are lots of fancy tools these days to make it easier for the radio operator. But enthusiasts still like to get back to basics, and one way to do this is to participate in Straight Key Night. This is when you pull out your traditional Morse code keyer and have a chat with others around the world. The most recent event was on New Year’s Eve. The only drag is that it sometimes takes a while to find another Ham who’s listening, and this can mean repetitively keying the letters QC SKN for long periods of time (QC invites listeners to respond, and SKN is to inform them you’re participating in Straight Key Night). Sure, a programmable keyer will do this for you, but that is against the spirit of the event. [Mike Herr] found a grey area by mechanically interfacing an Arduino with a straight key.

You can see the straight key being pressed by a hobby servo in the image above. The servo is driven by the Arduino, which will transmit the series of letters automatically. As you can see in the video after the break, once [Mike] hears back from a fellow operator he switches to a huge wooden straight key for the rest of the conversation.

Continue reading “Arduino Using A Straight Key For Morse Code Assistance”

Color Changing Bag Matches Clothing Color, Tells You What’s Inside

color-changing-shoulder-bag

Adding some lights to your everyday items will certainly give you a style leaning toward the world of Blade Runner. But if you can add functionality to control the blinky components you’ve actually got something. A great example of this is [Kathryn McElroy’s] Chameleon Bag. It’s a shoulder bag with a light-up flap. It can color match your clothing, but she also built some features that will let you know what is inside of the bag.

The project started by using a cardboard template in the size and shape of the bag’s flap. After adding an Arduino to control the LEDs and an RFID reader for an interactive element she sewed a replacement flap that also acts as a diffuser. In the video after the break she demonstrates matching the color of her scarf by reading a tag sewn in the end of it. She then starts loading up all the stuff needed for a day away from home. As the keys, phone, and computer are placed in the bag their tags are read, resulting in different combinations of color. Once everything she needs is inside, the flap turns green and she heads out the door.

This will go great with your illuminated umbrella.

Continue reading “Color Changing Bag Matches Clothing Color, Tells You What’s Inside”