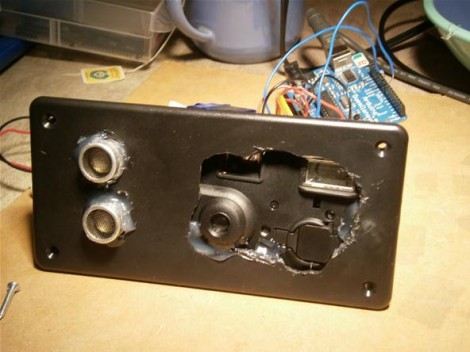
LED Clock Lights Up A Dead Mac Mini

[Professor Shadoko’s] Mac Mini died. But since the case designs on Apple products are half the reason to buy them, he decided to reuse the enclosure by turning it into this clock (translated).

As with the binary clock we saw yesterday, this one uses a bunch of LEDs to display the time, but it does it in a way that’s a bit more readable if you know what you’re looking for. The face has been divided up into two columns. On the left is hours, then minutes and seconds in increments of five. To the right is AM/PM, with minutes and seconds in increments of one. If we’re doing this right, the time seen above is 10:23:42 PM on April 28th, 2012. The white LEDs below the date act as a digital pendulum, scrolling left and right as the seconds tick by.

The display uses two MAX7219 LED drivers to control the grid which is build on a big hunk of protoboard. An Arduino ties the whole system together with a Chonodot for accurate time keeping. There’s even an ambient light sensor which adjusts the LED intensity to make this readable in direct sun, or the dark of night. See a demo clip embedded after the break.

Continue reading “LED Clock Lights Up A Dead Mac Mini”

Hackaday Links: April 29, 2012

More old computers on FPGAs!

[Andy] loves his Memotech MTX computer. It’s an oldie with a Z80 running at 4MHz; the perfect target for an FPGA port. The ReMemotech has everything the old one has – cassette interface and all – and can run up to six times faster than the original.

Also found in 10-forward

If you’re going to build a jukebox, why not go all out? Here’s a touch screen jukeboxwith an LCARS skin. Yep, the same interface found on Star Trek: The Next Generation.

New desktop wallpaper for you

[McMonster] found a great pair of blog posts (1, 2) showing what ancient ICs look like without their casing. Since these were CERDIP packages (two ceramic plates glued together) they were exceptionally easy to take apart leaving the entire chip intact. Pages are in Polish, but there’s a Google Translate button on the sidebar

Cheap and easy Arduino wi-fi

Quick quiz: what’s the easiest way to get data onto an Arduino wirelessly? XBees? GSM modules? Nope, just get a wireless router and an Ethernet shield. The Ethernet module only cost [Doss] $20, and we’re sure Hackaday readers have a spare wireless router around somewhere.

Chiptunes! Chiptunes I say!

[mdmoose29] has been working on making a custom SNES cartridge for a dubstep artist (tell us more, [moose]…). In his search for programming tools, he found theSNES Game Maker. We tried it out for a bit and it’s still a very unrefined beta. Still, making SNES programming easier is awesome.

You people are awesome. Here’s six things for a links post.

[Valentin] made a night vision monocular from an old VHS camcorder, a small spy camera, and a handful of infrared LEDs. Here’s a video of [Valentin]‘s build in action.

Land ROV Is Internet Connected And Packed Full Of Stuff

[Blair Kelly] has always been interesting in the concept of Remote Operated Vehicles. As soon as he got his hands on an Arduino he began his endeavor to turn an RC vehicle into a land-based ROV. What he’s done so far is incredible.

Here he’s showing off features of the build using a PS3 controller. But it can also take commands from an Xbox 360 controller or an arcade-style steering wheel. We like the latter the best, which is shown off at about six and a half minutes into the video (embedded after the break). Since there’s a webcam on board, this ends up being a virtual cockpit for the pint-sized car. But it gets better. That webcam is mounted on a servo motor, and [Blair] included controls that pan the camera. This lets the driver ‘look’ left and right. On the front of the vehicle there’s an accelerometer. Data is collected by the Arduino and sent via the WiFly module. This adds rumble to the controller if you’re using one that has that ability.

It’s a big project already, but it sounds like [Blair] has not end of ideas for future versions. Right now he’s planning to increase the overall size which will let him explore places that aren’t as flat as his livingroom.

Continue reading “Land ROV Is Internet Connected And Packed Full Of Stuff”

[David] Hand Soldered A Blinky Ball… And You Can Too!

This is a blinky ball that [David] designed, built, and programmed himself. Does it look familiar? It should, he took his inspiration from the original prototype, and the Hackerspace-produced derivative. [David’s] version is not as small, or as blinky, but in our minds the development process is the real reason for building something like this. He took a great idea and figured out how he could pull it off while pushing his skill set, staying within his time and budget constraints.

The project is powered by an Arduino nano which resides in the core of the ball. [David] used protoboard sourced locally for each of the slices, soldering green LEDs along the curved edges, and added shift registers to drive them. The ball is driven by a LiPo battery which can power it for about 45 minutes. You can see the animation designs he coded in the clip after the break.

Continue reading “[David] Hand Soldered A Blinky Ball… And You Can Too!”

Dexterity Enhancing Guitar

[Justin Lange’s] dad loves playing guitar, but an accident left him with nerve damage that makes it pretty much impossible these days. He just doesn’t have the dexterity needed to form the cords using his left hand. But his son’s hacking skills are helping him get back into it. [Justin] built a button-based add-on that forms the cords for him.

The build has two parts. A frame mounts over the finger board with slots for eighteen solenoids which push the strings down between the frets. These are controlled by the replacement finger board which is mounted below the neck. It has a double-row of buttons that let the player select the desired chord. One button chooses the key, with a second button acting as a modifier to switch to a seventh cord, or minor cord.

The project, which [Justin] has named folkBox, relies on a microcontroller. We spy an Arduino Mega in one of the build photographs but it will be interesting to see if the final project moves to a standalone chip. He’s set a goal for a more robust version of the build some time this summer.

[via Make]

CoolBot Keeps Your Laser Cutter From Overheating

[Charles] wrote in to share the project he just built for the London Hackerspace. He calls it CoolBot, and as the name indicates it’s responsible for keeping the laser cutter from overheating.

At its heart the system is a water pump. It uses a plastic storage container as a reservoir, with an outfeed from the laser tube coming in the top of the lid. [Charles] mounted a temperature sensor using a 3D printed part to anchor it in the center of the return stream. An Arduino clone uses this sensor, as well as ambient room temperature and laser tube temperature sensors to decide when to switch on the cooling pump. As with any hackerspace add-on, this wouldn’t be complete without Internet connectivity so he included an Ethernet shield in the project box. Speaking of, that box uses panel-mount connectors to keep dust and water away from the electronics. But the lid of the controller box also includes a character LCD for quick reference.

Don’t miss [Charles’] explanation of the system in the video after the break.

Continue reading “CoolBot Keeps Your Laser Cutter From Overheating”

Driving A T6963C Based Graphic LCD

[Tom Fleet] spent the dreary weekend inside learning how to drive this T6963C based graphic LCD controller. Although this is his first time venturing away from HD44780 character displays, the availability of an Arduino library helped him go from being a newbie to coding his own animated graphics.

The hardware setup is straight-forward. The screen has a 20-pin connector and operates at 5V. We don’t see it on his protoboard, but usually these displays also need a potentiometer which serves as a voltage divider for the screen contrast. The data and control pins eat up most of the available I/O on the ATmega328 chip he used, but the I2C and SPI pins are still open and he plans a future project to make this a wireless display for his PC using one of those protocols.

As for fonts and animation, [Tom] links to several tools which will come in handy. There’s a font program that will convert Windows system fonts into a C file for use on the Arduino. The animations start with a 1:1 ratio animated graphic drawn with his favorite image editing software. He then converts those to monochrome bmp files and used bmp2c to convert each frame to a C array. After the break there’s a seven second example that would work well as a boot screen for his project.

Continue reading “Driving A T6963C Based Graphic LCD”