A Simple Soft Power Switch Using Common Modules

If you want to easily control the power in a circuit, you’ll probably reach for the classic toggle switch. While there’s certainly nothing wrong with that, physical toggles are a bit dated at this point. A soft power switch that turns your gadget on and off at the tap of a finger is far more 21st century. You might think this kind of modern trickery is too difficult to implement on a DIY project, but as [Sasa Karanovic] shows, it’s actually a lot easier than you might think.

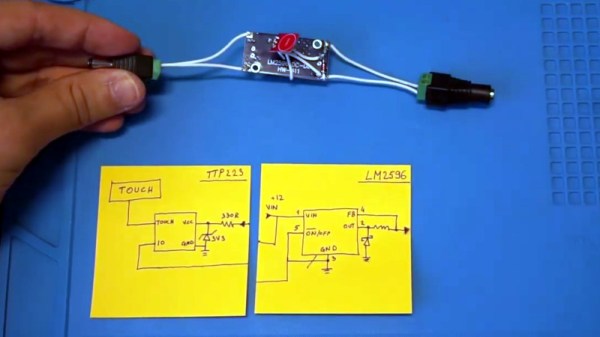
Now to be fair, that wasn’t actually his goal. All [Sasa] was trying to do was come up with a slick way to control the LED lighting in his 3D printer enclosure. Which, as you can see in the video below, he accomplished. But the hacked together circuit he used to do it could easily be adapted for other electronic projects. If you’re using a LM2596 DC-DC converter module to power your gadget, you can add a touch sensitive soft switch for literally pennies.

The trick is utilizing the enable pin on the LM2596. The common buck converter modules tie this pin to ground so the regulator is always enabled, but if you lift the pin off the PCB and connect it to the output of a TTP223 capacitive touch sensor, you can simply tap the pad to control the regulator. Power for the touch sensor itself is pulled from the input side of the regulator, so even when the power is cut off downstream, the sensor is still awake and can kick the chip back into gear when you need it.

If you’re not interested in touch control, you could try connecting the enable pin on the regulator to an ESP8266 and making a cheap Internet-controlled DC power supply. Continue reading “A Simple Soft Power Switch Using Common Modules”

Now This Is A Maker’s PCB Shaker

Anyone who has ever etched their own PCB knows that the waiting is the hardest part. Dissolving copper in ferric chloride takes time, much like developing a Polaroid picture. And although you really should not shake a fresh Polaroid to speed up development, the PCB etching process thrives on agitation. Why wait an hour when you can build a simple PCB shaker and move on to drilling and/or filling in 10 minutes?

We love that [ASCAS] was probably able to build this without reaching past the the spare parts box and the recycling bin. There’s no Arduino or even a 555 — just a 12 VDC geared motor, a DC-DC buck converter, and an externalized pot to control the speed of the sloshing.

It’s hard to choose a favorite hack here between the hinge used to rock this electric seesaw and the crankshaft/armature [ASCAS] made from a sandwich spread lid and a Popsicle stick. Everything about this build is beautiful, including the build video after the break.

Did you know that unlike ferric chloride, copper chloride can be recharged and reused? Here’s a one-stop etching station that does just that.

Continue reading “Now This Is A Maker’s PCB Shaker”

Using PoE With A Raspberry Pi 3 For About Two Bucks

When the Raspberry Pi 3 Model B+ was announced in March of 2018, one of its new features was the ability to be (more easily) powered via Power-over-Ethernet (PoE), with an official PoE HAT for the low price of just twenty-one USA bucks. The thing also almost worked as intended the first time around. But to some people this just isn’t good enough, resulting in [Albert David] putting out a solution he calls “poor man’s PoE” together for about two bucks.

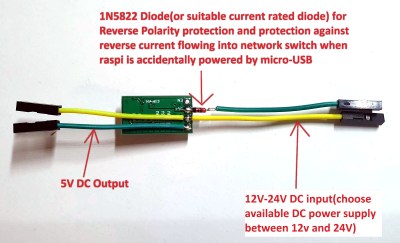
His solution makes it extra cheap by using so-called passive PoE, which injects a voltage onto the conductors of the network cable being used for PoE, without bothering with any kind of handshake. In general this is considered to be a very reliable (albeit non-standard) form of PoE that works great until something goes up in smoke. It’s also ridiculously cheap, with a PoE injector adapter (RJ-45 plug & 2.1×5.5 mm power jack to RJ-45 jack) going for about 80 cents, and a DC-DC buck converter that can handle the input of 12V for about 50 cents.

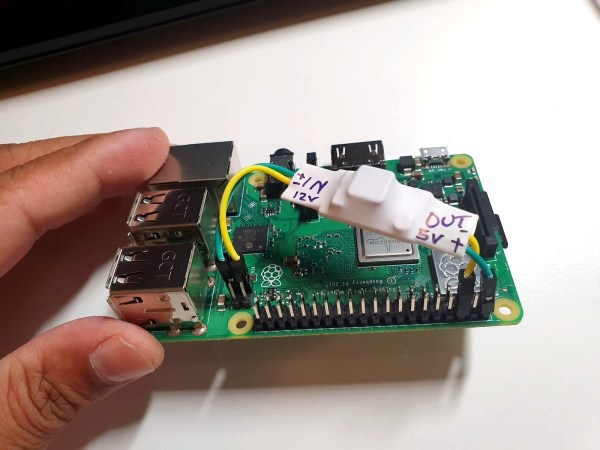
The rest of the $2 budget is mostly spent on wiring and heatshrink, resulting in a very compact PoE solution that plugs straight into the PoE header on the Raspberry Pi 3 board, with the buck converter outputs going into the ground and +5V pins on the Raspberry Pi’s GPIO header.

A fancier solution would implement any of the standard PoE protocols to do the work of negotiating a suitable voltage. Maybe this could be the high-tech, $5 solution featuring an MCU and a small PCB?

Circuit VR: An (Almost) Practical Buck Converter

In the last installment of Circuit VR, we walked around a simplified buck converter. The main simplification was using a constant PWM signal. The result is that the output voltage is a fixed fraction of the input voltage. For a regulator, the pulse width will need to depend on the output voltage so that any changes in the output are self-correcting. So this time, we’ll make a regulator, although we’ll still use a few Spice elements you’d have to replace in a practical design. In particular, we’ll assume you can generate a triangle wave, which is easy enough, and produce a stable 2.5 V reference.

The idea is to take a voltage reference and compare it to the output. We’ll think of the difference between the two as an error voltage, and use a comparator combined with a triangle wave generator to produce a PWM signal that is proportional to the error, and thus works to hold the output voltage constant.

Continue reading “Circuit VR: An (Almost) Practical Buck Converter”

Open Hardware Takes Charge In Papua New Guinea

You probably don’t think much about charging your phone. Just find an outlet, plug it in, and wait a while. Can’t find a cable or wall wart? A rainbow of cheap, candy-colored options awaits you down at the brightly-lit corner drugstore.

This scenario couldn’t be further from reality in third world countries like Papua New Guinea, where people living in remote jungles have cell phone coverage, but have to charge their phones by hooking them up directly to cheap solar panels and old car batteries.

[Marius Taciuc] wants to change all of that. At the suggestion of his friend [Brian], he designed an intermediary device that takes any input and converts it to clean 5 volts with a low-cost, reliable buck converter. The inputs are a pair of alligator clips, so they can be connected to car battery terminals, bare-wire solar panel leads, or 9V connectors.

Mobile phones mean so much to the people of Papua New Guinea. They’re like a first-world care package of news, medical advice, and education. At night, they become simple, valuable lanterns. But these dirty charging hacks often lead to house fires. Someone will leave their phone to charge in the morning when they go off to hunt, and come home to a pile of ashes.

This is an open, simple device that could ultimately save someone’s life, and it’s exactly the type of project we’re looking for. [Marius] hopes to see these all over eBay someday, and so do we. Charge past the break to see [Marius] discuss the Brian Box and the people he’s trying to help.

Continue reading “Open Hardware Takes Charge In Papua New Guinea”

Circuit VR: Simple Buck Converters

The first thing I ever built without a kit was a 5 V regulated power supply using the old LM309K. That’s a classic linear regulator like a 7805. While they are simple, they waste a lot of energy as heat, especially if the input voltage goes higher. While there are still applications where linear regulators make sense, they are increasingly being replaced by switching power supplies that are much more efficient. How do switchers work? Well, you buy a switching power supply IC, add an inductor and you are done. Class dismissed. Oh wait… while that might be the best way to do it from a cost perspective, you don’t really learn a lot that way.

In this installment of Circuit VR, we’ll look at a simple buck converter — that is a switching regulator that takes a higher voltage and produces a lower voltage. The first one won’t actually regulate, mind you, but we’ll add that in a future installment. As usual for Circuit VR, we’ll be simulating the designs using LT Spice.

Interestingly, LT Spice is made to design power supplies so it has a lot of Linear Technology parts in its library just for that purpose. However, we aren’t going to use anything more sophisticated than an op amp. For the first pass, we won’t even be using those.

Continue reading “Circuit VR: Simple Buck Converters”

Buck Converter Efficiency

We always appreciate when someone takes the time to build something and then demonstrates what different design choices impact using the real hardware. Sure, you can work out the math and do simulations, but there’s something about having real hardware that makes it tangible. [Julian Ilett] recently posted two videos that fit this description. He built a buck converter and made measurements about its efficiency using different configurations.

The test setup is simple. He monitors the drive PWM with a scope and has power meters on the input and output. That makes it easy to measure the efficiency since it is just the ratio of the power output to input. You can see the two videos, below.

Continue reading “Buck Converter Efficiency”