For someone programming in a high-level language like Python, or even for people who interact primarily with their operating system and the software running on it, it can seem like the computer hardware is largely divorced from the work. Yes, the computer has to be physically present to do something like write a Hackaday article, but most of us will not understand the Assembly language, machine code, or transistor layout well enough to build up to what makes a browser run. [Francis Stokes] is a different breed, though, continually probing these mysterious low-level regions of our computerized world where he was recently able to send an Ethernet packet from scratch.
development45 Articles
Why Use A Sensor When A Pseudo-Sensor Will Do?
Usually, when you need to sense something in a project, the answers are straightforward. Want to sense air temperature? There’s a sensor for that. Particulate content in the air? There’s a sensor for that, too. Someone sneaking up on you? Get yourself some passive infrared sensors (PIRs) and maybe a smart camera just to be sure.
But sometimes you can be sneaky instead, saving the cost of a sensor by using alternative techniques. Perhaps there’s a way to use the hardware you already have to determine what you need. Maybe you can use statistical methods to calculate the quantity you’re looking for from other measurements.
Today, we’ll examine a great example of a “pseudo-sensor” build in an existing commercial device, and examine how these techniques are often put to good use in industry.
Continue reading “Why Use A Sensor When A Pseudo-Sensor Will Do?”
M1 Development Board From Scraps
Apple is fairly notorious for building devices that are difficult to repair, but with the right tools it’s often not completely impossible to circumvent some of their barriers. As they say, every lock has a key. [dosdude1] has wanted a specific M1 development board for a while now and has been slowly piecing together everything he needs to cobble one together, and finally got this unit running despite many roadblocks put in his way by Apple.
The development kit is a Developer Transition Kit or “DTK” meant for developers during Apple’s transition from Intel chips to their own in-house ARM-based M1 platform. This particular version is in a Mac Mini form factor but it has a few hurdles to clear before it powers on. First, the board was cut in a critical location that shorted out many of the PCB layers, so this had to be carefully filed down to remove the shorts. It was also missing a few tiny surface mount components and a NAND chip, but these were scavenged from other scrapped parts and assembled into a fully working machine.
There are a number of other non-physical problems to solve here as well, too. Apple coded their NAND chips to work with specific WiFi modules so if these aren’t programmed to work together the computer will get stuck in a boot loop. But with that and a few other details out of the way [dosdude1] finally has his DTK up and running in a 2018 Mac Mini chassis, right down to the working power LEDs. We’ve seen all kinds of PCB damage before (although not often quite this intricate) and even PCBs repaired that were snapped in half.
Thanks to [CodeAsm] for the tip!
3D-Printed Automated Development Tank For Classic Photo Films
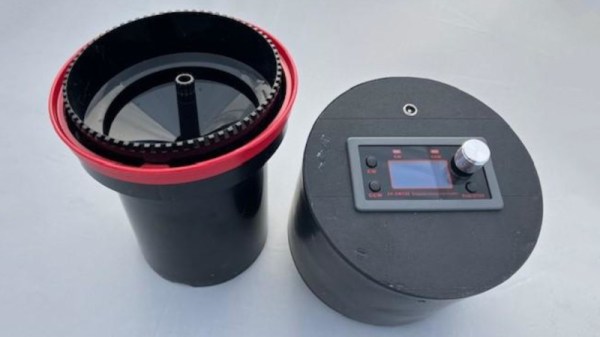
[packetandy] had a problem. He was still into classic analog photography, but local options for development were few and far between. After some frustration, he decided to take on the process himself, creating an automatic development tank for that very purpose.
For black and white film, developing is fairly straightforward, if dull and time consuming. The film requires constant agitation during development, which can be dull to do by hand. To get around this, [packetandy] decided to build a development tank rig that could handle agitation duties for him by wiggling the film around in his absence.
The tank itself is created by Patterson, and has a stick on top for agitating the film inside. The rig works by attaching a NEMA stepper motor to this stick to jerk it around appropriately. Rather than go with a microcontroller and custom code, [packetandy] instead just grabbed a programmable off-the-shelf stepper controller that can handle a variety of modes. It’s not sophisticated, but neither is the job at hand, and it does just fine.
It’s a nifty build that should see [packetandy]’s black-and-white photography on the up and up. Meanwhile, if simple development isn’t enough for you, consider diving into the world of darkroom robot automation if you’re so inclined!
How IBM Stumbled Onto RISC
There are a ton of inventions out in the world that are almost complete accidents, but are still ubiquitous in our day-to-day lives. Things like bubble wrap which was originally intended to be wallpaper, or even superglue, a plastic compound whose sticky properties were only discovered later on. IBM found themselves in a similar predicament in the 1970s after working on a type of mainframe computer made to be a phone switch. Eventually the phone switch was abandoned in favor of a general-purpose processor but not before they stumbled onto the RISC processor which eventually became the IBM 801.
As [Paul] explains, the major design philosophy at the time was to use a large amount of instructions to do specific tasks within the processor. When designing the special-purpose phone switch processor, IBM removed many of these instructions and then, after the project was cancelled, performed some testing on the incomplete platform to see how it performed as a general-purpose computer. They found that by eliminating all but a few instructions and running those without a microcode layer, the processor performance gains were much more than they would have expected at up to three times as fast for comparable hardware.
These first forays into the world of simplified processor architecture both paved the way for the RISC platforms we know today such as ARM and RISC-V, but also helped CISC platforms make tremendous performance gains as well. In fact, RISC-V is a direct descendant from these early RISC processors, with three intermediate designs between then and now. If you want to play with RISC-V yourself, our own [Jonathan Bennett] took a look at a recent RISC-V SBC and its software this past March.
Thanks to [Stephen] for the tip!
How Small Can The ESP32 Get?
At its core, the ESP32 chip is not much more than an integrated circuit, a huge mass of transistors sealed inside an epoxy resin package with some leads. Of course, most of us won’t buy discrete ESP32 chips with no support circuitry since it’s typically easier and often not that much more expensive to get them paired with development boards of some type for easy access to things like USB and GPIO. But these tiny chips need little in the way of support to get up and running as [Paul] demonstrates with this tiny ESP32 board.
The project started as a challenge for [Paul] to build the smallest ESP32 that would still function. That means carving away nearly everything normally found accompanying one of these chips. There is no charging circuitry, only one of the GPIO pins is accessible, and it even foregoes the WiFi antennas which eliminates the major reason most people would reach for this chip in the first place. But at this form factor even without wireless capabilities it still blows other chips of this stature, like the ATtiny series, out of the water.
Even though [Paul] built it as a challenge, it goes a long way to demonstrate what’s really needed to get one of these chips up and running properly. And plenty of projects don’t need a ton of I/O or Wi-Fi either, so presuming these individual chips can be found cheaply and boards produced for various projects its an excellent way to minimize size and perhaps even power requirements. You can make these boards even smaller than a USB-A connector if you want to take this process even further, too.
Blinkenlights To Bootloader: A Guide To STM32 Development
While things like the Arduino platform certainly opened up the gates of microcontroller programming to a much wider audience, it can also be limiting in some ways. The Arduino IDE, for example, abstracts away plenty of the underlying machinations of the hardware, and the vast amount of libraries can contribute to this effect as well. It’s not a problem if you just need a project to get up and running, in fact, that’s one of its greatest strengths. But for understanding the underlying hardware we’d recommend taking a look at something like this video series on the STM32 platform.
The series comes to us from [Francis Stokes] of Low Byte Productions who has produced eighteen videos for working with the STM32 Cortex-M4 microcontroller. The videos start by getting a developer environment up and blinking LEDs, and then move on to using peripherals for more complex tasks. The project then moves on to more advanced topics and divides into two parts, the development of an application and also a bootloader. The bootloader begins relatively simply, and then goes on to get more and more features built into it. It eventually can validate and update firmware, and includes cryptographic signing (although [Francis] notes that you probably shouldn’t use this feature for production).
One of the primary goals for [Francis], apart from the actual coding and development, was to liven up a subject matter that is often seen as dry, which we think was accomplished quite well. A number of future videos are planned as well. But, if you’re not convinced that the STM32 platform is the correct choice for you, we did publish a feature a while back outlining a few other choices that might provide some other options to consider.
Continue reading “Blinkenlights To Bootloader: A Guide To STM32 Development”