E3D’s Love Letter To Toolchanging 3D Printers

It’s been just over a year since E3D whetted our appetites for toolchanging printers. Now, with the impending release of their first toolchanging system, they’ve taken the best parts of their design and released them into the wild as open source. Head on over to Github for a complete solution to exchanging, locating, and parking tools on a 3D printer.

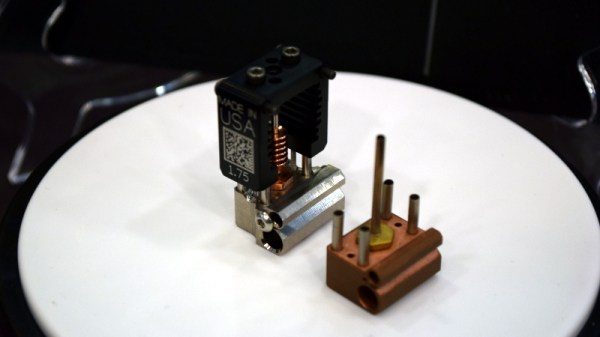
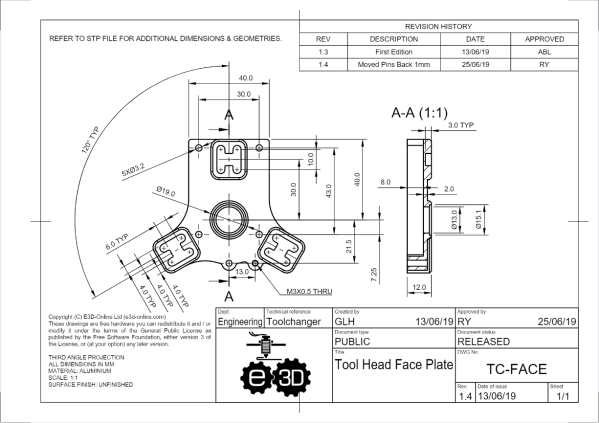
For anyone interested in fabricating the design, the files are in a format that you can almost re-zip and email to a manufacturer for quotes. As is, the repository offers STP-style CAD files, a complete set of dimensioned drawings, exploded views, and even a bill of materials. Taken as a whole, the system elegantly solves the classic problems that we’d encounter in toolchanging. Locking tools is done with a spring-based T-bar that swivels onto an wedge-shaped groove on the back of each tool plate. Locating tools is done so with a 3-groove kinematic coupling fabriacted from dowel pins. With these problems solved and presented so cleanly, these files become a path by which we can establish a common means for exchanging tools on 3D printer systems.

It’s worth asking: why develop an exceptional design and then release it for free? I’ll speculate that E3D has done an excellent job over the years establishing a well-recognized standard set of stock parts. Nearly every 3D printer builder is bound to have at least one spare V6 hotend sitting idle in a disassembled pool of former-3D-printers. With tool-changing positioned to become another step forward in the space of possibilities with 3D printing, setting the standard for tools early encourages the community to continue developing applications that lean on E3D’s ecosystem of parts.

In the last 30 years, 3D printing has transformed away from a patent-trolling duopoly to a community-friendly group of contributors that lean on each other’s shoulders with shared findings. It’s a kind gesture to the open-source community of machine builders to receive such a feature-complete mechanism. With that said, let’s start rolling the toolchanger hacks.

High Detail 3D Printing With An Airbrush Nozzle

On a fused deposition modeling (FDM) 3D printer, the nozzle size dictates how small a detail you can print. Put simply, you can’t print features smaller than your nozzle for the same reason you’d have trouble signing a check with a paint roller. If the detail is smaller than the diameter of your tool, you’re just going to obliterate it. Those who’ve been around the block a few times with their desktop 3D printer may have seen this come up in practice when their slicer refused to print lines which were thinner than the installed nozzle (0.4mm on the vast majority of printers).

Smaller nozzles exist for those looking to improve their printer’s detail on small objects, but [René Jurack] wasn’t happy with just putting a finer nozzle on a stock E3D-style hotend. In his opinion it’s still a hotend and arrangement intended for 0.4mm printing, and doesn’t quite fully realize the potential of a smaller diameter nozzle. After some experimentation, he thinks he’s found the solution by using airbrush nozzles.

As [René] sees it, the hotend is too close to the subject being printed when using nozzles finer than 0.4mm. Since you’re working on tiny objects, the radiant heat from the body of the hotend being only a few millimeters away is enough to deform what you’re working on. But using the long and tapered airbrush nozzle, the hotend is kept at a greater distance from the print. In addition, it gives more room for the part cooling fan to hit the print with cool air, which is another critical aspect of high-detail FDM printing.

Of course, you can’t just stick an airbrush nozzle on your E3D and call it a day. As you might expect, they are tiny. So [René] designed an adapter that will let you take widely available airbrush nozzles and thread them into an M6 threaded hotend. He’s now selling the adapters, and judging by the pictures he posted, we have to say he might be onto something.

If you’re more about brute strength than finesse, you might be interested in outfitting your E3D with a ruby nozzle instead.

Continue reading “High Detail 3D Printing With An Airbrush Nozzle”

ERRF 18: Slice Engineering Shows Off The Mosquito

With few exceptions, it seemed like every 3D printer at the first inaugural East Coast RepRap Festival (ERRF) was using a hotend built by E3D. There’s nothing inherently wrong with that; E3D makes solid open source products, and they deserve all the success they can get. But that being said, competition drives innovation, so we’re particularly interested anytime we see a new hotend that isn’t just an E3D V6 clone.

The Mosquito from Slice Enginerring is definitely no E3D clone. In fact, it doesn’t look much like any 3D printer hotend you’ve ever seen before. Tiny and spindly, the look of the hotend certainly invokes its namesake. But despite its fragile appearance, this hotend can ramp up to a monstrous 500 C, making it effectively a bolt-on upgrade for your existing machine that will allow you to print in exotic materials such as PEEK.

We spent a little time talking with Slice Engineering co-founder [Dan], and while there’s probably not much risk it’s going to dethrone E3D as the RepRap community’s favorite hotend, it might be worth considering if you’re thinking of putting together a high-performance printer.

Continue reading “ERRF 18: Slice Engineering Shows Off The Mosquito”

E3D Introduces Tool Changing 3D Printer

E3D has introduced their latest answer to multimaterial printing at the Midwest RepRap Festival this weekend. Their research project into a 3D printer with the ability to change toolheads is the latest advancement in multimaterial printing. It’s a work of engineering brilliance, and they’ve already written up their teardown on how this all came to be.

While milling machines and other fancy industrial CNC have had tool changing for decades, and the subject has been pursued by the RepRap community for a few years now, it really hasn’t caught on. The question then is, what is tool changing on a 3D printer good for? The answer is multimaterial printing, and doing it in a way that doesn’t have the downsides of current methods of printing with multiple materials.

There are three current methods of printing in multiple materials. The first is putting two nozzles on the same extruder, but this has the downside of one nozzle interfering with the other. The second is pushing two different kinds of plastic through the same nozzle, such as in the E3D Cyclops, or Prusa’s multimaterial upgrade. This has the downside of cross-contamination, and you can’t print in materials that require different temperature profiles. The third method is simply using multiple carriages on the same machine, such as the lovely stuff from Autodesk or Project Escher. This last method is horrifically complex.

The answer the problem of multimaterial printing is hot-swapping toolheads, but to do this you need precision and repeatability. The folks at E3D have been working on this for years, and I remember seeing some experiments with electro-permanent magnets a few MRRFs ago, but now they finally have a solution. The answer is simply a cam that’s turned by a cheap hobby servo. This is kinematic coupling that allows the carriage to clamp onto a toolhead with 5 μm precision.

Right now, E3D’s experiments in toolchanging 3D printers have culminated in a single 3D printer featuring their toolchange carriage, four toolheads, some amazing linear rails, and a CoreXY configuration. The prints that are coming off of this printer are spectacular. There are four-color Benchies, and the drivetrain of a remote-controlled car with gears printed in Taulman plastic and a driveshaft printed in ABS. The car was a single print made with multiple hotends, demonstrating most of the problems of multimaterial printing disappear with the E3D swapping toolhead printer.

If you’re interested in purchasing one of these printers, E3D currently has a survey for potential buyers and a deposit queue for any future purchases.

Hackaday Links Column Banner

Hackaday Links: February 25, 2018

Hipster hardware! [Bunnie] found something interesting in Tokyo. It’s a LED matrix display, with a few PDIP chips glued onto the front. There are no through-holes or vias, and these PDIPs can’t be seen through on the back side of the board. Someone is gluing retro-looking chips onto boards so it looks cool. It’s the ‘gluing gears to everything therefore steampunk’ aesthetic. What does this mean for the future? Our tubes and boxes of 74-series chips will be ruined by a dumb kid with a hot glue gun when we’re dead.

Is it Kai-CAD or Key-CAD? Now you can share your troubles with the greatest problem in Electronic Design Automation with others.

Speaking of unimaginable problems in EDA suites and PCB design tools, here’s a Git-based visual version control thingy for Eagle. Cadlab.io is a version control system for Github and Eagle that offers visual diff of PCB layouts and schematics. Neat? Yes, especially if you have more than one person working on a board.

How about a 3D printed business card embosser? [Taekyeom] designed and printed a pair of 3D rollers, one of which is embossed with the ‘negative’ of a design, the other with the ‘positive’ of a design. When rolled against each other, these rollers mesh and putting a piece of paper through the pinky pinching machine embosses paper. Add a frame, a handle, and a few zip ties for belts, and you have a fully 3D printed paper embosser.

There’s a new ransomware that encrypts your files and won’t allow you to access them until you pay someone some crypto. Big news, huh? Well, yes, actually. The HC7 Planetary ransomware is apparently the first bit of ransomware that accepts Etherium. ETH is all grown up now.

Aw, snap, 3D printers with automatic tool changing. This is a project from E3D that shows off magnetic (?) extruders and hot ends for 3D printers. You can change your hot end (and nozzle, and filament) in mid-print. What does this mean? Well, swapping filament is the most obvious use case, but the Prusa system might have this nailed down. What is more interesting is swapping hotends, allowing you to print in multiple temperatures (and different materials), and maybe even different nozzle sizes. This is coming to MRRF, the greatest 3D printing con on the planet. MRRF is happening in March 23-25th in beautiful scenic Goshen, Indiana.

hardware demoscene? Yes, it’s true! #badgelife is a hardware demoscene wrapped up around wearable conference badges. We just had a meetup in San Francisco this week, and the talks were amazing. [Kerry Scharfglass] talked about scaling one Diamond Age badge to one hundred Diamond Age badges. [Whitney Merrill] talked about building badges for the Crypto and Privacy village at Defcon. If you’re into electronics, you are, by default, into manufacturing and this is the best education in manufacturing and logistics you will ever get. The true pros know how to reduce air freight costs by two hundred percent!

Water Cooling A 3D Printer

It may seem like a paradox, but one of the most important things you have to do to a 3D printer’s hot end is to keep it cool. That seems funny, because the idea is to heat up plastic, but you really only want to heat it up just before it extrudes. If you heat it up too early, you’ll get jams. That’s why nearly all hot ends have some sort of fan cooling. However, lately we have seen announcements and crowd-funding campaigns that make it look like water cooling will be more popular than ever this year. Don’t want to buy a new hot end? [Dui ni shuo de dui] will show you how to easily convert an E3D-style hot end to water cooling with a quick reversible hack.

That popular style of hot end has a heat sink with circular fins. The mod puts two O-rings on the fins and uses them to seal a piece of silicone tubing. The tubing has holes for fittings and then it is nothing to pump water through the fittings and around the heat sink. The whole thing cost about $14 (exclusive of the hot end) and you could probably get by for less if you wanted to.

Continue reading “Water Cooling A 3D Printer”

The Engineering Analysis Of Plastic-Dissolving Lubricant

Over the years, E3D has made a name for themselves as a manufacturer of very high-quality hotends for 3D printers and other printer ephemera. One of their more successful products is the Titan Extruder, a compact extruder for 3D printers that is mostly injection-molded plastic. The front piece of the Titan is a block of molded polycarbonate, a plastic that simply shouldn’t fail in its normal application of holding a few gears and bearings together. However, a few months back, reports of cracked polycarbonate started streaming in. This shouldn’t have happened, and necessitated a deep dive into the failure analysis of these extruders. Lucky for us, E3D is very good at doing engineering teardowns. The results of the BearingGate investigation are out, and it’s a lesson we can all learn from.

The first evidence of a problem with the Titan extruders came from users who reported cracking in the polycarbonate case where the bearing sits. The first suspect was incorrectly manufactured polycarbonate, perhaps an extruder that wasn’t purged, or an incorrect resin formulation during manufacturing. A few whacks with a hammer of each production run ruled out that possibility, so suspicion turned to the bearing itself.

After a few tests with various bearings, the culprit was found: in some of the bearings, the lubricant mixed with the polycarbonate to create a plastic-degrading toxic mixture. These results were verified by simply putting a piece of polycarbonate and the lubricant in a plastic bag. This test resulted in some seriously messed up plastic. Only some of the bearings E3D used caused this problem, a lesson for everyone to keep track of your supply chain and keep records of what parts went into products when.

The short-term fix for this problem is to replace the bearing in the Titan with IGUS solid polymer bushings. These bushings don’t need lubricant, and therefore are incapable of killing the polycarbonate shell. There are downsides to this solution, namely that the bushings need to be manufactured, and cause a slight increase in friction reducing the capability of the ‘pancake’ steppers E3D is using with this extruder.

The long-term solution for this problem is to move back to proper bearings, but changing the formulation of the polycarbonate part to something more chemical resistant. E3D settled on a polymer called Tritan from Eastman, a plastic with similar mechanical properties, but one that is much more chemically resistant. This does require a bit more up-front work than machining out a few bearings, but once E3D gets their Tritan parts in production, they will be able to move back to proper bearings with the right lubrication.

While this isn’t a story of exploding smartphones or other disastrous engineering failures, it is a great example of how your entire supply chain goes into making a product, and how one small change can ruin an entire product. This is real engineering right here, and we’re glad E3D finally figured out what was going on with those broken Titan extruders.