Hoverboard Becomes Kart In Easy Build

The hoverboard furnished to the world in the 2010s was not the one promised to us by Hollywood. Rather than a skateboard without wheels, we got a handsfree Segway, delivering faceplanting fun for the whole family. [Emanuel Feru] decided to repurpose his into a much safer electric kart. 

The build starts with a pedal-powered children’s kart, which has its drivetrain and rear axle removed. The hoverboard is bolted in its place, with its track and wheel size conveniently similar enough to make this practical. The original circuitboards are left in place, reprogrammed with custom firmware for their new role. [Emanuel]’s code enables the stock hardware to drive the motors with Field Oriented Control, for better efficiency. Additionally, the hardware reads a set of pedals cribbed from a PC racing wheel for throttle input, replacing the original gyrometer setup. With field weakening enabled, [Emanuel] reports the kart reaching up to 40 km/h.

It’s a tidy hack that makes great use of all the original hoverboard hardware, rather than simply throwing new parts at the problem. We’ve seen similar hacks before, with Segways in lieu of 2015’s most dangerous Christmas gift. Video after the break.

Continue reading “Hoverboard Becomes Kart In Easy Build”

Three-Dollar Router Rebooter Has One Job

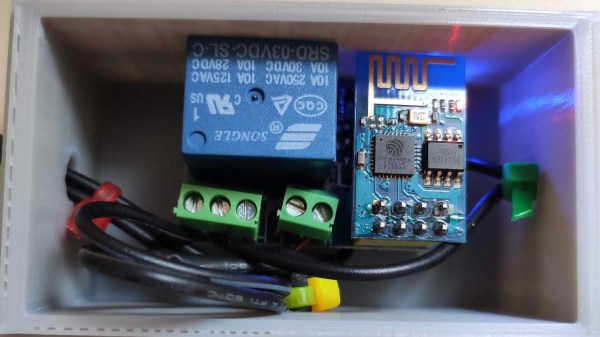
Sometimes connectivity problems go away by power cycling a router. It’s a simple but inconvenient solution to a problem that shouldn’t exist, but that didn’t stop [Mike Diamond] from automating it for a few bucks in parts. The three-dollar router rebooter may be a simple device with only one job, but it’s well documented and worth a look.

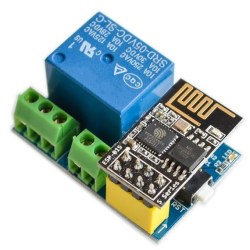
The device is an ESP8266 board configured to try to reach Google periodically via the local wireless network. If Google cannot be reached, the board assumes a reboot is needed and disconnects the 12 V power supply from the router by using a relay. Then, after a delay, power is re-connected and all of one’s problems are over until the next time it happens. [Mike] used a relay module that has built-in screw terminals and a socket for the ESP8266-01, so it looks like the whole device can be put together without soldering a thing.

While the code for making this happen may sound trivial, [Mike] nevertheless delves into documenting it. It makes a great example of how to implement a simple event-driven finite state machine in a way that’s clear and concise. By structuring the code so that there is a finite number of specific states the device can be in (router power on, router power off, and testing connection) and by defining exactly how and when the device switches between those states, operation and troubleshooting becomes a much more manageable job. Another great example is this IoT Garage Door Opener project. If you’re programming devices that interface to physical things, these techniques are definitely good practice.

Combine Broken Drone Propellers For A Second Spin

If you’ve ever flown or watched anyone fly a racing drone for any length of time, you know that crashes are just part of the game and propellers are consumables. [Adam] knows this all to well, decided to experiment with combining multiple broken propellers into one with a 3D printed hub.

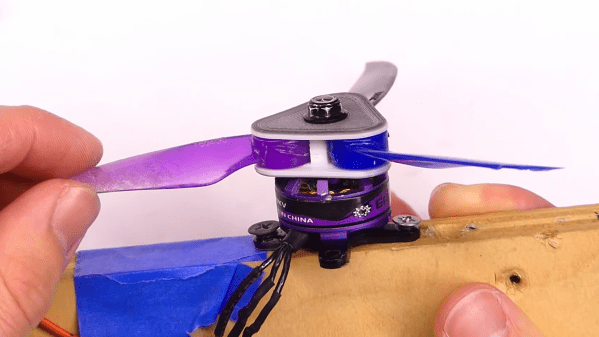
A damaged propeller will often have one blade with no damage, still attached to the hub. [Adam] trimmed the damaged parts of a few broken props, and set about designing a 3D printed hub to attach the loose blades together. The hubs were designed let the individual blades to move, and folding out as the motors spin up, similar to the props on many photography drones.

Once [Adam] had the fit of the hubs dialed in, he mounted a motor on a piece of wood and put the reborn propellers through their paces. A few hubs failed in the process, which allowed [Adam] to identify weak points and optimise the design. This sort of rapid testing is what 3D printing truly excels at, allowing test multiple designs quickly instead of spending hours in CAD trying to foresee all the possible problems.

He then built a test drone from parts he had lying around and proceeded with careful flight testing. The hubs were thicker than standard propellers so it limited [Adams] motor choices to ones with longer shafts. Flight testing went surprisingly well, with a hub only failing after [Adam] changed the battery from a 3 cell to a 4 cell and started with some aerobatics. Although this shows that the new props are not suitable for the high forces from racing or aerobatics/freestyle flying, they could probably work quite well for smoother cruising flights. The hubs could also be improved by adding steel pins into the 3D printed shafts, and some carefully balancing the assembled props.

Continue reading “Combine Broken Drone Propellers For A Second Spin”

Sun-Seeking Sundial Self-Calibrates In No Time

Sundials, one of humanity’s oldest ways of telling time, are typically permanent installations. The very good reason for this is that telling time by the sun with any degree of accuracy requires two-dimensional calibration — once for cardinal direction, and the other for local latitude.

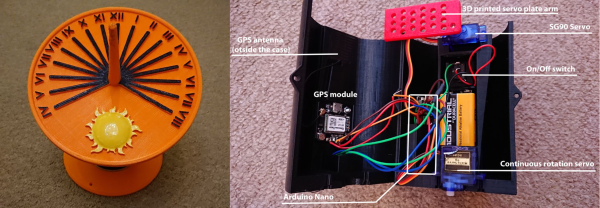
[poblocki1982] is an amateur astronomer and semi-professional sundial enthusiast who took the time to make a self-calibrating equatorial ‘dial that can be used anywhere the sun shines. All this solar beauty needs is a level surface and a few seconds to find its bearings.

Switch it on, set it down, and the sundial spins around on a continuous-rotation servo until the HMC5883L compass module finds the north-south orientation. Then the GPS module determines the latitude, and a 180° servo pans the plate until it finds the ideal position. Everything is controlled with an Arduino Nano and runs on a 9V battery, although we’d love to see it run on solar power someday. Or would that be flying too close to the sun? Check out how fast this thing calibrates itself in the short demo after the break.

Not quite portable enough for you? Here’s a reverse sundial you wear on your wrist.

Celebrate Spring With A DIY Vibration Sensor

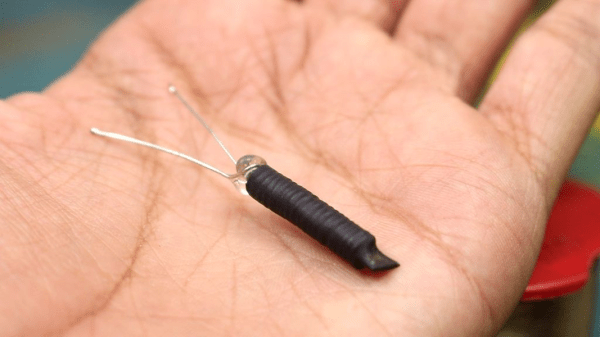
Is your heaving pile of electronic parts shrinking by the day as you finish old back-burnered projects and come up with new ones? Try an old pastime that never gets old: rolling your own sensors using household objects. [Nematic!] needs a way to sense vibration for an upcoming project. Instead of spending $1 plus shipping and waiting who knows how long for a spring vibration sensor to come in the mail, they made one in a matter of minutes.

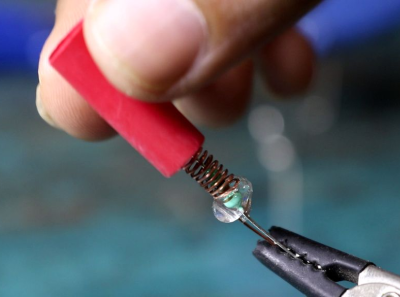
A spring vibration sensor is a simple device that can be used as a poor man’s accelerometer, or simply to detect vibration. All you need is a length of conductive wire, a 10 kΩ resistor, and a way to pick up those good vibrations. For the purposes of demonstration, [Nematic!] is using an Arduino Nano in the short build video after the break.

The wire is wound around the threads of a bolt to form a coil that’s just large enough for a resistor to fit inside. One end of the coil is connected to 5 V, and one leg of the resistor connects to an input pin. Together, they form a normally-open switch. When vibrations force the free ends of both to touch, the circuit is complete and the pin is pulled high.

If you make one of these and find the sensitivity is off, just twist up a new coil with stiffer or softer wire depending on the problem. Iterating doesn’t get much cheaper than wrapping wire around a bolt. We can’t wait to see how [Nematic!] will use this sensor. In the meantime, we’re planning to use one to detect when the dryer stops running and send a text.

Speaking of bargain basement sensors, did you know you can detect water leaks with two pennies, an aspirin, and a clothespin? These projects demonstrate the kind of ingenuity that can win you a pile of toys in our new Making Tech At Home contest, running now through July 28th, 2020.

Continue reading “Celebrate Spring With A DIY Vibration Sensor”

EARN IT: Privacy, Encryption, And Policing In The Information Age

You may have heard about a new bill working its way through the US congress, the EARN IT act. That’s the “Eliminating Abusive and Rampant Neglect of Interactive Technologies Act of 2020”. (What does that mean? It means someone really wanted their initials to spell out “EARN IT”.)

EARN IT is a bipartisan bill that claims to be an effort to put a dent in child exploitation online. It’s also managed to catch the attention of the EFF, Schneier, and a variety of news outlets. The overwhelming opinion has been that EARN IT is a terrible idea, will make implementing end-to-end encryption impossible, and violates the First and Fourth Amendments. How does a bill intended to combat child pornography and sex trafficking end up on the EFF bad list? It’s complicated.

Continue reading “EARN IT: Privacy, Encryption, And Policing In The Information Age”

Neat Open Source Pinhole Camera Design Can Be (Mostly) 3D Printed

We’ve seen pinhole camera builds before, but this new one looks interesting. The Scura is a new open-source design for a pinhole camera that shoots on analog 35 mm film. It is all 3D printable except for a handful of screws, magnets, and the pinhole itself, which is laser cut. The cool and unusual part of the design, though, is the curved film holder, which produces 60 mm by 25 mm (2.3 in by 0.98 in) panoramic images that are sharp to the edges.

Continue reading “Neat Open Source Pinhole Camera Design Can Be (Mostly) 3D Printed”