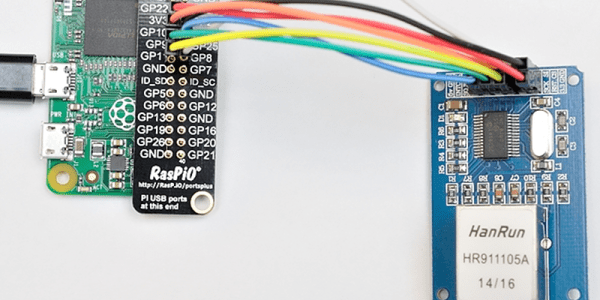
[Alex@Raspi.tv] had the misfortune of blowing the USB hub and Ethernet port on a Raspberry Pi B+. He thought about using a cheap SPI to Ethernet board to rescue it, and while he bought the board, he never got around to interfacing it to the broken Pi. However, when he saw the Raspberry Pi Zero arrive and noticed that everyone wanted to connect it to the network, he remembered the SPI board, rescued it from his junk box, and a few hours later had Ethernet via Raspberry Pi GPIO working.
ethernet147 Articles
Hacking Old Ethernet Gear
Have you ever wanted a pocket-sized device that could tell you if a network jack was live or not? [TanzerGuy] did and he hacked a piece of old networking gear to do the job.
Today when you think of Ethernet, you probably think of CAT-5 cable or something similar. But it hasn’t always been like that. In the early days of Ethernet networking, an Ethernet cable was a big piece of coax. A media attachment unit (MAU) clamped to the cable and then connected to an attachment unit interface (AUI) that resided in the actual network card. Later standards used thinner coax that attached to the card using a Tee connector, but even these are rare today.
Managing An Unmanaged Switch
Network switches come in two different flavors: managed, where you have some interface to configure and monitor the equipment, and unmanaged where the device just does what it is supposed to do and you can’t really control it. [Tiziano Bacocco] wanted to manage his cheap unmanaged switch, so he did what any good hacker would do: he opened it up.
Inside the Digicom 10/100 switch he found an IP178CH controller IC and a quick search turned up a data sheet. [Tiziano] noticed there were three ways to configure the switch: Some hardware pins could control very basic functions; an EEPROM (absent on the PCB) could configure the device; or the chip would accept commands via a synchronous serial port.
Since the datasheet covered the protocol required, [Tiziano] commandeered an Arduino Pro Mini and used it to send commands to configure the switch. A few resistors and some quick code allowed him to control VLAN and other functions on the switch via the USB port. Of course, he mentioned you could use a Raspberry Pi if you wanted a network interface–or maybe that’s a good excuse to use one of those Ethernet shields you got on clearance at Radio Shack.
Bread Online Is A Bread Maker For The Internet Of Things
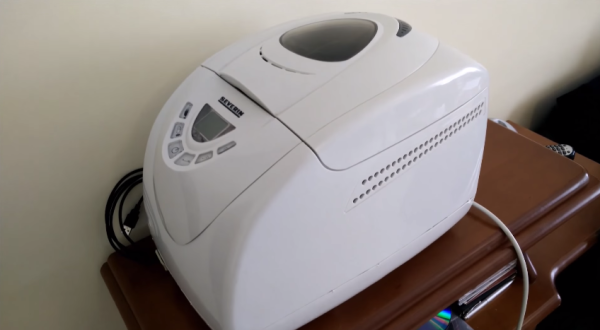
An engineering student at the University of Western Macedonia has just added another appliance to the ever-growing list of Internet enabled things. [Panagiotis] decided to modify an off-the-shelf bread maker to enable remote control via the Internet.
[Panagiotis] had to remove pretty much all of the original control circuitry for this device. The original controller was replaced with an Arduino Uno R3 and an Ethernet shield. The temperature sensor also needed to be replaced, since [Panagiotis] could not find any official documentation describing the specifications of the original. Luckily, the heating element and mixer motor were able to be re-used.
A few holes were drilled into the case to make room for the Ethernet connector as well as a USB connector. Two relays were used to allow the Arduino to switch the heating element and mixer motor on and off. The front panel of the bread maker came with a simple LCD screen and a few control buttons. Rather than let those go to waste, they were also wired into the Arduino.
The Arduino bread maker can be controlled via a web site that runs on a separate server. The website is coded with PHP and runs on Apache. It has a simple interface that allows the user to specify several settings including how much bread is being cooked as well as the desired darkness of the bread. The user can then schedule the bread maker to start. Bread Online also comes with an “offline” mode so that it can be used locally without the need for a computer or web browser. Be sure to check out the video demonstration below. Continue reading “Bread Online Is A Bread Maker For The Internet Of Things”
Retro Edition: The LAN Before Time
Ethernet has been around since the mid-70s, but if you think it was always Cat5 and 10BaseT, you’d be sorely mistaken. The first ethernet was built with coaxial cable, vampire taps, AUI adapters, and a whole bunch of other network hardware that will make wizened networking veterans cringe. [Matt] had heard about these weird physical layers back when he started building networks in 1997, but he had never seen one. Now it’s an ancient and forgotten footnote in the history of computer networking. Is it possible to build a Thicknet in this modern era? It turns out, yes, it’s possible. It’s not easy, though.
The network [Matt] is building is a true 10Base5, or Thicknet, network. The backbone of this network is a coaxial cable 9.5mm in diameter. [Matt] discovered that while the common belief that Thicknet used RG-8/U cable. This appears to be incorrect, as the connectors for this cable – vampire taps that pierced the insulation and shield of the cable – are designed for cable manufactured by Belden, part number 9880.
[Matt] assembled the cable, vampire taps, AUI cables, and even found a few ISA NICs that would still work with a reasonably modern computer. He even went so far as to build a USB Ethernet adapter with an AUI interface. This impossibly retro device uses a standard USB to 10BaseT Ethernet adapter, with a chip designed to convert 10BaseT to AUI hacked onto a circuit board. That in itself is an incredible piece of engineering, with a handful of power supplies to get the correct 2.5, 3.3, 5, and 12 Volts to the right places.
As far as exercises in computing history go, [Matt] is at the top of his game. In the process of building it, he also figured out why no one uses Thicknet anymore; once it’s in place, you can’t change it, the cable is big, bulky, and the connectors are terrible. Still, it’s an amazing example of how far we’ve come.
Hackaday Links: June 7, 2015
I’ve said over and over again that Apple’s MagSafe port is the greatest advancement in laptop tech in the last 15 years. Those charger connectors break, though, so how do you fix it? With Lego, of course (Google translatrix). Use a light-colored 1×4 brick so the LED will shine through.
Want to learn Git commands? Here’s a great game that does just that. It’s a really well-designed game/tutorial that walks you through basic Git commands.
Lets say you’re just slightly paranoid about the Bad Guys™ getting into your computer with 0-days and roller blades. You’d like to connect this computer to the Internet, but you don’t want to leave it connected all the time. The solution? A timer for an Ethernet switch. It’s actually a better solution than doing the same thing with scripts: there’s a real, physical interface, and if the Bad Guys™ get in when you are connected, they could just enable the network adapter anyway. An extremely niche use case, but that’s 99% of the security hacks we see.
The DaVinci 3D printer is an okay printer if you’re cool with the Gilette model. The filament cartridges are chipped, and the software is proprietary. These problems have been solved, and now you can use a standard RepRap heated bed and glass with the DaVinci. At this point, people are buying the DaVinci just to tear it apart.
An Arduino Device That Monitors Your External IP Address
[Bayres’] dad setup a webcam as a surveillance camera for a remote property. The only problem was that the only stable Internet connection they could get at this property was DSL. This meant that the external IP address of the webcam would change somewhat often; the needed a way to keep track of the external IP address whenever it changed. That’s when [Bayres] built a solution using Arduino and an Ethernet shield.
The main function of this device is to monitor the public IP address and report any changes. This is accomplished by first making a request to checkip.dyndns.org. This website simply reports your current public IP address. [Bayres] uses an Arduino library called Textfinder in order to search through the returned string and identify the IP address.
From there, the program compares this current value to the previous one. If there is any change, the program uses the Sendmail() function to reach out to an SMTP server and send an e-mail alert to [Beyres’] dad. The system also includes a small LCD. The Arduino outputs the current IP address to this display, making it easy to check up on the connection. The LCD is driven by 74HC595 shift register in order to conserve pins on the Arduino.
The system is also designed with a pretty slick setup interface. When it is booted, the user can enter a configuration menu via a Serial terminal. This setup menu allows the user to configure options such as SMTP server, email address, etc. These variables are then edited and can be committed to EEPROM as a more permanent storage solution. Whenever the system is booted, these values are read back out of the EEPROM and returned to their appropriate variables. This means you can reconfigure the device on the fly without having to edit the source code and re-upload.