There’s always something to be learned from taking things apart. Sometimes the parts can be used for other things, sometimes they can be repaired or improved upon, but sometimes it’s all in good fun. Especially in this case where extremely high temperatures and combustible gasses are involved. This is from the latest video from [Warped Perception] that lets us see inside of a catalytic converter as its operating.
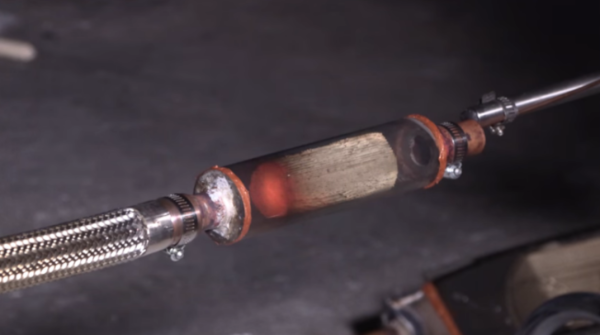
Catalytic converters are installed on most vehicles (and other internal combustion engines) in order to process unburned hydrocarbons from exhaust gasses with a catalyst. These can get extremely hot, and this high temperature complicated the build somewhat. There were two prototypes constructed for this build and the first was a cross-section of a catalytic converter with a glass window sealed on in order to allow the viewing of the catalyst during the operation of a small engine. It was easy to see the dirty exhaust gasses entering and cleaner gasses leaving, but the window eventually blew off. The second was a complete glass tube which worked much better until the fitting on the back finally failed.
A catalytic converter isn’t something we’d normally get to see the inside of, and this video was worth watching just to see one in operation in real life. You could also learn a thing or two about high-temperature fittings as well if you’re so inclined. It might be a nice pairing with another build we’ve seen which gave us a window into a different type of combustion chamber than ones normally found on combustion engines.
Thanks to [Ryoku] for the tip!