A Game That Does More With Less

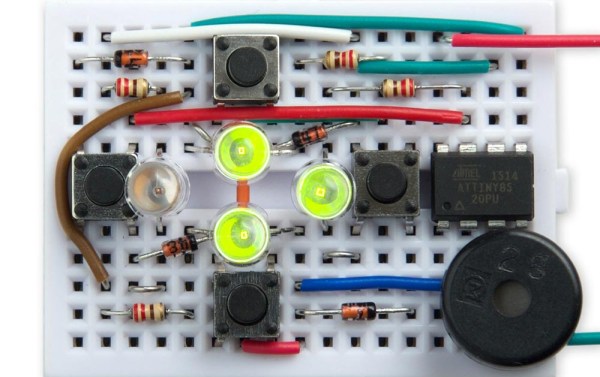
[David Johnson-Davies] created a minimal Secret Maze Game using a single ATTiny85 and a few common components. This simple game uses four buttons, four LEDs, and a small speaker. The player moves in the four cardinal directions using buttons, and the LEDs show walls and corridors. If an LED is lit, it means the path in that direction is blocked by a wall, and attempting to move in that direction will make a beep. When the player reaches the exit, a short victory tune chirps from the speaker.

Sample maze. A 16×16 matrix is allocated for maze designs.

Since the ATTiny85 has only five I/O lines, [David] had to get a bit clever to read four buttons, display output on four LEDs, and drive a little speaker. The solution was to dedicate one pin to the speaker and the other four to charlieplexing, which is a method of driving more LEDs than you have pins. It takes advantage of the fact that most microcontroller pins can easily switch state between output high, output low, or low-impedance high-impedance input.

As for the buttons, [David] charlieplexed them as well. Instead of putting an LED in a charlieplexed “cell”, the cell contains a diode and an SPST switch in series with the diode. To read the state of the switch, one I/O line is first driven low and the other I/O line is made an input with a pullup. A closed switch reads low on the input, and an open switch reads high. With charlieplexing, four pins is sufficient for up to twelve LEDs (or buttons) in any combination, which is more than enough for the Secret Maze.

Charlieplexing is also what’s behind this 110 LED micro-marquee display, or this elegant 7-segment display concept that takes advantage of modern PCB manufacturing options.

Always Misplacing Your Keys? You Can Fix That With Some Logic Chips

Every time he came home, it was the same thing. As soon as he crossed the threshold, his keys just disappeared. There was no other logical explanation for it. And whenever it was time to leave again, he had to turn the house upside down to find them.

One day, [out-of-the-box] decided he’d had enough and built a door-activated alarm system out of stuff he had on hand—a decade counter, a cheapo reed switch-based door alarm, and some transistors. When the door is closed, the decade counter’s output is set to light up a green LED. When he comes home and opens the door, the reed switch closes, triggering the decade counter to shift its output to the next pin. The red LED comes on, and NPN transistor grounds the piezo, sounding the alarm. The only way to stop it is by inserting a shorted 1/4″ phone plug conveniently attached to his key ring into a jack on the circuit board until he hears that satisfying click of safe key-ping.

For those times when immediately plugging the keys into the wall isn’t feasible, or if his keys should disappear before he has the chance, there’s a momentary on the board that will stop the symphony of robotic cicadas blasting out from the piezo. It’s also good for family members who don’t want to play along or haven’t yet earned their 1/4″ plug.

Be sure to check out the build video after the break, which is just through that door there. And keep an eye on your keys, eh? Hackaday is not responsible for lost or stolen personal articles. Should you lose them, we can only suggest making a new car key from the spare and printing replacements for any standard keys.

Continue reading “Always Misplacing Your Keys? You Can Fix That With Some Logic Chips”

Hackaday Links Column Banner

Hackaday Links: February 4th, 2018

Here’s something remarkably displeasant. Can you cook a steak with glue? [Dom] and [Chris] from ExplosiveDischarge have cooked a steak using a huge, huge amount of two-part epoxy. The chemistry behind this is just the exothermic reaction when two-part epoxy kicks off, and yes, the steak (a very thin cut) was sufficiently wrapped and protected from the hot sticky goo. What were the results? An overcooked steak, actually. This isn’t a sous vide setup where the temperature ramps up to 50°C and stays there — the temperature actually hit 80°C at its peak. There are a few ways to fix this, either by getting a thicker cut of steak, adding some bizarre water cooling setup to keep the temperature plateaued at a reasonable temperature.

This is your weekly reminder for the Repairs You Can Print contest.

We’ve got a twofer for awesome remote-controlled hovering stuff. The first is a 1:8 scale Harrier. This plane designed and built by [Joel Vlashof] will be a reasonably accurate model of a Harrier, capable of VTOL. It’s built around a huge 130mm EDF, powered by 2x6s lipos, and stabilized with a kk2.1 flight controller with VTOL software. This is as accurate a Harrier that you’re going to get in such a small format, and has the cool little spinny vanes that allow the beast to transition from vertical to horizontal flight.

Want some more cool hovering things? [Tom Stanton] is building a remote controlled Chinook. Yes, that helicopter with two main rotors. The usual way of doing this is with proper helicopter control systems like collectives and Jesus nuts. [Tom]’s building this version with standard quadcopter technology, mounting a motor to a servo, and doubling it up, and mounting it on a frame. In effect, this RC Chinook is the tail boom of a tricopter doubled up on a single frame. It does fly, and he’s even built a neat foamboard body for it.

SpaceX’s Falcon Heavy is going to do something next Tuesday, sometime in the afternoon, east coast time. Whatever happens, it’s going to be spectacular.

Hey, it’s time for a poll. I need to decide between ‘tide pod’ and ‘solo jazz’. For what I’m doing, the cost and effort are the same, I just need to know which is more aesthetic, cool, or whatever. Right now it’s 50:50. One must be crowned victorious!

Here’s the stupidest thing you’re going to see all year. That’s someone looping a quadcopter in front of a Frontier A320 (Probably. Seems too big for a 319 and too small for a 321) on approach. This guy is 3.6 miles East of runway 25L at McCarran Internation in Las Vegas, at an altitude far above the 400-foot limit. Judging from the video and the wingspan, this quad came within 200 feet of a plane carrying at least 150 people. It’s the stupidest thing you’ve ever seen, so don’t do it. It’ll be great to see the guy responsible for this in jail.

Benchtop Fume Extractor Cuts The Cord, Clears The Air

What good is safety gear that isn’t used because it’s annoying and gets in the way of getting the job at hand completed? None, really, and the solder fume extractor is one item that never seems to live in harmony with your workspace. They’re often noisy, they obstruct your vision, and a power cord draped across your bench is a sure way to ruin your soldering zen.

To fix those problems, [Nate] has built a nice battery powered solder fume extractor that’s so low profile and so quiet, you won’t mind sharing a bench with it. Based on a standard 80-mm case fan, the extractor has a built-in 18650 battery for power and a USB charging port. There are nice little features, like a speed control and a low-battery indicator. The fan mounts to a pair of custom PCBs, which form the feet for the fan. [Nate] claims to have run the fan for 12 hours straight on battery before needing a charge, and that it’s so quiet he needs to add a power indicator to the next version. Also making an appearance in rev 2 will be a carbon filter to catch the fumes, but as [Nate] notes, better to spread them around for now than let them go directly up his nose.

Are you in the hacking arts for the long haul? Let’s hope so. If you are, make sure you’re up on the basics of mitigating inhalation hazards.

Repairs You Can Print: Nintendo 3DS XL Lives Again!

Handheld game consoles have a hard life, and even the most well-built models can sometimes fail. The Nintendo 3DS XL, for example, can fail at its hinge, which is what happened to the one owned by [Mark]. Would he fix the hinge? No, he had a far simpler if a little less flexible solution, a 3D-printed bracket that clips over the whole device.

Sometimes the best pieces of work are also the simplest ones, and this one certainly fits that bill on both counts. When your console dies, you want it fixed, and though this doesn’t extend as far as providing a working hinge action it should allow you to play without further damaging anything. It’s not impossible to imagine that it could be made to incorporate a flexible zig-zag section to produce a closeable hinge, but if your Nintendo is broken you’ll care little for such niceties. The project can be downloaded from its Thingiverse page.

A common failure that we’d expect to accompany a broken hinge would be a faulty flexible ribbon cable. Fortunately, those are fixable on the 3DS, too.

A Few Laser-Cut Cases For Your SBCs

Single-board computers, usually featuring ARM processors, have revolutionized the world of the hardware hacker over the last decade. The computing power you would have found in a desktop computer not so long ago, mounted on a small PCB and powered from a mobile phone charger.

With a few notable exceptions though, these single board computers are just that, boards. No cases in the pack, which has, of course, spawned a huge aftermarket of commercial offerings and a pile of homemade ones of varying sophistication. If these homemade offerings are your fancy then today’s link may be of interest, some very well-designed laser-cut cases from [Nick Smith] for a selection of popular and less well-known boards.

The Orange Pi Lite and Raspberry Pi Zero are both familiar enough, but one of the delights of writing for Hackaday reveals itself in the discovery of the more esoteric Marvell ESPRESSObin, an SBC with multiple network ports and serial ATA.

Are cases your passion? Step back in time for our round-up of case designs for the first Raspberry Pi.

Via Hacker News.


Beating Life-Force Amulet

It’s one thing to see science-fiction slowly become reality, but quite another to take that process into your own hands. Inspired by a movie prop, [Eric Strebel] decided to build himself a 21st science-fiction artifact: a pulsing, life-force amulet.

At the — aheam — heart of this amulet is a blinking LED circuit which [Strebel] modified into a slow pulse with the help of his friends. To add to the surreal quality of the amulet, he sourced a stone from a local gem show, bringing his circuit along to get an idea of what the final product would look like. Once [Strebel] had shaped the stone to a more manageable size, he took a polyester filler mold of its rear face to use as a base from which to cast a durable resin housing for the circuit.

[Strebel] is using a pair of coin cell batteries which fit snugly behind the glowing LED, and in case he ever needs to get inside the amulet, he’s attached the stone to the rear with sew-on straps — super-gluing them to each piece. He went for a bit of an industrial look for the necklace — a braided oil line with a modified quick-release clasp that works like a charm.

How does this amulet stack up to one from the 23rd century? You be the judge!