The Narrowing Gap Between Amateur And Professional Fabrication

The other day I saw a plastic part that was so beautiful that I had to look twice to realize it hadn’t been cast — and no, it didn’t come out of a Stratysys or anything, just a 3D printer that probably cost $1,500. It struck me that someone who had paid an artisan to make a mold and cast that part might end up spending the same amount as that 3D printer. It also struck me that the little guys are starting to catch up with the big guys.

Haz Bridgeport, Will Mill

Sometimes it’s just a matter of getting a hold of the equipment. If you need a Bridgeport mill for your project, and you don’t have one, you have to pay for someone else to make the thing — no matter how simple. You’re paying for the operator’s education and expertise, as well as helping pay for the maintenance and support of the hardware and the shop it’s housed in.

I once worked in a packaging shop, and around 2004 we got in a prototype to use in developing the product box. This prototype was 3D printed and I was told it cost $12,000 to make. For the era it was mind blowing. The part itself was simplistic and few folks on Thingiverse circa 2017 would be impressed; the print quality was roughly on par with a Makerbot Cupcake. But because the company didn’t have a 3D printer, they had to pay someone who owned one a ton of cash to make the thing they wanted.

Unparalleled Access to Formerly Professional-Only Tools

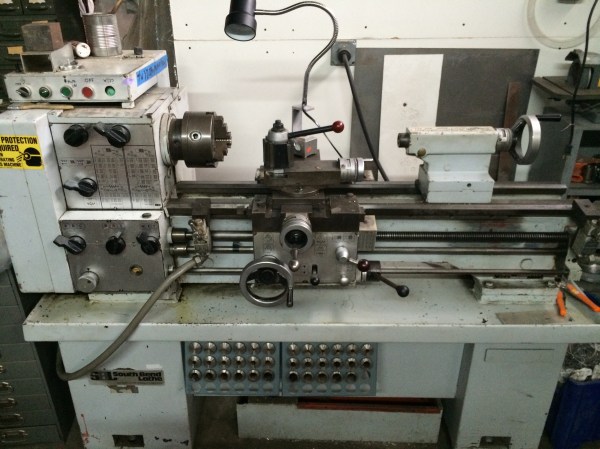
But access to high end tools has never been easier. Hackerspaces and tool libraries alone have revolutionized what it means to have access to those machines. There are four or five Bridgeports (or similar vertical mills) at my hackerspace and I believe they were all donated. For the cost of membership, plus the time to get trained in and checked out, you can mill that part for cheap. Repeat with above-average 3D printers, CNC mills, vinyl cutters, lasers. The space’s South Bend lathe (pictured) is another example of the stuff most people don’t have in their basement shops. This group ownership model may not necessarily grant you the same gear as the pros, but sometimes it’s pretty close.
Continue reading “The Narrowing Gap Between Amateur And Professional Fabrication”

So, You’ve Never Made A Spaceframe Before

It is sometimes a surprise in our community of tinkerers, builders, hackers, and makers, to find that there are other communities doing very similar things to us within their own confines, but in isolation to ours. A good example are the modified vehicle crowd. In their world there are some epic build stories and the skills and tools they take for granted would not in any way be unfamiliar to most Hackaday readers.

As part of a discussion about electric vehicles near where this is being written, someone tossed an interesting link from that quarter into the mix; a two-part treatise on building ultra-light-weight tubular frame vehicles. Or space frames, as you might know them.

You might think that making a tubular framed for a vehicle would be a straightforward enough process, but as the article explains, it contains within it a huge well of geometry and metallurgy to avoid a creation that is neither too heavy nor contains excessive weakness. Part one deals mainly with prototyping a frame, the selection of materials and joining tubes, while part two goes into more detail on fabrication. The author likes brazing which may offend the sensibilities of welding enthusiasts, but you can substitute your jointing tech of choice.

A particularly neat suggestion, one of those simple ideas that make you wish you’d thought of it yourself, is to prototype a frame in miniature with copper wire and solder to evaluate the effect of different forces upon it before you commit your final design to steel.

The articles are a few years old, but no less pertinent in the information they contain. Meanwhile if you are a spaceframe veteran, then you may have your own suggestions for the comments below. And if you’d like some tips on how not to build a spaceframe, have a look at this motorcycle.

Thank you [JHR] and [Jarkman] for the tips.

Lasering Axonometric Fonts

I am something of an Inkscape fan. If you’re not familiar with the application, it’s like an Open Source version of Adobe Illustrator. Back when I was a production artist I’d been an Illustrator master ninja but it’s been four years and my skills are rusty. Plus, Inkscape is just enough different in terms of menus and capabilities that I had a hard time adapting.

So I created some wooden lettering with the help of Inkscape and a laser cutter, and I’m going to show you how I did it. If you’re interested in following along with this project, you can find it on Hackaday.io.

While playing around with Inkscape, I noticed you can create a variety of grids, including axonometric grids. This term refers to the horizon lines in an orthographic projection. In other words, it helps make things look 3D by providing perspective lines.

Continue reading “Lasering Axonometric Fonts”

Strandbeest Not Fooling Anyone — We See Right Through It

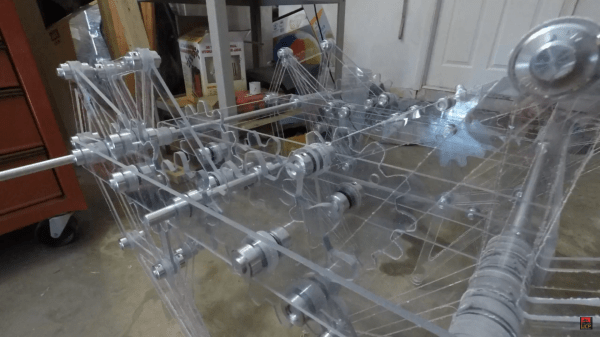
This Strandbeest is ready for the security line at a security-conscious high school. Like see-though backpacks, its clear polycarbonate parts let you see everything that goes into the quirky locomotion mechanism. Despite having multiple legs, if you analyze the movement of a Strandbeest it actually moves like a wheel.

For us, it’s the narrated fabrication video found below that makes this build really interesting. Hackaday alum [Jeremy Cook] has been building different versions of [Theo Jansen’s] Strandbeest for years now. Strandmaus was a small walker controlled by a tiny quadcopter, and MountainBeest was a huge (and heavy) undertaking. Both were made out of wood. This time around [Jeremy] ordered his polycarbonate parts already cut to match his design. But it’s hardly a walk on the beach to make his way to final assembly.

The holes to accept the hardware weren’t quite large enough and he had to ream them out to bring everything together. We enjoyed seeing him build a jig to hold the spacers for reaming. And his tip on using an offset roll pin to secure the drive gear to the motor shaft is something we’ll keep in mind.

In the end, things don’t go well. He had machined out a motor coupling and it ends up being too weak for the torque driving the legs. Having grown up watching [Norm Abram] build furniture (and houses) without a single blown cut or torn-out end grain this is a nice dose of reality. It’s not how perfect you can be with each step, it’s how able you are to foresee problems and correct them when encountered.

Continue reading “Strandbeest Not Fooling Anyone — We See Right Through It”

The Fab Lab Next Door: DIY Semiconductors

You think you’ve got it going on because you can wire up some eBay modules and make some LEDs blink, or because you designed your own PCB, or maybe even because you’re an RF wizard. Then you see that someone is fabricating semiconductors at home, and you realize there’s always another mountain to climb.

We were mesmerized when we first saw [Sam Zeloof]’s awesome garage-turned-semiconductor fab lab. He says he’s only been acquiring equipment since October of 2016, but in that short time he’s built quite an impressive array of gear; a spin-coating centrifuge, furnaces, tons of lab supplies and toxic chemicals, a turbomolecular vacuum pump, and a vacuum chamber that looks like something from a CERN lab.

[Sam]’s goal is to get set up for thin-film deposition so he can make integrated circuits, but with what he has on hand he’s managed to build a few diodes, some photovoltaic cells, and a couple of MOSFETs. He’s not growing silicon crystals and making his own wafers — yet — but relies on eBay to supply his wafers. The video below is a longish intro to [Sam]’s methods, and his YouTube channel has a video tour of his fab and a few videos on making specific devices.

[Sam] credits [Jeri Ellsworth]’s DIY semiconductor efforts, which we’ve covered before, as inspiration for his fab, and we’re going to be watching to see where he takes it from here. For now, though, we’d better boost the aspiration level of our future projects.

Continue reading “The Fab Lab Next Door: DIY Semiconductors”

From Zero To Nano

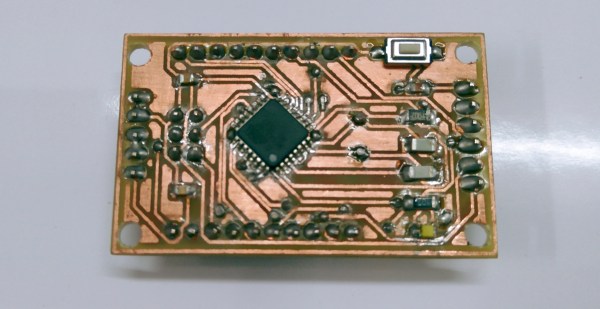
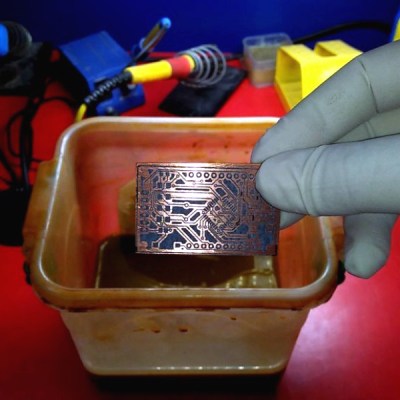
Have you ever wanted to build your own Arduino from scratch? [Pratik Makwana] shares the entire process of designing, building and flashing an Arduino Nano clone. This is not an entry-level project and requires some knowledge of soldering to succeed with such small components, but it is highly rewarding to make. Although it’s a cheap build, it’s probably cheaper to just buy a Nano. That’s not the point.

The goal here and the interesting part of the project is that you can follow the entire process of making the board. You can use the knowledge to design your own board, your own variant or even a completely different project.

from-zero-to-nano-thumb[Pratik Makwana] starts by showing how to design the circuit schematic diagram in an EDA tool (Eagle) and the corresponding PCB layout design. He then uses the toner transfer method and a laminator to imprint the circuit into the copper board for later etching and drilling. The challenging soldering process is not detailed, if you need some help soldering SMD sized components we covered some different processes before, from a toaster oven to a drag soldering process with Kapton tape.

Last but not least, the bootloader firmware. This was done using an Arduino UNO working as master and the newly created the Arduino Nano clone as target. After that you’re set to go. To run an actual sketch, just use your standard USB to UART converter to burn it and proceed as usual.

Voilá, from zero to Nano:

Continue reading “From Zero To Nano”

How To Have An Above Average Time With A Cheap Horizontal Bandsaw

[Quinn Dunki] has brought yet another wayward import tool into her garage. This one, all covered in cosmoline and radiating formaldehyde fumes, is a horizontal bandsaw.

Now, many of us have all have some experience with this particular model of horizontal saw. It waits for us at our work’s machine shop, daring us to rely on it during crunch time. It lingers in the corner of our hackerspace’s metalworking area, permanently stuck in the vertical position; at least until someone finally removes that stripped screw. Either that or it’s been cannibalized for its motor, the castings moldering in a corner of the boneyard.

This article follows on the heels of [Quinn]’s other work, a treatise on the calibration of a drill press, and it outlines all the steps one has to take to bring one of these misunderstood tools into consistent and reliable operation. It starts with cultivating a healthy distrust of the factory’s assurances that this device is, “calibrated,” and needs, “no further attention.” It is not, and it does. Guides have to be percussively maintained out of the blade’s way. Screws have to be loosened and adjusted. It takes some effort to get the machine running right and compromises will have to be made.

In the end though, with a high quality blade on, the machine performs quite well. Producing clean and quality cuts in a variety of materials. A welcome addition to the shop.