An External Autofocus For DSLRs

Most modern DSLR cameras support shooting full HD video, which makes them a great cheap option for video production. However, if you’ve ever used a DSLR for video, you’ve probably ran into some limitations, including sluggish autofocus.

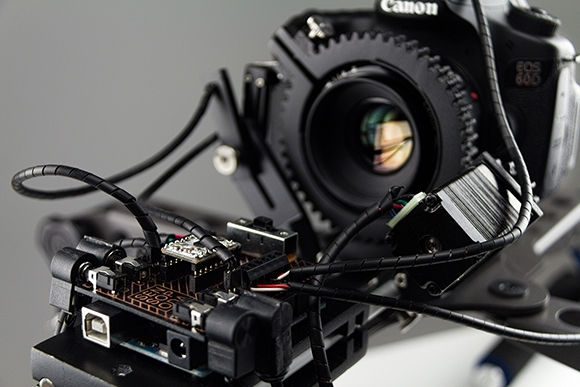
Sensopoda tackles this issue by adding an external autofocus to your DSLR. With the camera in manual focus mode, the device drives the focus ring on the lens. This allows for custom focus control code to be implemented on an external controller.

To focus on an object, the distance needs to be known. Sensopoda uses the HRLV-MaxSonar-EZ ultrasonic sensor for this task. An Arduino runs a control loop that implements a Kalman filter to smooth out the input. This is then used to control a stepper motor which is attached to the focus ring.

The design is interesting because it is rather universal; it can be adapted to run on pretty much any DSLR. The full writeup (PDF) gives all the details on the build.

3D Scanning By Calculating The Focus Of Each Pixel

calculating-focus-to-generate-depth-map

We understand the concept [Jean] used to create a 3D scan of his face, but the particulars are a bit beyond our own experience. He is not using a dark room and laser line to capture slices which can be reassembled later. Nope, this approach uses pictures taken with several different focal lengths.

The idea is to process the photos using luminance. It looks at a pixel and it’s neighbors, subtracting the luminance and summing the absolute values to estimate how well that pixel is in focus. Apparently if you do this with the entire image, and a set of other images taken from the same vantage point with different focal lengths, you end up with a depth map of pixels.

What we find most interesting about this is the resulting pixels retain their original color values. So after removing the cruft you get a 3D scan that is still in full color.

If you want to learn more about laser-based 3D scanning check out this project.

[Thanks Luca]

Hacking The Computer Interface Of A Ford Focus Mk2

You can do some neat stuff to the way your Ford Focus Mk2 works, but first you have to gain access to the data system. If you know some Russian, and don’t mind a bit of dongle rewiring, this guide will have you hacking the car’s CAN bus in no time. It was written by [Preee] and he has already added Radio RDS and CD Track information to the speedometer display panel, implemented hands free control for his cellphone, disabled the sounds the car makes when he goes into reverse, changed the door locking speed from 5mph to 10mph, and much more.

To gain access to the system you need hardware to bridge from a computer to the CAN bus. He hit eBay and bought an ELM327 cable which plugs into the On-Board Diagnostics port (ODBII). There are two different ways these dongles can be configured and since this isn’t the right one for the Focus he had to alter it. His hardware changes are illustrated in the second post of the forum thread. Instead of just switching over to the other configuration, he wired up a toggle switch to select between the two.

With hardware in place he grabbed some software and started hacking away. But as we hinted above, it’s not as simple as you might think. The software is in Russian. [Preee] did his best to add translations to a few screenshots, but it’s still going to be a bit of a bother trying to find your way around the GUI.

[Thanks Fred]

Focus Fix For Non-reflex 35mm Camera

For camera fanatics the acquisition of an old camera is a thrilling event. But if you’re going to collect them, you’d better have some repair skills so that you can also use them. [Fernando’s] latest find was this Minox 35mm camera. The aperture needed cleaning, and after reassembling the unit he realized the he had not marked the focus ring when taking it apart. This is not a reflex camera, so you can’t look in the view finder to adjust focus. He came up with his own method to get the focus ring calibrated.

The focal point needs to focus on the film. He simulated this plane using some magic tape, which removes easily without leaving a residue. When the shutter is open, you can see the image projected on this translucent surface. He then set up the camera with the lens 90 cm from a bright light bulb. By adjusting the focus to create a sharp image on the temporary screen, he knows the focus is calibrated, and can reset the focus ring to the 0.9m mark.

Need some help developing that exposed film? You could always give the coffee and vitamin C hack a try.

Disco Death Ray

Wielding the power to melt glass or instantly ignite most day to day materials can be intoxicating pretty fun. With a little math, a lot of patience, and 5,800  1cm pieces of mirror, this build requires welding glasses just to look at the 1-2cm focal point. With an idea rumored to date back to Archimedes, this more portable parabolic project is perfect for your home burning needs. Unfortunately, this setup seems to have burnt itself to death at some point, though that makes room for version two, which will reportedly bump the mirror count to 32,000 or so.

There are plenty of other ways to make a death ray out there as well, including using lasers or lenses. Think you have a better tool of destruction? Be sure to tell us about it.

Hardware Store Follow Focus

Want to do quick and accurate focus change with your DSLR? Here’s a discussion thread covering dirt-cheap solutions. It starts with a broccoli rubber-band and a couple of zip ties. That being a bit chintzy, the more popular build seen above uses a hose clamp, rubber band for padding, a drawer pull, a nut, and some threaded rod. If you build it, be very careful not to over-tighten the clamp and crush your focus ring! After the break we’ve embedded a video of what follow focus looks like through the lens and what is happening with the camera during the shoot.

Continue reading “Hardware Store Follow Focus”