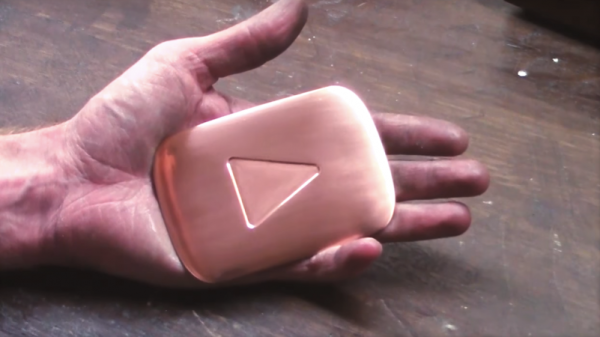
The Fab Lab Next Door: DIY Semiconductors

You think you’ve got it going on because you can wire up some eBay modules and make some LEDs blink, or because you designed your own PCB, or maybe even because you’re an RF wizard. Then you see that someone is fabricating semiconductors at home, and you realize there’s always another mountain to climb.

We were mesmerized when we first saw [Sam Zeloof]’s awesome garage-turned-semiconductor fab lab. He says he’s only been acquiring equipment since October of 2016, but in that short time he’s built quite an impressive array of gear; a spin-coating centrifuge, furnaces, tons of lab supplies and toxic chemicals, a turbomolecular vacuum pump, and a vacuum chamber that looks like something from a CERN lab.

[Sam]’s goal is to get set up for thin-film deposition so he can make integrated circuits, but with what he has on hand he’s managed to build a few diodes, some photovoltaic cells, and a couple of MOSFETs. He’s not growing silicon crystals and making his own wafers — yet — but relies on eBay to supply his wafers. The video below is a longish intro to [Sam]’s methods, and his YouTube channel has a video tour of his fab and a few videos on making specific devices.

[Sam] credits [Jeri Ellsworth]’s DIY semiconductor efforts, which we’ve covered before, as inspiration for his fab, and we’re going to be watching to see where he takes it from here. For now, though, we’d better boost the aspiration level of our future projects.

Continue reading “The Fab Lab Next Door: DIY Semiconductors”

Flying Balls Of Molten Aluminum!

We’re replacing “holy moley” in our vocabulary. Levitating globs of molten aluminum are that much more amazing. It’s not that we couldn’t believe it would work — we understand the physics after the fact. It’s just that we never would have thought to build an induction forge that can simultaneously melt and levitate a chunk of aluminum. (Video embedded below.)

[imsmoother] has had plans for 3 kW and 10 kW induction heaters online since at least 2011, and we’re wondering how we haven’t covered it before. Anyway, in the video, he’s using the smaller of the two to melt a chunk of aluminum. Continue reading “Flying Balls Of Molten Aluminum!”

Mini-Forge On A Budget

7

Feeling a little black-smithy? Ever wanted to hammer some red-hot steel into a new shape? Turns out, it’s well within your reach!

We’ve seen soup can forges, paint can forges, and even full blown coal fired forges — but none quite as simple as this. All you need is a fire brick — and some tools.

The problem is, fire bricks are kind of fragile. In order to drill into it without cracking the brick [Mike] advises us to clamp it in a wooden jig to help support it. Slowly drill a long hole lengthwise in it, slightly oblong to allow for your work piece to go inside. Flip the brick sideways, and add a second perpendicular hole in order to insert your gas torch of choice.

Now before you go heating it up, it is wise to reinforce the brick by wrapping some wire around it to prevent it from falling apart when it inevitably cracks due to temperature changes. A more permanent solution is to encase the entire brick in concrete to make it more durable, which [Mike] plans on doing next time. Continue reading “Mini-Forge On A Budget”

Melting Metal With A DIY Foundry Furnace

Foundry Furnace

If you want to do casting at home, you’ll need a way to melt metal. [Jake]’s DIY foundry furnace gets hot enough to melt aluminium, and is built out a mix of scrap parts.

The chamber of the furnace is built out of a water heater tank which has been lined with a special cement that refracts heat. The furnace is heated by a Babington burner. This type of burner works by atomizing the fuel and injecting it into the furnace. They are good for burning waste oil to achieve high heats.

A scrap Volkswagen oil pump and a cordless drill are used to feed oil into the burner. Once it’s fired up, the furnace takes about 10 minutes to melt the 11 pounds of metal that it can hold. [Jake] melted about 40 pounds of aluminium alloy from scrap alloy wheels in 2 hours, which should be more than enough for a home casting project.

After the break, check out the overview of the device and a demo of melting aluminium.

Continue reading “Melting Metal With A DIY Foundry Furnace”

Rolling Your Own Furnace Controller

replacement-thermostat

[Viktor’s] found an opportunity to put his embedded design skills to use when the furnace controller in his building went out. He admits it would have been much easier to just purchase a replacement, but not nearly as fun. Instead he built this furnace controller based on a PIC 18F4550.

First off, you may find it strange that we’re calling this a furnace controller and not a thermostat. But a study of the hardware schematic reveals that the device doesn’t have the ability to sense temperature. It merely switches the furnace on and off based on a time schedule. We guess this is for an apartment building where measuring the temperature at one central point doesn’t suffice?

At any rate, the build is clean and the UI looks quite easy to use. Inside there’s a board-mounted 12V relay which controls the furnace. The schedule is saved to the EEPROM of the microcontroller and time is kept by a battery-backed DS1307.

We’d love to see this extended in the future. Some possibilities would be adding internet connectivity and implementing a mesh network of temperature sensors which would give feedback to the main unit.

Building A Casting Furnace With Heat Exchanger

This completely DIY casting furnace turned out just great thanks to all the work [Biolit11] put into it along the way. He wanted to replace his older furnace with one that was more efficient, and to that end he built a heat exchanger into the design. This way the exhaust will preheat the intake air.

The furnace itself started with the shell of an old electric water heater. Excluding the design process, the majority of the build involved mold making. For circular parts he’s using quick tube, the paperboard forms used for pouring concrete footings. For more intricate parts he shaped polystyrene. They are layered in place and high-temperature cement is poured to form the permanent parts. After it hardens the polystyrene can be removed in chunks.

The heat exchanger is the part to the left. It includes several wide, flat pipes made of cement for removing the exhaust. Around those pipes a snaking metal chase carries the intake air which picks up the heat as it passes over the exhaust pipes.

For his first run with the new furnace he melted down a bunch of scrap aluminum and poured ingots.

[Thanks DC3]

Building A Coal Forge

We don’t get to see Blacksmith hacks around here too often. But even if they were rolling in on a weekly basis we think this one would be considered the special expanded edition with full-color centerfold. The sixty-five images in this coal forge build log are all commented and just begging to steal your attention for part of the afternoon.

The build mostly involves fabricating a system for injecting air into the forge and providing a mechanism for evacuating the waste ash. [BillDaCat] starts with a 3″ pipe as the ash dump, adding a latching door used to empty it when full. He then welds together a metal trough with a slotted bottom to hold the fiery fury, attaching the ash dump below. He uses a plasma cutter to add an opening in the upper portion of the ash dump for a blast gate.

If you’re excited about his build you should also check out the metal pour and the induction furnace.

[via Reddit]