Hacking Flappy Bird By Playing Mario

This is a hacking and gaming tour de force! [Seth Bling] executed a code injection hack in Super Mario World (SMW) that not only glitches the game, but re-programs it to play a stripped-down version of “Flappy Bird”. And he did this not with a set of JTAG probes, but by using the game’s own controller.

There are apparently a bunch of people working on hacking Super Mario World from within the game, and a number of these hacks use modified controllers to carry out the sequence of codes. The craziest thing about our hack here is that [Seth] did this entirely by hand. The complete notes are available here, but we’ll summarize the procedure for you. Or you can go watch the video below. It’s really incredible.

Continue reading “Hacking Flappy Bird By Playing Mario”

Hack A PS/2 Keyboard Onto Your Pi Zero

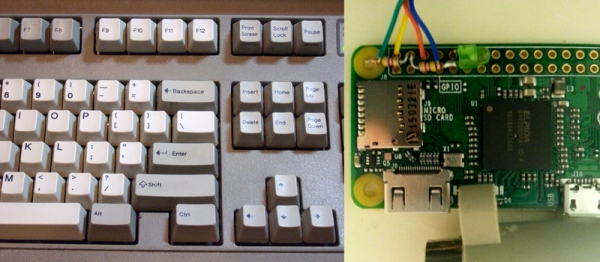
Hacking for the Raspberry Pi Zero is a tricky proposition. Whatever you do, you’re working with a nominal five dollar board, so your hacks can’t be too highfalutin. For instance, a decent PS/2 to USB adapter will cost you as much as the Zero did, if not more. But if you just need to drive your Pi Zero from your old Model M (we hear you!) you’ve got to do it on the cheap.

So when prolific Pi hacker [mincepi] set out to build a PS/2 adapter, some corners were cut. PS/2 is a clocked data protocol, but the good news is that the clock doesn’t start and stop all the time as in I2C or SPI. This means that if you poll the data line at just the right frequency, at least in principle you’ll be able to ignore the clock.

ps2-schematic_border

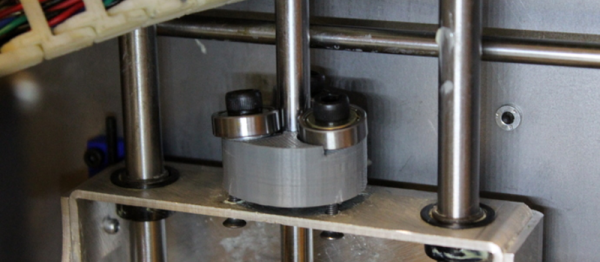
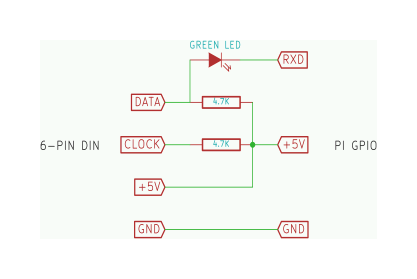
So that’s what [mincepi] did. As you can see in the schematic and the banner image, there’s nothing to it. Two resistors provide the pullup voltage for the clock and data lines. And here’s a gem: a green LED with a drop voltage of about 2 V converts the 5 V data line down to something that the Pi Zero’s 3.3 V won’t get fried with. Cute, and very much in keeping with the spirit of the hack. You might be tempted to scrounge up a 3.3 V zener diode from somewhere just to be on the safe side, but remember, it’s a five dollar computer you’re protecting.

The last piece is a custom kernel module for the Pi that polls the PS/2 data line at just the right frequency. If you’re not a Linux person and “compiling a kernel module” sounds scary, [mincepi] has even put together a nice guide for the Raspbian distribution that he’s using. It should work with minor tweaks for any other distro.

We said [mincepi] is a prolific Pi hacker and here’s the proof: we’ve covered his quick-and-dirty VGA output hack and a scheme to get analog sound input into the Pi Zero just in the last couple of weeks. Hack on!

Barcodes That Hack Devices

[virustracker] has been playing around with barcodes lately, and trying to use them as a vector to gain control of the system that’s reading them. It’s a promising attack — nobody expects a takeover via barcodes. The idea isn’t new, and in fact we’ve seen people trying to drop SQL attacks in barcodes long ago, but [virustracker] put a few different pieces together and came up with a viable attack.

The trick is that many POS terminals and barcode readers support command characters in their programming modes. Through use of these Advanced Data Formatting (ADF) modes, [virustracker] sends Windows-Key-r, and then cmd.exe, ftps a file down, and runs it. Whatever computer is on the other side of the barcode scanner has just been owned. ADF even supports a delay function to allow time for the command window to pop up before running the rest of the input.

The article details how they got their payload from requiring more than ten individual barcodes down to four. Still, it’s a suspicious-looking attack to try to pull off where other people (think cashiers) are looking. However, we have many automated machines in our everyday life that use barcodes. How many of these are vulnerable is an open question. [virustracker] suggests lottery machines, package-delivery automats, and even hospitals.

The defense is simple, and it’s the same as everywhere else: disable the debug and configuration modes in your production systems, and sanitize your input. Yes, even the barcodes.

Hacking A USB Port Onto An Old Router

Sometimes hacks don’t have to be innovative to be satisfying. We thought that [daffy]’s instructions and video (embedded below the break) for turning an old WRT54G router into an Internet radio were worth a look even if he’s following a well-traveled path and one that we’ve reported on way back when.

The hack itself is simple. [daffy] locates unused USB data lines, adds in a 5V voltage regulator to supply USB bus power, and then connects it all to a USB sound card. Hardware side, done! And while he doesn’t cover the software side of things in this first video, we know where he’s headed.

The WRT54G router was the first commodity Linux-based router to be extensively hacked, and have open-source firmware written for it. If you’re using OpenWRT or dd-wrt on any of your devices, you owe a debt to the early rootability of the WRT54G. Anyway, it’s a good bet that [daffy] is going to find software support for his USB sound card, but we remain in suspense to see just exactly how the details pan out.

Our favorite WRT54G hack is still an oldie: turning a WRT54G into the brains for a robot. But that was eight years ago now, so surely there’s something newer and shinier. What’s the coolest device that you’ve seen a WRT router hacked into?

Continue reading “Hacking A USB Port Onto An Old Router”

Developed On Hackaday : HaDge Update – It’s A HACK

Work on HaDge – the Hackaday con badge, continues in bits and spurts, and we’ve had some good progress in recent weeks. HaDge will be one conference badge to use at all conferences, capable of communicating between badges.

Picking up from where we left off last time, we had agreed to base it around the Atmel D21, a 32-bit ARM Cortex M0+ processor. To get some prototype boards built to help with software development, we decided to finish designing the HACK before tackling HaDge. HACK is a project that [Michele Perla] started that we have sort of assimilated to act as the prototyping platform for HaDge. We wanted a compact micro-controller board and hence opted for the SAM D21E – a 32 pin package with 26 IO’s.

[Michele Perla] had earlier designed HACK based on the larger 32 pin SAM D21G and used Eagle to hack-brddraw the schematic and layout. Using the Eagle to KiCad script, he quickly converted the project and got on to making the board layout. I took up the rear guard, and worked on making his schematic (pdf) “pretty” and building up a schematic library of symbols. While [Michele] finished off the board layout, I worked on collecting STEP models for the various footprints we would be using, most of which I could get via 3dcontentcentral.com. The few I couldn’t were built from scratch using FreeCAD. The STEP models were converted to VRML using FreeCAD. Using [Maurice]’s KiCad Stepup script, we were able to obtain a complete STEP model of the HACK board.

HACK is now ready to go for board fabrication and assembly. We plan to get about 20 boards made and hand them out to developers for working on the software. The GitHub repository has all the current files for those who’d like to take a look – it includes the KiCad source files, PDFs, gerbers, data sheets and images. The board will be breadboard compatible and also have castellated pads to allow it to be soldered directly as a module. Let us know via group messaging on the HACK project page if you’d like to get involved with either the software or hardware development of HaDge.

In a forthcoming post, we’ll put out ideas on how we plan to take forward HaDge now that HACK is complete. Stay tuned.

Developed On Hackaday – HaDge Is Back To The Drawing Board

A couple of days back, we wrote about the HACK – a prototyping platform designed by [Michele Perla] based on the Atmel SAM R21 MCU. It’s one of the new breed of devices consisting of an ARM Cortex-M0 MCU + IEEE 802.15.4 Wireless radio bundled together. This was exciting since we could pack a lot of punch in the HaDge hardware. We planned to use the same design later to power the HaDge. Building HACK would have allowed us to get it in the hands of the software team, while the hardware folks worked on the real HaDge layout.

The HACK design was ready for review and we asked around to verify the antenna layout, which was the part we were not too sure about.  We asked Atmel for help with verifying the layout. That’s when we had the facepalm moment. They asked us – “What about FCC certification?” Since we plan to build the badges in quantities of a few hundred at the very least, it’s obvious we cannot escape from FCC certification. A design based around the R21 is ruled out – the cost of obtaining approval is pretty high. This means we need to punt the R21 and instead use an off-the-shelf radio module which is already FCC certified. Sigh.

Now the good news. This is a setback in terms of time, and effort put in by [Michele]. But beyond that, we’re good to go back to the drawing board and start afresh. First off, we decided to revert back to the Atmel D21 as the main controller. It’s a fairly decent MCU, and there’s a fairly robust tool chain available that a lot of people are familiar with. For the Radio, we are looking at some of these available options :

The last one from Microchip looks quite promising. But we’re open for better and cheaper suggestions, so please chime in with your comments.

Developed On Hackaday – It’s A Badge. No, It’s The HaDge

Sometime back, we announced start of a new project under the “Developed on Hackaday” series – a Badge for the Hackaday community. At its core, this badge is a single node in an Internet of Badges. At every event this badge is deployed at, a Hackaday Sub-Etha mesh network will be created, and each badge will be able to transmit and receive messages from other badge wearers. There are plans for an Sub-Etha to Internet gateway, so even if badge wearers are on the other side of the world, they’re still connected through the HaDge network.

Things have been moving along quickly, so I thought of doing a quick round-up and share progress with the community. First off, it has a name. HaDge, as in HackaDay Badge. Our objectives up until now were to set up a team, name the project, set up repositories and lock down on a working bill of materials. Within a few weeks, we’ve got all of that tied down. The HaDge group chat channel has been super active, and everyone’s been pitching in with ideas and suggestions. A spreadsheet seemed like a good idea – it let everyone add in their suggestions regarding candidate parts, create a feature list and then talk about it on the channel.

We realized early on that building the hardware is going to take some time. So in the interim, we need a dev kit platform to get in to the hands of the software developers so they can start working on the smarts that will power the HaDge. [Michele Perla] had already built JACK (Just another Cortex kit) – a development kit powered by the Atmel SAM D21. It’s pretty bare bone with just the bare minimum of parts to make it work while keeping an eye on reliability. The microcontroller+radio on the HaDge is the Atmel SAM R21 – a close relative of the D21, so it made sense to respin the JACK and create HACK (Hackaday Cortex kit) – a development kit powered by the Atmel SAM R21 that is going to be used as the core of the HaDge. [Michele] has worked hard single-handedly to complete the design and it is now ready to go for PCB fabrication soon. We are just awaiting some feedback and review of the Antenna part of the design. None of us on the hardware team have a strong RF-fu so we don’t want to make an avoidable mistake. If you’d like to review and help vet the HACK design, grab the design files from the github repo and let us know.

Once HACK board layout is cleared for fabrication, we’ll work on building kits that can be sent out to the software folks. We will also be working on porting the HACK design in to KiCad and this is something I have already stared work on. I started by using the neat Eagle2KiCad conversion tool by [LachlanA]. It’s not perfect, but it does reduce the work involved in porting over from Eagle to Kicad. Once that is done, hardware development for the actual HaDge will see some progress – keep a watch on the project page.