Hacking A USB Port Onto An Old Router

Sometimes hacks don’t have to be innovative to be satisfying. We thought that [daffy]’s instructions and video (embedded below the break) for turning an old WRT54G router into an Internet radio were worth a look even if he’s following a well-traveled path and one that we’ve reported on way back when.

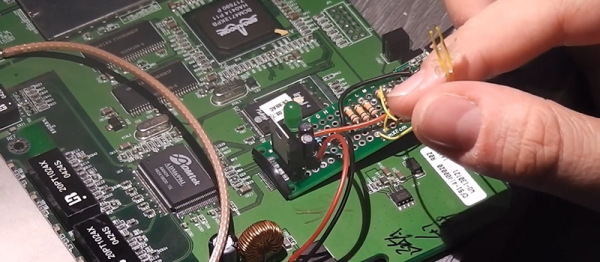
The hack itself is simple. [daffy] locates unused USB data lines, adds in a 5V voltage regulator to supply USB bus power, and then connects it all to a USB sound card. Hardware side, done! And while he doesn’t cover the software side of things in this first video, we know where he’s headed.

The WRT54G router was the first commodity Linux-based router to be extensively hacked, and have open-source firmware written for it. If you’re using OpenWRT or dd-wrt on any of your devices, you owe a debt to the early rootability of the WRT54G. Anyway, it’s a good bet that [daffy] is going to find software support for his USB sound card, but we remain in suspense to see just exactly how the details pan out.

Our favorite WRT54G hack is still an oldie: turning a WRT54G into the brains for a robot. But that was eight years ago now, so surely there’s something newer and shinier. What’s the coolest device that you’ve seen a WRT router hacked into?

Continue reading “Hacking A USB Port Onto An Old Router”

Developed On Hackaday : HaDge Update – It’s A HACK

Work on HaDge – the Hackaday con badge, continues in bits and spurts, and we’ve had some good progress in recent weeks. HaDge will be one conference badge to use at all conferences, capable of communicating between badges.

Picking up from where we left off last time, we had agreed to base it around the Atmel D21, a 32-bit ARM Cortex M0+ processor. To get some prototype boards built to help with software development, we decided to finish designing the HACK before tackling HaDge. HACK is a project that [Michele Perla] started that we have sort of assimilated to act as the prototyping platform for HaDge. We wanted a compact micro-controller board and hence opted for the SAM D21E – a 32 pin package with 26 IO’s.

[Michele Perla] had earlier designed HACK based on the larger 32 pin SAM D21G and used Eagle to hack-brd
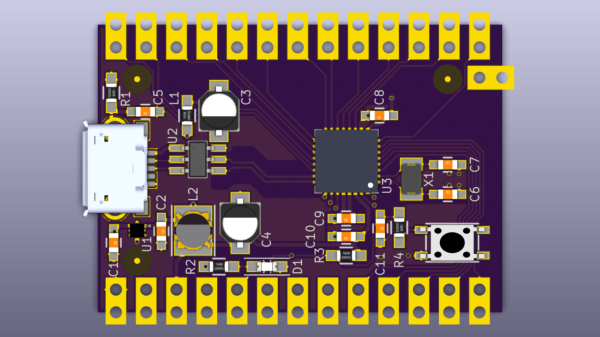
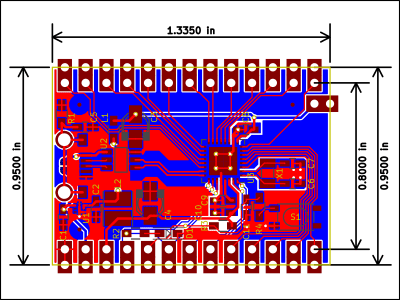
draw the schematic and layout. Using the Eagle to KiCad script, he quickly converted the project and got on to making the board layout. I took up the rear guard, and worked on making his schematic (pdf) “pretty” and building up a schematic library of symbols. While [Michele] finished off the board layout, I worked on collecting STEP models for the various footprints we would be using, most of which I could get via 3dcontentcentral.com. The few I couldn’t were built from scratch using FreeCAD. The STEP models were converted to VRML using FreeCAD. Using [Maurice]’s KiCad Stepup script, we were able to obtain a complete STEP model of the HACK board.

HACK is now ready to go for board fabrication and assembly. We plan to get about 20 boards made and hand them out to developers for working on the software. The GitHub repository has all the current files for those who’d like to take a look – it includes the KiCad source files, PDFs, gerbers, data sheets and images. The board will be breadboard compatible and also have castellated pads to allow it to be soldered directly as a module. Let us know via group messaging on the HACK project page if you’d like to get involved with either the software or hardware development of HaDge.

In a forthcoming post, we’ll put out ideas on how we plan to take forward HaDge now that HACK is complete. Stay tuned.

Developed On Hackaday – HaDge Is Back To The Drawing Board

A couple of days back, we wrote about the HACK – a prototyping platform designed by [Michele Perla] based on the Atmel SAM R21 MCU. It’s one of the new breed of devices consisting of an ARM Cortex-M0 MCU + IEEE 802.15.4 Wireless radio bundled together. This was exciting since we could pack a lot of punch in the HaDge hardware. We planned to use the same design later to power the HaDge. Building HACK would have allowed us to get it in the hands of the software team, while the hardware folks worked on the real HaDge layout.

The HACK design was ready for review and we asked around to verify the antenna layout, which was the part we were not too sure about.  We asked Atmel for help with verifying the layout. That’s when we had the facepalm moment. They asked us – “What about FCC certification?” Since we plan to build the badges in quantities of a few hundred at the very least, it’s obvious we cannot escape from FCC certification. A design based around the R21 is ruled out – the cost of obtaining approval is pretty high. This means we need to punt the R21 and instead use an off-the-shelf radio module which is already FCC certified. Sigh.

Now the good news. This is a setback in terms of time, and effort put in by [Michele]. But beyond that, we’re good to go back to the drawing board and start afresh. First off, we decided to revert back to the Atmel D21 as the main controller. It’s a fairly decent MCU, and there’s a fairly robust tool chain available that a lot of people are familiar with. For the Radio, we are looking at some of these available options :

The last one from Microchip looks quite promising. But we’re open for better and cheaper suggestions, so please chime in with your comments.

Developed On Hackaday – It’s A Badge. No, It’s The HaDge

Sometime back, we announced start of a new project under the “Developed on Hackaday” series – a Badge for the Hackaday community. At its core, this badge is a single node in an Internet of Badges. At every event this badge is deployed at, a Hackaday Sub-Etha mesh network will be created, and each badge will be able to transmit and receive messages from other badge wearers. There are plans for an Sub-Etha to Internet gateway, so even if badge wearers are on the other side of the world, they’re still connected through the HaDge network.

Things have been moving along quickly, so I thought of doing a quick round-up and share progress with the community. First off, it has a name. HaDge, as in HackaDay Badge. Our objectives up until now were to set up a team, name the project, set up repositories and lock down on a working bill of materials. Within a few weeks, we’ve got all of that tied down. The HaDge group chat channel has been super active, and everyone’s been pitching in with ideas and suggestions. A spreadsheet seemed like a good idea – it let everyone add in their suggestions regarding candidate parts, create a feature list and then talk about it on the channel.

We realized early on that building the hardware is going to take some time. So in the interim, we need a dev kit platform to get in to the hands of the software developers so they can start working on the smarts that will power the HaDge. [Michele Perla] had already built JACK (Just another Cortex kit) – a development kit powered by the Atmel SAM D21. It’s pretty bare bone with just the bare minimum of parts to make it work while keeping an eye on reliability. The microcontroller+radio on the HaDge is the Atmel SAM R21 – a close relative of the D21, so it made sense to respin the JACK and create HACK (Hackaday Cortex kit) – a development kit powered by the Atmel SAM R21 that is going to be used as the core of the HaDge. [Michele] has worked hard single-handedly to complete the design and it is now ready to go for PCB fabrication soon. We are just awaiting some feedback and review of the Antenna part of the design. None of us on the hardware team have a strong RF-fu so we don’t want to make an avoidable mistake. If you’d like to review and help vet the HACK design, grab the design files from the github repo and let us know.

Once HACK board layout is cleared for fabrication, we’ll work on building kits that can be sent out to the software folks. We will also be working on porting the HACK design in to KiCad and this is something I have already stared work on. I started by using the neat Eagle2KiCad conversion tool by [LachlanA]. It’s not perfect, but it does reduce the work involved in porting over from Eagle to Kicad. Once that is done, hardware development for the actual HaDge will see some progress – keep a watch on the project page.

RTLSDR

Decoding Satellite-based Text Messages With RTL-SDR And Hacked GPS Antenna

[Carl] just found a yet another use for the RTL-SDR. He’s been decoding Inmarsat STD-C EGC messages with it. Inmarsat is a British satellite telecommunications company. They provide communications all over the world to places that do not have a reliable terrestrial communications network. STD-C is a text message communications channel used mostly by maritime operators. This channel contains Enhanced Group Call (EGC) messages which include information such as search and rescue, coast guard, weather, and more.

Not much equipment is required for this, just the RTL-SDR dongle, an antenna, a computer, and the cables to hook them all up together. Once all of the gear was collected, [Carl] used an Android app called Satellite AR to locate his nearest Inmarsat satellite. Since these satellites are geostationary, he won’t have to move his antenna once it’s pointed in the right direction.

Hacked GPS antenna
Hacked GPS antenna

As far as antennas go, [Carl] recommends a dish or helix antenna. If you don’t want to fork over the money for something that fancy, he also explains how you can modify a $10 GPS antenna to work for this purpose. He admits that it’s not the best antenna for this, but it will get the job done. A typical GPS antenna will be tuned for 1575 MHz and will contain a band pass filter that prevents the antenna from picking up signals 1-2MHz away from that frequency.

To remove the filter, the plastic case must first be removed. Then a metal reflector needs to be removed from the bottom of the antenna using a soldering iron. The actual antenna circuit is hiding under the reflector. The filter is typically the largest component on the board. After desoldering, the IN and OUT pads are bridged together. The whole thing can then be put back together for use with this project.

Once everything was hooked up and the antenna was pointed in the right place, the audio output from the dongle was piped into the SDR# tuner software. After tuning to the correct frequency and setting all of the audio parameters, the audio was then decoded with another program called tdma-demo.exe. If everything is tuned just right, the software will be able to decode the audio signal and it will start to display messages. [Carl] posted some interesting examples including a couple of pirate warnings.

If you can’t get enough RTL-SDR hacks, be sure to check out some of the others we’ve featured in the past. And don’t forget to send in links to your own hacking!

search-console

Fooling Google Search Console With Tricky PHP

When [Steve] received a notice from Google that a new owner had been added to his Google Search Console account, he knew something was wrong. He hadn’t added anyone to his account. At first he thought it might be a clever phishing tactic. Maybe the email was trying to get him to click a malicious link. Upon further investigation, he discovered that it was legitimate. Some strange email address had been added to his account. How did this happen?

When you want to add a website to Google’s services, they require that you prove that you own the actual website as a security precaution. One method to provide proof is by uploading or creating an HTML file to your website with some specific text inside. In this case, the file needed to be called “google1a74e5bf969ded17.html” and it needed to contain the string “google-site-verification: googlea174e5bf969ded17.html”.

[Steve] logged into his web server and looked in the website directory but he couldn’t find the verification file. Out of curiosity, he tried visiting the web page anyways and was surprised to find that it worked. After some experimentation, [Steve] learned that if he tried to load any web page that looked like “googleNNNNNNN.html”, he would be presented with the corresponding verification code of “google-site-verification: googleNNNNNNNN.html”. Something was automatically generating these pages.

After further investigation, [Steve] found that some malicious PHP code had been added to his website’s index.php page. Unfortunately the code was obfuscated, so he couldn’t determine exactly what was happening. After removing the new code from the index.php file, [Steve] was able to remove the hacker’s email address from [Steve’s] Google account.

This is a very interesting hack, because not only did it allow this one hacker to add himself to [Steve’s] Google account, but it would also have allowed anyone else to do the same thing. This is because each new hacker would have been able to fool Google’s servers into thinking that they had uploaded the verification file thanks to the malicious PHP code. It makes us think that perhaps Google’s verification system should use a separate randomized string inside of the verification file. Perhaps one that can’t be guessed or calculated based on known variables such as the file name.

Thin Client Hack

Hacking A Thin Client To Gain Root Access

[Roberto] recently discovered a clever way to gain root access to an HP t520 thin client computer. These computers run HP’s ThinPro operating system. The OS is based on Linux and is basically just a lightweight system designed to boot into a virtual desktop image loaded from a server. [Roberto’s] discovery works on systems that are running in “kiosk mode”.

The setup for the attack is incredibly simple. The attacker first stops the virtual desktop image from loading. Then, the connection settings are edited. The host field is filled with garbage, which will prevent the connection from actually working properly. The real trick is in the “command line arguments” field. The attacker simply needs to add the argument “&& xterm”. When the connection is launched, it will first fail and then launch the xterm program. This gives the attacker a command shell running under the context of whichever user the original software is running as.

The next step is to escalate privileges to root. [Roberto] discovered a special command that the default user can run as root using sudo. The “”hpobl” command launches the HP Easy Setup Wizard. Once the wizard is opened, the attacker clicks on the “Thank You” link, which will then load up the HP website in a version of Firefox. The final step is to edit Firefox’s default email program association to xterm. Now when the attacker visits an address like “mailto:test@test.com”, Firefox (running as root) launches xterm with full root privileges. These types of attacks are nothing new, but it’s interesting to see that they still persist even in newer software.