Magical Blinky Capacitive Sensing Tweezers

Electronic tweezers – the kind that can test the voltage between two contacts, the resistance of an SMD resistor, or the capacitance of a circuit – are very cool and very useful if somewhat expensive. We’ve seen commercial versions of these smart tweezers, hacks to make them more useful, and homebrew versions that still work very well. All of these versions are pretty large, as far as tweezers go. [kodera2t]’s version of electronic tweezers submitted for this year’s Hackaday Prize goes in the other direction: it’s the smallest set of electronic tweezers that’s still useful.

[kodera]’s electronic sensing tweezers only measure capacitors, and for good reason: chip caps usually don’t have values printed on them. These tweezers don’t print out the value of a cap on a display, either. Instead, these tweezers just flash an LED if the value of the cap is above 0.1uF. It’s simple, but surprisingly useful for most soldering jobs.

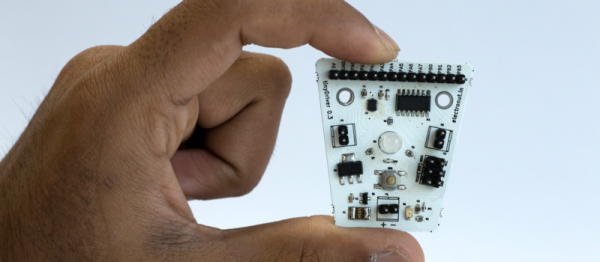
The circuit for this pair of magical tweezers is about as simple as if can get, with all the smarts contained in a very small ATtiny10. The PCB [kodera] designed is smaller than the coin cell battery, and with the help of some copper tape and possibly an insulator, this device can be mounted to any pair of tweezers. It’s a simple tool, yes, but that’s the beauty of it, and makes for a great entry into the Hackaday Prize

Continue reading “Magical Blinky Capacitive Sensing Tweezers”

TinyDriver – ATtiny84 Platform Without Arduino

You don’t need an Arduino for everything! Or do you? This is an argument that plays out here quite often. Whatever the outcome, most folks agree that once you’ve dipped your feet in the shallow end of the pool, the real fun is when you dive into the deep end.

[Mahesh Venkitachalam] designed tinyDriver, an experimental Open Source breakout board for the Atmel ATtiny84 chip. His idea was to create a convenient platform which can be used to understand microcontrollers in-depth, by letting users dive under the hood and make use of the various features of the chip such as timers, PWM, interrupts, ADC, and digital I/O. The ATtiny84 is cheap and simple enough for starters. Add a low-cost AVR programmer, install the free and cross-platform avr-gcc and avrdude tool chain, read up the data sheet, learn some C programming and start experimenting. Rinse and repeat and you’ll be a pro at it soon. He’s got a few starter projects documented on his website to get you going.

The hardware is open source, and the Git repository contains the hardware source and example code. If you’re a hardware noob, he’s thoughtfully added a PTC resettable fuse and reverse polarity protection on the board to make sure you don’t release the magic blue smoke prematurely. All of the I/O’s are broken out on a header, and the motor driver and RGB LED can be disabled when not needed. The board isn’t hand-assembly friendly, but he plans to crowd fund it shortly. If you want to move beyond the Arduino platform, projects like the tinyDriver are the way to go.

The HackadayPrize2016 is Sponsored by:

World Create Day: A Subcontinent, An Island Continent, And Asia

Hackaday’s own World Create Day is just two days away. This Saturday, April 23rd, the Hackaday community will rise up, come together, have fun, share a few stories, and build something cool in the process.

ausasiaWhen we announced World Create Day a few weeks ago, we were inundated with responses. Hackerspaces across the globe have offered up their spaces for the Hackaday community to brainstorm the latest entries for The Hackaday Prize.

We have hackerspaces from Islamabad to Adelaide and from Mumbai to Shenzhen opening their doors to the world. If you’re near any of these events, join in on the festivities. If you don’t see one in your neck of the woods, you can still host your own meetup. Just click here to get your town on the map.

What’s going on at these meetups? [Robert] and [Steven] in Adelaide are planning several events including a meet and greet, a few lightning talks, and snacks. They’re also live streaming their event. Maker’s Asylum in Mumbai is doing project demos and forming some teams for the Hackaday Prize. It’s going to be a great event at every hackerspace, and the largest distributed meetup we’ve ever done. Don’t miss this.

The HackadayPrize2016 is Sponsored by:

A Friendly Flying Robot Pet

[luca] has always wanted a flying robot, but despite the recent popularity of quadcopters and drones [luca] has never seen a drone that is truly autonomous. Although sometimes billed as autonomous, quadcopters and fixed wing aircraft have always had someone holding a remote, had to stay in a controlled environment, or had some off-board vision system.

Computers are always getting smaller and faster, battery and motor technology is always getting better. That’s why [luca] is building a truly autonomous flying robot for the 2016 Hackaday Prize.

Since [luca] is building a coaxial copter – something that looks like a ducted fan with a few vanes at the bottom – there will be control issues. Normal helicopters use the pitch of the blades and the torque produced by the tail rotor to keep flying straight. A quadcopter uses two pairs of motors spinning in opposite directions to stay level. With just two rotors mounted on top of each other, you would think [luca]’s coaxial copter is an intractable problem. Not so; there are bizarre control systems for this type of flying machine that make it as nimble in the sky as any other helicopter.

The design of this flying robot is a bit unlike anything on the market. It looks like a flying ducted fan, with a few electronics strapped to the bottom. It’s big, but also has the minimum number of rotors, to have the highest power density possible with current technology. With a few calculations, [luca] predicted this robot will be able to hoist an IMU, GPS, ultrasonic range finder, optical flow camera, and a LIDAR module in the air for about fifty minutes. That’s a remarkably long flight time for something that hovers, and we can’t wait to see how [luca]’s build turns out.

The HackadayPrize2016 is Sponsored by:

Good News! It’s The Dacia 1310!

Although we’ve never had the privilege to drive one, [skaarj] tells us Dacia made some terrible cars. The Dacia 1310, a communist clone of the Renault 12, was cheap, had sixty-two horses under the hood, and was easy to maintain. The cabin, by all accounts, is a bit lacking, giving [skaarj] the opportunity to improve the instrument cluster and dash. He’s not throwing a stereo in and calling it a day – [skaarj] is upgrading his Dacia with retro-futuristic components including a vacuum tube amp, a CRT computer display, and an unspeakably small dumb terminal.

[skaarj]’s build began with a hit and run accident. With most of the body panels on the passenger side of the car removed, [Skaarj] ground some rust, rattle canned some rust proof paint, and bondoed the most offensive corrosion. Work then began on the upgraded dash, with a few choice components chosen including an old Soviet television, a hardware neural network to determine hardware faults, and a bizarre implementation of a CAN bus on a car without any of the requisite electronics.

This is one of those projects that can go on forever; there’s a lot you can do with the dashboard of a car if you’re not constrained by a suffocating desire to appear normal. In that respect, [skaarj] has this one locked up – he’s got a vacuum tube amplifier and enough CRTs in this car to add retro satellite navigation. It’s a great entry for The Hackaday Prize, as something cool is sure to come out of this project.

The HackadayPrize2016 is Sponsored by:

GameGirl: A Better Portable Raspberry Pi

For better or worse, the most popular use for the Raspberry Pi – by far – is media centers and retro game consoles. No, the great unwashed masses aren’t developing Linux drivers for their Pi peripherals, and very few people are tackling bare metal ARM programming. That doesn’t mean creating a handheld console based on the Pi isn’t a worthy pursuit.

For their entry for the 2016 Hackaday Prize, [David] and [Jean-André] are building a portable Pi console that’s much better than an old Bondo-encrusted Game Boy enclosure stuffed with hot glue and wires. They’re doing this project the right way with a hardware accelerated display, custom software, and a high quality case.

[David] is in charge of the hardware, and that means making a very, very small handheld console. The design of this GameGirl is extremely similar to the old-school Game Boy Pocket (or Game Boy Light). There’s a D-pad, four buttons, select, start, and two ‘shoulder’ buttons on the back. The build is based on the Raspberry Pi Zero, and thanks to the Pi’s standard 40-pin header, [David] is able to configure the display to use an RGB565 DPI interface. This means the display is stupidly cheap while still leaving a few GPIO pins left over for the SPI, buttons, backlight, and PWM audio.

[Jean-André] is the other half of the team, and his contributions to open source software make him exceptionally qualified for this project. He’s the main developer for Lakka, a DIY retro emulation console, and the #5 RetroArch contributor. No, this project isn’t using RetroPie – and there’s a reason for that. Emulator hackers are spending a lot of time optimizing emulators for the Raspberry Pi, only because of RetroPi. If these emulator hackers spent their time optimizing for an API like LibRetro, you could eventually play a working version of Pilotwings 64 on the Raspberry Pi and every other platform LibRetro is available for. All the effort that goes into making a game work with a Raspberry Pi is effort that goes into making that game work for the PSP, Wii, iOS, and a PC. Yes, its philosophical pissing in the wind while saying, ‘this is what the community should do’; this is open source software, after all.

With the right ideas going into the hardware and software, [David] and [Jean-André] have an amazing project on their hands. It’s one of the most popular entries and are near the top of the charts in the community voting bootstrap effort where every like on a project gets the team a dollar for their project. GameGirl is shaping up to be a great project, and we can’t wait to see the it in action.

The HackadayPrize2016 is Sponsored by:

Digital Logging Of Analog Instruments

The only useful data you’ll ever find is already digitized, but a surprising number of gauges and meters are still analog. The correct solution to digitizing various pressure gauges, electric meters, and any other analog gauge is obviously to replace the offending dial with a digital sensor and display. This isn’t always possible, so for [Egar] and [ivodopiviz]’s Hackaday Prize entry, they’re coming up with a way to convert these old analog gauges to digital using a Raspberry Pi and a bit of computer vision.

The idea behind this instrument digitizer isn’t to replace the mechanics and electronics, as we are so often wont to do. Instead, this team is using a 3D printed bracket that mounts a Raspberry Pi and camera directly in front of an analog gauge. Combine this contraption with OpenCV, and you have a device that’s just smart enough to look at a needle on a dial, convert that to a number, and save it to a file or send it out over WiFi.

It’s an extremely simple device for what [Egar] and [ivodopiviz] admit is a relatively niche application. However, if you only need digital measurements of an analog meter for a month or so, or you don’t want to mess up your steampunk decor, it’s an ingenious build.

The HackadayPrize2016 is Sponsored by: