Angry Robot Face Is Less Than Friendly

Sometimes you just need to create a creepy robot head and give it an intimidating personality. [Jens] has done just that, and ably so, with his latest eerie creation.

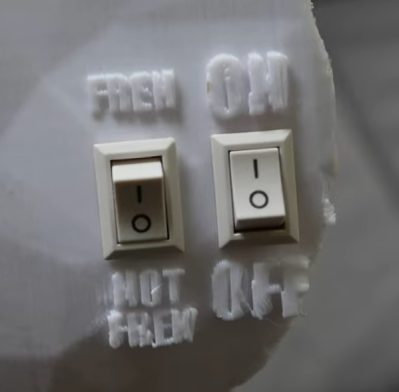
The robot face is introduced to us with a soundtrack befitting Stranger Things, or maybe Luke Million. The build was inspired by The Doorman, a creepy art piece with animatronic eyes. [Jens’] build started with a 3D model of a 3D mask, with the eyes and mouth modified to have rectangular cutouts for LED displays. The displays are run by a Raspberry Pi Pico, which generates a variety of eye and mouth animations. It uses a camera for face tracking, so the robot’s evil eyes seem to follow the viewer as they move around. In good form, the face has a simple switch—from good to evil, happy to angry. Or, as [Jens] designates the modes: “Fren” and “Not Fren.”

[Jens] does a great job explaining the build, and his acting at the end of the video is absolutely worth a chuckle. Given Halloween is around the corner, why not build five to eight of these, and hide them in your roommate’s bedroom?

Video after the break.
Continue reading “Angry Robot Face Is Less Than Friendly”

Realistic Animatronic Eyes Are An Easy DIY Build

It’s not Halloween yet, but if you’re planning a technically-complicated costume, it might serve you well to start building now. To that end, here’s a guide from [Ikkalebob] on how to produce a compact animatronic eye mechanism.

The eye is inspired by mechanisms used in professional animatronics. However, that doesn’t mean it’s hard to build. Complex machining is done away with in favor of readily reproducible 3D-printed components. The eyes are able to look in different directions and can move realistically, and the build includes working eyelids that have a great blinking action to them that feels very natural. An Arduino Uno is charged with running the eyes, paired with a bunch of hobby servos and an Adafruit PCA9685 servo driver. A hefty 5V, 4 amp power supply is on hand to deliver enough juice so the servos move smoothly without stuttering.

It’s the kind of thing that’s perfect for your spooky familiar, or installing eyes in the back of your head. It would be perfect to hide behind a window or in the bushes, too. Video after the break.

Continue reading “Realistic Animatronic Eyes Are An Easy DIY Build”

Build Your Own Mini Fogging Cauldron

The best cauldrons are full of bubbling, steamy potions of great magical potential. We don’t have many of those in the real world, though, so sometimes we have to make do with a simulacra. [wannabemadsci] has built just that, with this fogging cauldron prop that uses no fog fluid or dry ice, running solely with water instead.

The heart of the build is a piezo element that vibrates at ultrasonic frequencies to atomize water. They’re available from websites like AliExpress complete with a driver circuit to energize the piezo element. The water is delivered from a wetted fiber wick, and quickly becomes a fog when the piezo is energized.

The disk was installed in a custom PVC water cup with the wetted wick, along with the electronics. The assembly was then lowered into an off-the-shelf plastic cauldron party favor to complete the look. The trick is to mount the piezo element sideways to get a nice-looking distribution of fog. A green LED was installed to light the cauldron from within.

The resulting effect is a sinister-looking glowing cauldron with a steady stream of fog emanating from the top. It’s a great piece of Halloween decor, and as a bonus, it doesn’t require any fancy chemicals to make it work. If you’re thirsty for more, be sure to check out the winners of last year’s Halloween Hackfest. Video after the break.

Continue reading “Build Your Own Mini Fogging Cauldron”

A two picture montage of a boy wearing a sonic the hedgehog costume with LEDs in them. The left picture is at night with the boy wearing sunglasses and a face mask with the sonic costume head piece lit up. The right picture is during the day with the boy wearing a face mask, holding a plastic pu mpkin bucket for candy and wearing a lit up sonic the hedgehog costume in the front yard of a house.

LEDs Put New Spin On A Sonic The Hedgehog Costume

[Wentworthm] couldn’t say no to his son’s plea for a Sonic the Hedgehog costume for Halloween but also couldn’t resist sprucing it up with LEDs either. The end result is a surprisingly cool light up Sonic the Hedgehog costume.

a picture of a breadboard with an Arduino Nano on it, with wires going out to 3d printed tear dropped shapes that have LED strips in them, with some LED strips on.

After some experimentation, [Wentworthm] ordered two costumes and ended up mixing and matching the head piece of one with the body suit of the other. For the head, [Wentworthm] created six 3D printed “quills” that had slots for the WS2812B LED strips to slide into and diffuse out the sides, with each quill sliding into the folds of the Sonic head “spikes”. Sewn strips of cloth were used to house the LED strips that were placed down the sides of the costume. An additional 3D printed switch housing was created to allow for a more robust interface to the two push buttons to activate the LEDs. An Arduino Nano, soldered to a protoboard, was used to drive the LED strips with a USB battery pack powering the whole project.

[Wentworthm] goes into more detail about the trials and errors, so the post is definitely worth checking out for more detail on the build. Halloween is always a great source of cool costumes and we’ve featured some great ones before, like a light up crosswalk costume to making a giant Gameboy colour costume.

Video after the break!

Continue reading “LEDs Put New Spin On A Sonic The Hedgehog Costume”

Bike-Riding Skeleton Stalks The Streets On Halloween

Stationary pumpkins and motionless skeletons aren’t enough to scare people these days. If you want to really create a fright on Halloween, you need something more convincing. This bike-riding skeleton from [rc jedi] might just do the trick.

A few neat tricks make this impressive build surprisingly simple in nature. Propulsion is via a scrapped electric scooter drivetrain hidden in the sidecar. This not only propels the rig, but the third wheel means there’s no need to do any fancy balancing work to keep the bike upright. Steering is via a big chunky servo mounted to the bike frame which controls the handlebars. Regular RC gear handles remote control of the steering and drive.

The skeleton itself was an off-the-shelf buy, that was modified to have more flexibility in its joints. The hands were attached to the handlebars, and the feet attached to the pedals, so it appears to pedal the bicycle as it moves down the road. A dog skeleton rides along in the sidecar as a spooky companion.

A skeleton prowling the streets by BMX is a wonderfully spooky sight. We’ve seen some other great skeleton builds before, too, from the canine to the musical variety. Video after the break.

Continue reading “Bike-Riding Skeleton Stalks The Streets On Halloween”

This Crosswalk Sign Costume Is A Halloween Hit

Halloween costumes can be anything from an expensive authentic recreation of a character’s garb, to a cheap knockoff bought from one of those overcrowded pop-up stores. Alternatively, you can get creative and conceptual about things, such as by building yourself a crosswalk sign costume.

The creation of [jared531], the build uses a large piece of cardboard painted black as the base. This sits behind the wearer, and is given a yellow outline to emulate the crosswalk signals common in the US. Red fairy lights are then laid out on half of the cardboard in a pattern emulating the “STOP” hand signal.

The wearer should then dress in all-black garb, and attach the flat cardboard panel to themselves with elastic straps. A black mesh face covering helps to complete the look by blending in the wearer’s face. They are then outfitted with white fairy lights around their body, emulating the “WALK” signal.

It’s a simple concept, but quite accurately replicates a typical crosswalk sign. It’s something we certainly haven’t seen before, which is impressive in this Internet era when anything new is old again mere minutes later.

If your tastes are more avant-garde, though, consider going the TV head route next year. If you’ve built your own high-tech, high-concept costume, hit us up on the tips line!

A wooden scary face dispensing candy through its mouth

Automatic Candy Dispenser Takes The Hard Work Out Of Halloween

Halloween may be behind us, but we couldn’t resist showing you [Mellow]’s latest project: an automatic candy dispenser that takes the hard work out of serving trick-or-treaters. It’s a cool build that might serve as an inspiration for next year’s Halloween project, or perhaps for a different occasion altogether: think birthday parties or Valentine’s Day. After all, when’s a bad time to give sweet treats to someone you love?

The basic concept is a scary face, made of wood, that disgorges a set amount of candy through its mouth after you press its nose. The dispensing mechanism is made from 3D printed mechanical parts as well as a piece of drain pipe. Candy is stored in the pipe, with a servo-operated flap releasing a set amount each time the nose is pressed. [Mellow] cleverly designed the flap to be somewhat flexible, so that it wouldn’t crush any candy bars that got stuck between it and the pipe.

A Wemos D1 Mini reads out the nose switch and drives the candy-dispensing servo, as well as a further two servos that swivel the eyes left and right for an additional visual effect. The original idea was to have the eyes swiveling all the time, but because the mechanism turned out to be quite loud [Mellow] changed the code to only move them during the candy-dispensing process.

We’ve seen several designs for automated candy dispensers over the years, ranging from a Jack-o-Lantern that holds enough candy to feed a small city, to a beautifully over-engineered machine more suitable as a Valentine’s Day gift.

Continue reading “Automatic Candy Dispenser Takes The Hard Work Out Of Halloween”