Porting DOOM To A Forgotten Apple OS

Apple hasn’t always had refined user experiences in their operating systems. In the distant past of the ’90s they were still kind of clunky computers that were far from the polished, high-end consumer machines of the modern era. That wasn’t all that Apple offered back then, though. They had a long-forgotten alternative operating system that was called A/UX designed for government applications, and [Keriad] is here to show us this relic operating system and port DOOM to it.

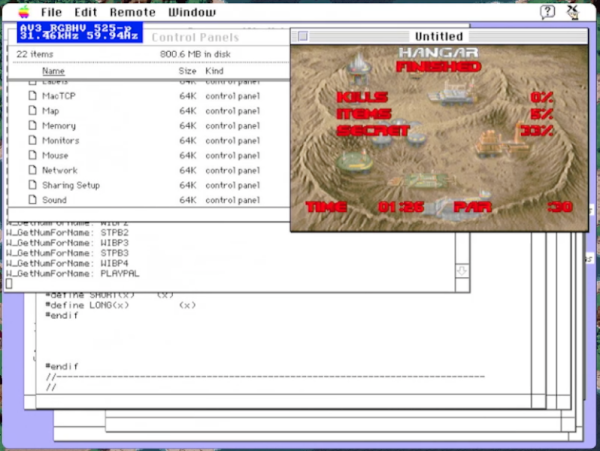
A/UX was designed in the pre-PowerPC days when Macintosh computers ran on Motorola 68000 chips. Luckily, [Keriad] has a Mac Quadra 800 with just such a chip that is still fully-functional. DOOM was developed with the NeXTSTEP operating system which can run on old Macs thanks to another tool called MacX which allows X11 applications to run on Mac. A version of gcc for A/UX was found as well and with the source code in hand they were eventually able to compile a binary. There were several hiccups along the way (including the lack of sound) but eventually DOOM was running on this forgotten operating system.

The main problem with the build in the end, besides the lack of sound, is that the game only runs at 2 – 3 frames per second. [Keriad] speculates that this is due to all of the compatibility layers needed to compile and run the game at all, but it’s still impressive. As far as we know, [Keriad] is the first person to port DOOM to this OS, although if you’re looking for something more straightforward we would recommend this purpose-built Linux distribution whose sole task is to get you slaying demons as quickly as possible.

See How To Effectively Use A Green Screen In A Limited Space

Virtual green screens are pretty neat, but for results, nothing beats the real thing. But what if you have limited space? [Fred Emmott] had about 30 inches behind his desk to work with, and shares what it took to make a green screen work reliably in a limited space.

Even (and consistently deployable) lighting is even more important than the camera.

When it comes right down to it, the fundamentals of camera work (lighting, angles, and so on) are unchanged, but hanging a green screen only 30 inches behind one’s desk does make it a bit more challenging to dial in the right environment. In addition, [Fred] wanted a solution that could be deployed and packed away without much of a hassle, and without taking up too much storage space. He ended up using a collapsible green screen that can be pulled straight up and out from its container, similar to portable stand-up banners used at trade shows.

As for the camera end of things, [Fred] found that reliable, quality lighting was critically important, even more so than the camera used. For repeatable results, he suggests disabling any automatic features (such as low light enhancement, or auto white balance, and settings of that nature) and to use LED lighting in the ‘daylight’ range for illumination and fill. The key to good green screen results is to light things evenly, and this is a bit more challenging when working in such a tight space.

To deal with this, [Fred] suggests lights that can be easily repositioned, and put them as far back from things as you can. Get the lighting as even as possible, then adjust your software to match ([Fred] uses OBS Studio) for best results. Once that’s done, it can be more easily set up and torn down with minimal fiddling.

Computers sure make all this much easier than it was back in the day, and if you’re curious, here is all about how green screens were done before the digital age.

Throw Out That Box? No, Build A Shelving Unit

Are you one of those people who hoards cardboard for someday, and then periodically breaks it all down and puts it out for recycling because you haven’t done anything with it yet? Well, load up a new blade in the utility knife and fire up that hot glue gun, because the [Cardboard Ninja]’s gonna show you how to make a shelving unit from the biggest box in your collection.

[Cardboard Ninja] goes about the build quite smartly, cutting the legs from the four long bends already in the cardboard. This is repeated in the shelves, which are made from the box’s sides — [Cardboard Ninja] takes advantage of the bends when it comes to cutting out the shelves and creates the other three with the edge of a metal ruler. The rest of the cardboard is devoted to supports for shelves and legs.

While you could use this unit to hold all the other, smaller boxen you have lying around, that would be a gross under-utilization. You see, the way this is put together, it can hold upwards of 133 lbs (60 kg) total, provided the rules of weight distribution are followed, and the heaviest things are on the bottom shelf.

That does seem like a lot of weight, but given that this was constructed by someone who has a holster for their utility knife and calls themselves [Cardboard Ninja], I think we can trust their stress tests and just go with it. Given that, it’s always a good idea to anchor shelving units to the wall.

You know, this would make a pretty good entry into the second Challenge of this year’s Hackaday Prize. Remember: this is the final weekend to enter, and the window closes at 7AM Pacific on Sunday, so get hackin’!

Continue reading “Throw Out That Box? No, Build A Shelving Unit”

Mouse Charging Mod Shows Even Simple Hacks Can End Up Complex

Hardware hacks have something in common with renovations that involve taking down a wall: until one actually gets started and opens things up, there’s no telling what kind of complications might be lurking. [voussoir] has a project that demonstrates this nicely: modifying a rechargeable mouse to use USB-C instead of micro-B turned out to have quite a few little glitches in the process. In fact, changing the actual receptacle was the simplest part!

On one hand, the mouse in question seems like a perfect candidate for easy modification. The enclosure isn’t too hard to open, there is ample space inside, and USB is used only for recharging the battery. So what was the problem? The trouble is something familiar to anyone who has worked on modifying an existing piece of hardware: existing parts are boundaries to hacking work, and some are less easily modified than others. Continue reading “Mouse Charging Mod Shows Even Simple Hacks Can End Up Complex”

Swapped ROM Revives Ailing HP-48S Calculator

Buying broken gear for cheap is time honored hacker tradition, and while we might not always be successful in reviving it, rarely do we come away empty handed. There’s always parts to salvage, and you can’t put a price on the knowledge to be gained when poking around inside an interesting piece of hardware. So we’re not surprised at all to hear that [Tomas Pavlovic] jumped at the chance to grab this faulty HP-48S calculator for a couple bucks.

Luckily for us, the story doesn’t end at the bottom of his parts bin. When he got the HP-48S back home, he immediately set out to see if it could be repaired. After changing out a few choice components and not seeing any result in the device’s behavior, he became suspicious that the problem may be with the firmware; specifically, the soldered-on chip that holds it.

Dumping the original ROM.

After carefully lifting the NEC uPD23C2000GC from its resting place for the last 30 years or so, he wired up an adapter that let him connect the chip to his programmer so its contents could be dumped. Rather than trying to find another ROM chip, he decided to wire in a socket and found a re-writable SST39SF040 that could stand in as a replacement. Flashing a fresh copy of the firmware to the new socketed chip got the calculator up and running again, with the added bonus of allowing [Tomas] to pull the chip and flash a different firmware version should he care to experiment a bit.

Now, we know what you’re thinking. Where was the fix? What exactly brought this piece of 1990s gear back to life? That part, unfortunately, isn’t very clear. You’d think if the original ROM chip was somehow faulty, [Tomas] wouldn’t have been able to so easily pull a valid firmware image from it. That leaves us with some pretty mundane possibilities, such as a bad solder joint on the chip’s pins. If that was indeed the case, this fix could have been as simple as running a hot iron over the pins…but of course, where’s the fun in that?

Update: We heard back from [Tomas], and it turns out that when compared to a known good copy, the dumped firmware did have a few swapped bits. His theory is that the NEC chip is in some weird failure mode where the calculator wouldn’t run, but it was still functional enough to get most of the content off of it. What do you think? Let us know in the comments.

The Case For Designer Landline Phones

Long before the idea of hot dog-shaped iPhone cases, Otter Boxen, or even those swappable Nokia face plates, people were just as likely to express themselves with their landline phones. Growing up at my house in the 80s, the Slimline on the kitchen wall was hidden inside a magneto wall set from the early 1900s, the front of which swung out to reveal the modern equipment behind it. Back in my bedroom, I had the coolest phone ever, a see-through Unisonic with candy-colored guts. Down in the basement was my favorite extension, tactility-wise: a candy apple-red wall unit with dimly-lit circular push buttons that were springy and spongy and oh-so fun to dial.

Popular culture shows us that people were dreaming of cool telephone enclosures before they were even a thing. Obviously, TV secret agent Maxwell Smart’s shoe phone wasn’t plausible for the technology of that era, but it also wasn’t really feasible for aesthetic reasons. For decades, phone subscribers had to use whatever equipment Ma Bell had to offer, and you couldn’t just buy the things outright at the mall — you had to lease the hardware from her, and pay for the service.

Continue reading “The Case For Designer Landline Phones”

A laptop with a mahogany case

The Compu-tor Is A Raspberry Pi Laptop In A Mahogany Case

The Compu-tor, designed by [Henry Edwards], is one of those things that doesn’t neatly fit into any categories. It is a clamshell-type portable computer, although unlike most laptops, it doesn’t come with a built-in battery. It has a sleek custom-designed case, but lacks the futuristic sci-fi looks typical of a cyberdeck. The keyboard can act as an input device, but can also turn into a musical instrument.

In short, it’s a bit of all of those things, but the most striking part is the beautifully-machined mahogany case. The two halves are connected through two beefy friction hinges and a silicone ribbon cable: the bottom half contains the keyboard, speakers, USB ports and power connections, while the top half holds a Raspberry Pi and a 10″ touchscreen. The display bezel has that curved shape typical of CRT monitors, fitting nicely with the 1970s vibe given off by the dark wood.

Another retro touch is in the connections between the various circuit boards and the front panel switches: [Henry] used wire-wrapping, something we haven’t seen for a while. The keyboard is a simple grid of identical keys with handwritten labels. Other labels, like that of the power connector, are made from traditional embossing tape.

The Compu-tor runs Debian, and seems to be quite usable as a compact laptop. It even comes with USB ports to hook up external devices, and with a simple 12 V input it should be no problem to find an external power source for it. Wood seems to be a popular material to build Raspberry Pi-based laptops from: we’ve seen them housed in anything ranging from wooden cigar-boxes to laser-cut plywood, and even incredibly tiny boxes.

Continue reading “The Compu-tor Is A Raspberry Pi Laptop In A Mahogany Case”