Plot Your Way Past A Tiny Buffer

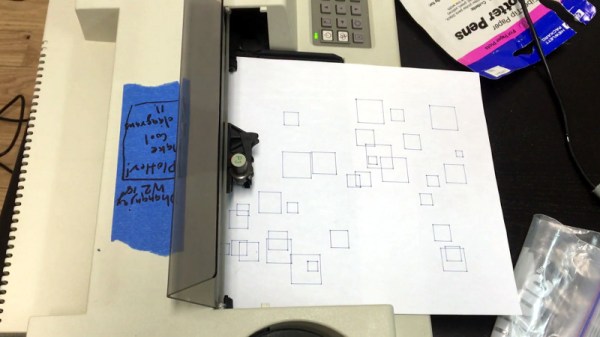
There is a dedicated community of plotter enthusiasts who keep their often-aging X-Y axis pen drawing devices going decades after they were built, and who share plotter-generated paper artwork online. [Dhananjay Balan] was seduced by this, so acquired a second-hand HP7440A through eBay and set about bringing it to life.

Bringing it to life was in the first instance the usual progression of cleaning the mechanism and checking all was in order, before doing a bit of research to find that the missing power supply was a 10-0-10V AC item. Then some adapters and a USB-to-serial port had it talking to a modern PC, and thanks to the wonders of HPGL it was working once more. This could thus have been a very simple tale worthy of the dreaded Not A Hack moniker, had the focus then not changed from the hardware into the software.

Back in the day, a 60-byte buffer in a plotter must have seemed huge. But in 2019 a plotter can be sent data at a rate that will swiftly fill it, after which the commands are not stored and are never drawn. Introducing a delay between sending commands solves the problem, but at the expense of very slow plotting. This was solved with a very clever use of the HPGL command to send the pen position, which waits until the pen has finished moving before sending its return value. This became a handy way to detect when the plotter was ready for more, allowing speedier printing without buffer overruns.

The plotter has an expansion port into which an optional module containing trigonometric drawing functions could have been plugged, but was missing in this example. HP’s idea was that the buffer was so small that a programmer would have difficulty writing their own, but the buffer hack in the previous paragraph put paid to that. Python code for all this and more is in a handy GitHub repository.

Via Hacker News.

Restoring An HP LCZ Meter From The 1980s

We are fantastically lucky not only in the parts that are easily available to us at reasonable cost, but also for the affordable test equipment that we can have on our benches. It was not always this way though, and [NFM] treats us to an extensive teardown and upgrade of a piece of test equipment from the days when a hacker’s bench would have been well-appointed with just a multimeter and a 10MHz ‘scope.

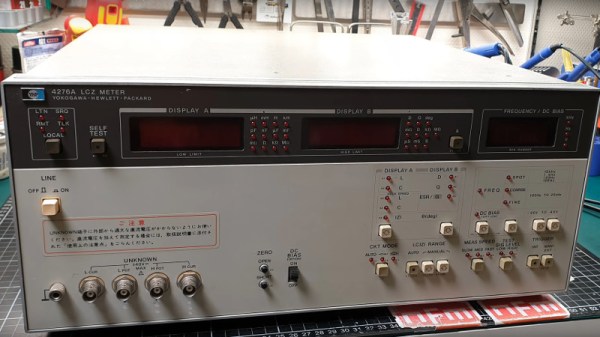
The Hewlett Packard 4276A LCZ meter is, or perhaps was, the king of component testers. A 19″ rack unit that would comfortably fill a shelf, it has a host of functions and a brace of red LED displays. This particular meter had clearly seen better days, and required a look inside just to clean up connectors and replace aged batteries.

In the case is a backplane board with a series of edge connectors for a PSU, CPU, and analogue boards. Aged capacitors and those batteries were replaced, and those edge connectors cleaned up again. The CPU board appears to have a Z80 at its heart, and we’re sure we spotted a 1987 date code. There are plenty of nice high-quality touches, such as the individual 7-segment digits being socketed.

An after-market option for this equipment included a DC offset board, and incredibly HP publish its full schematic and a picture of its PCB in their manual. It was thus a simple process and quick PCB ordering to knock up a modern replica, with just a few component substitutions and single resistors replacing an HP specific encapsulated resistor pack.

As a treat we get a ringside seat for the set-up and alignment of the machine. The DC offset board gives the wrong voltage, which he traces to a voltage reference with a different tolerance to the original HP part. [NFM] makes some adjustments to resistor values, and is able to pull the voltage to the correct value. Finally we see the instrument put through its paces, and along the way have a demonstration of how capacitance of a ceramic capacitor can vary with voltage close to its working voltage. Even if you never have the need for an LCZ meter or never see an HP 4276A, this should be worth a watch. And if you now have an urge to find a bench full of similar treasures, take a look at our guide to old test equipment.

Continue reading “Restoring An HP LCZ Meter From The 1980s”

Let’s Look At Some Cool Old LEDs

LEDs are now a mature technology, with all manner of colors and flavors available. However, back in the 1970s, it was early days for this fledgling display tech, and things looked very different. [IMSAI Guy] happened to work at the optoelectronics division of Hewlett-Packard during their development of LED displays, and has a handful of prototypes from those heady days.

The video is a great look at not only vintage display hardware, but also rarely seen prototypes that seldom left the HP offices. Matrix, 7-segment and even 16-segment devices are all in attendance here. There’s great macro photography of the packages, including the now-forgotten bubble displays as well as hermetically sealed glass packages. The parts all have a uniquely 1970s look, drenched in gold plating and otherwise just looking very expensive.

The followup video breaks out the microscope and powers up the displays. [IMSAI Guy] shares some useful tips on how to best tinker with unknown LED parts, as well as knowledge about the chemical compounds and manufacturing processes involved in LED production. If you don’t know your III-V compounds from your II-VI compounds, prepare to learn.

It’s always interesting to take a look back, and even better to get a peek at the experiments of engineers of the past.

If you’re wondering about applications of this hardware, we’ve seen messageboards and watches before. Video after the break.

Continue reading “Let’s Look At Some Cool Old LEDs”

HP Rolls Out Metal 3D Printers

You normally think of HP as producing inkjet and laser printers. But they’ve been quietly building 3D printers aimed at commercial customers. Now they are moving out with metal printers called — predictably — the HP Metal Jet. The video (see below) is a little glitzy, but the basic idea is that print bars lay down powder on a 21-micron grid. A binding agent prints on the powder, presumably in a similar way to a conventional inkjet printer. A heat source then evaporates the liquid from the binder.

The process repeats for each layer until you remove the part and then sinter it using a third-party oven-like device. According to HP, their technique has more uniform material properties than fusing the powder on the bed with a laser. They also claim to be much faster than metal injection molding.

Continue reading “HP Rolls Out Metal 3D Printers”

Hacking A Very Special 486

It’s fair to say that Moore’s Law is not delivering on its promise of advancing semiconductor capabilities as fast as it used to, as the limits of current fabrication techniques are being met. Where this is being written for example there are two laptops, one from the last year and one that is 11 years old, and while the new one is undeniably faster it has not overtaken the other by as much as a ten year gap between 1990s machines would have revealed.

So with older laptops being still so relatively quick, what possible attraction could there be for working on a machine from the 1990s, when the Moore’s Law curve was steeper? It’s something [Jim W] is doing, with his HP Internet Advisor (J2522B), and when you see the machine in question perhaps you’ll understand why. The J2522B is a laptop, but it’s no ordinary ’90s road warrior’s status symbol. This 486-powered beast is a piece of test equipment, specifically one for examining Ethernet ports, thus it’s built like a tank and is mains powered only. It boasts a 486DX4, 16 MB of memory, a then-colossal 1.3 GB hard drive, and an ISA Fast Ethernet card. Oh, and WIndows 95, which with a couple of decades’ hindsight seems an amusing choice to power a piece of security test equipment.  Impressive specs for the day, but the $20,000 price tag would still have been steep compared to a comparable laptop.

[Jim]’s machine is destined for classic gaming, though with only the little HP pop-out mouse you saw on their Omnibook range at the time, he needed a PS/2 port. Some chipset hunting found that, but at the cost of accidentally frying a MOSFET when a screen connector was incorrectly re-inserted. We’re then treated to a guide to substituting older MOSFETs with modern parts, useful in itself, but followed by a marvelous piece of bodge work as an SOIC-8 part is placed on a DPAK footprint.

This is an interesting series of posts, partly from a retro angle as they deal with an interesting machine, but also from a hacking angle as he’s getting closer to the vintage PC hardware than most of us to. Keep an eye on it, there is sure to be more in the pipeline.

HP Inkjet Printer Trains For Space

The International Space Station is one of our leading frontiers of science and engineering, but it’s easy to forget that an exotic orbiting laboratory has basic needs shared with every terrestrial workplace. This includes humble office equipment like a printer. (The ink-on-paper kind.) And if you thought your office IT is slow to update their list of approved equipment, consider the standard issue NASA space printer draws from a stock of modified Epson Stylus 800s first flown on a space shuttle almost twenty years ago. HP signed on to provide a replacement, partnering with Simplexity who outlined their work as a case study upgrading HP’s OfficeJet 5740 design into the HP Envy ISS.

Simplexity provided more engineering detail than HP’s less technical page. Core parts of inkjet printing are already well suited for space and required no modification. Their low power consumption is valued when all power comes from solar panels, and ink flow is already controlled via methods independent of gravity. Most of the engineering work focused on paper handling in zero gravity, similar to the work necessary for its Epson predecessor. To verify gravity-independent operation on earth, Simplexity started by mounting their test units upside-down and worked their way up to testing in the cabin of an aircraft in free fall.

CollectSpace has a writeup with details outside Simplexity’s scope, covering why ISS needs a printer plus additional modifications made in the interest of crew safety. Standard injection-molded plastic parts were remade with an even more fire-resistant formulation of plastic. The fax/scanner portion of the device was removed due to concerns around its glass bed. Absorbent mats were attached inside the printer to catch any stray ink droplets.

NASA commissioned a production run for 50 printers, the first of which was delivered by SpaceX last week on board their CRS-14 mission. When it wears out, a future resupply mission will deliver its replacement drawn from this stock of space printers. Maybe a new inkjet printer isn’t as exciting as 3D printing in space or exploring space debris cleanup, but it’s still a part of keeping our orbital laboratory running.

[via Engadget]


Current Measurement With Oscilloscopes

What do a Rogowski coil, a magnetic core, and a hall effect sensor have in common? They are all ways you can make oscilloscope probes that measure current. If you think of a scope as a voltage measurement device, you ought to watch the recent video from Keysight Technology (see below). It is true that Keysight would love to sell you a probe, but the video is not a sales pitch, just general technical information about making current measurements with an oscilloscope.

Of course, you can always measure the voltage across a shunt resistor — either one that is naturally in the circuit or one you’ve put inline just for measuring purposes. But if you add a resistor it will change the circuit subtly and it may have to handle a lot of power.

The Keysight video points out that there are different probes for different current measurement regimes. High current, medium current, and low current all use different probes with different technologies. The video is only about 6 minutes long and if you’ve never thought about measuring current with a scope, it is worth watching.

The video shares some high-level details of how the current probes work — that’s where the Rogowski coil comes in, for example. Of course, you can’t expect a vendor to tell you how to build your own current probes. That’s OK, though, because we will. Current probes are often expensive, but you can sometimes pick up a deal on a used one.

Continue reading “Current Measurement With Oscilloscopes”