A DIY Sprinkler Controller Using An ESP8266

There is something strangely amusing about the idea of a sprinkler system relying on a cloud. But it was this limitation in some commercial offerings that led [Zack Lalanne] to create his own controller when it was time to upgrade his aging irrigator.

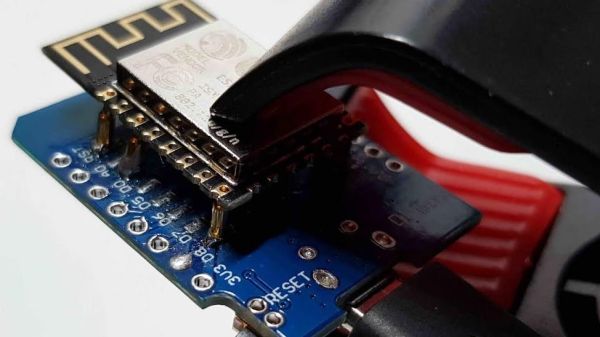
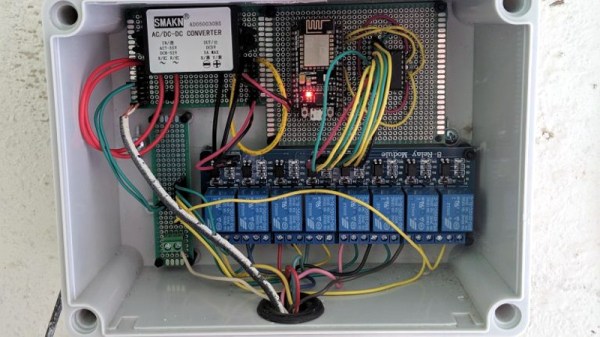
It’s a straightforward enough device, he’s taken an ESP8266 on the ubiquitous NodeMCU board, and added a shift register for some output line expansion to drive a set of relays. The interest here lies with the software, in which he’s used the ESPHome firmware and added his own custom part for the shift register. This change alone should be useful for many other experimenters with the ‘8266 and ESPHome combination.

The ESP8266 end of the device ties in with his instance of the Home Assistant home automation hub software. On this he’s been able to tie in all his various sprinkler outputs he added, and apply whatever automation scripts he chooses. The result is a freshly watered lawn, with not a cloud in the sky (or backend).

The value of this project lies only partly in its use for sprinkler owners, for us it also lies in the clear write-up showing the way for others with similar home automation tasks. It’s not the only way to make an ESP sprinkler controller, you should also see this one from 2017.

Fallout Inspired Display Is Ready For The Apocalypse

We’ve seen more projects based on books, TV shows, movies, and video games than we could ever hope to count. Hackers and makers derive inspiration from what they see around them, and it turns out there’s considerable overlap between the folks who sit in their labs building stuff all day and the ones who spend their free time playing games or watching movies. Big surprise, right? But among them, few can match the influence of the Fallout franchise.

As the latest entry in a long line of incredible Fallout-inspired builds, we present the Octoglow VFD by [Michał Słomkowski]. While this build isn’t trying to replicate anything directly from the games, it captures all the hallmarks that make up the game’s distinctive post-apocalyptic chic : antiquated vintage components, exposed internals, and above all, a dirty, industrial look. It’s supposed to look like somebody built the stuff out of parts they found in the trash, primarily because that’s exactly what they would’ve needed to do.

So what is it? Well, that’s a little hard to nail down. Frankly we’d say it’s a little more like art than anything, but it does have some useful functions. Currently it shows the time, date, weather information, and various RSS feeds on its dual vacuum fluorescent displays. There’s also a real-life Geiger-Müller counter onboard, because what says Fallout more than a little radiation?

The build itself is absolutely fascinating, and [Michał] leaves no stone unturned in his comprehensive write-up. Every module of the Octoglow has its own page on his site, and each one is bristling with hardware details, schematics, and firmware documentation. Reading along you’ll run into all sorts of interesting side notes: like how he reverse engineered a wireless temperature sensor with his sound card, or devised his own ten-pin bus to interconnect all the modules.

If the Octoglow doesn’t quite scratch that Vault-Tec itch, there’s plenty more where that came from. How about this replica of the wall terminals from Fallout 4, or this radiation monitor perfect for roaming the wastelands? Don’t forget to bring along this 3D printed Thirst Zapper for protection.

The Rhysonic Wheel Automates Live Music

Making waves in the music world is getting harder. Almost anyone who has access to the internet also has access to a few guitars and maybe knows a drummer or can program a drum machine. With all that competition it can be difficult to stand out. Rather than go with a typical band setup or self-producing mediocre rap tracks, though, you could build your own unique musical instrument from scratch and use it to make your music, and your live performances, one-of-a-kind.

[Pete O’Connell]’s instrument is known as the Rhysonic Wheel, which he created over the course of a year in his garage. The device consists of several wheels, all driven at the same speed and with a common shaft. At different locations on each of the wheels, there are pieces of either metal or rubber attached to strings. The metal and rubber bits fling around and can strike various other instruments at specified intervals. [Pete O’Connell] uses them to hit a series of percussion instruments, a set of bells, and even to play a guitar later on in the performance.

While it looks somewhat dangerous, we think that it adds a level of excitement to an already talented musical performance. After all, in skilled hands, any number of things can be used to create an engaging and unparalleled musical performance with all kinds of sounds most of us have never heard before.

Continue reading “The Rhysonic Wheel Automates Live Music”

Teardown Video: What’s Inside The Self-Solving Rubik’s Cube Robot

You can find all kinds of robots at Bay Area Maker Faire, but far and away the most interesting bot this year is the Self-Solving Rubik’s Cube built by [Takashi Kaburagi]. Gently mix up the colored sides of the cube, set it down for just a moment, and it will spring to life, sorting itself out again.

I arrived at [Takashi’s] booth at just the right moment: as the battery died. You can see the video I recorded of the battery swap process embedded below. The center tile on the white face of the cube is held on magnetically. Once removed, a single captive screw (nice touch!) is loosened to lift off the top side. From there a couple of lower corners are lifted out to expose the tiny lithium cell and the wire connector that links it to the robot.

Regular readers will remember seeing this robot when we featured it in September. We had trouble learning details about the project at the time, but since then Takashi has shared much more about what went into it. Going back to 2017, the build started with a much larger 3D-printed version of a cube. With proof of concept in hand, the design was modeled in CAD to ensure everything had a carefully planned place. The result is a hand-wired robotic core that feels like science fiction but is very, very real.

I love seeing all of the amazing robots on the grounds of the San Mateo County Event Center this weekend. There is a giant mech wandering the parking lot at the Faire. There’s a whole booth of heavy-metal quadruped bots the size of dogs. And if you’re not careful where you walk you’ll step on a scaled-down Mars rover. These are all incredible, out of this world builds and I love them. But the mental leap of moving traditional cube-solvers inside the cube itself, and the craftsmanship necessary to succeed, make this the most under-appreciated engineering at this year’s Maker Faire Bay Area. I feel lucky to have caught it during a teardown phase! Let’s take a look.

Continue reading “Teardown Video: What’s Inside The Self-Solving Rubik’s Cube Robot”

Breakout Board Becomes Pogo Pin Programmer

Making a programming jig becomes exponentially more difficult after two pins and who would even consider building one if they were not setting up more than twenty boards? If it were easy for novices to construct jigs, we might all have a quiver of them on the shelf next to our microprocessors. Honestly, a tackle box full of homemade programming fixtures sounds pretty chic. The next advantage to ditching the demo boards is that bare processors take up less room and don’t draw power for unnecessary components like unused voltage regulators and LEDs. [Albert David] improves the return-on-time-investment factor by showing us how to repurpose a WeMos board to program a bare ESP8266 module.

[Albert]’s concept can apply to many other surface-mount chips and modules. The first step is to buy a demo board which hosts a programmable part and remove that part. Since you’ve exposed some solder pads in the process, put pogo pins in their place. Pogo pins are small spring-loaded probes that can be surface mounted or through-hole. We’ve used them for programming gorgeous badges and places where the ESP8266 has already been installed. When you are ready to install your software, clamp your Franken-porcupine to the controller and upload like normal. Rinse, wash, repeat. We even get a view of the clamp [Albert] uses.

A Trash-Steam-Machine-80

Sometimes for a retrocomputing enthusiast it can be challenging to see a surviving machine gutted and used for another purpose. But in the case of [Tom Pick]’s Radio Shack TRS-80 based Steam Machine PC we can forgive him, because it began with a very unpromising machine that had most definitely seen better days.

The TRS-80 in question is a Model III, the all-in-one console device with a numerical keypad, CRT monitor, and dual 5.25″ floppy drives built in. This provided plenty of space for the components of a modern PC with a 12″ LCD monitor. The PC itself is a run-of-the mill 2.6 GHz Pentium and nothing exceptional, but its input devices are of note. The keyboard is a Red Dragon mechanical item which has been made to look the part in place of the old Radio Shack item with a set of custom colour-coded keycaps, while the pointing device in a particularly neat touch is a modern Radio Shack-branded mouse. The boot screen is the proper Radio Shack logo from the TRS-80’s heyday, meaning that if you didn’t know any differently you might think this was meant to be. Sadly the two floppy drives are unconnected, though we’re sure it would be possible to make a modern PC see them for a bit of 360k storage goodness.

We don’t see as many projects featuring the TRS-80 series as we should, and the model III is a particular rarity. Far more common in these pages is the portable Model 100, most recently gaining a cellular connection.

Plot Your Way Past A Tiny Buffer

There is a dedicated community of plotter enthusiasts who keep their often-aging X-Y axis pen drawing devices going decades after they were built, and who share plotter-generated paper artwork online. [Dhananjay Balan] was seduced by this, so acquired a second-hand HP7440A through eBay and set about bringing it to life.

Bringing it to life was in the first instance the usual progression of cleaning the mechanism and checking all was in order, before doing a bit of research to find that the missing power supply was a 10-0-10V AC item. Then some adapters and a USB-to-serial port had it talking to a modern PC, and thanks to the wonders of HPGL it was working once more. This could thus have been a very simple tale worthy of the dreaded Not A Hack moniker, had the focus then not changed from the hardware into the software.

Back in the day, a 60-byte buffer in a plotter must have seemed huge. But in 2019 a plotter can be sent data at a rate that will swiftly fill it, after which the commands are not stored and are never drawn. Introducing a delay between sending commands solves the problem, but at the expense of very slow plotting. This was solved with a very clever use of the HPGL command to send the pen position, which waits until the pen has finished moving before sending its return value. This became a handy way to detect when the plotter was ready for more, allowing speedier printing without buffer overruns.

The plotter has an expansion port into which an optional module containing trigonometric drawing functions could have been plugged, but was missing in this example. HP’s idea was that the buffer was so small that a programmer would have difficulty writing their own, but the buffer hack in the previous paragraph put paid to that. Python code for all this and more is in a handy GitHub repository.

Via Hacker News.