When we talk about video games on an oscilloscope, you’d be pardoned for assuming the project involved an analog CRT scope in X-Y mode, with vector graphics for something like Asteroids or BattleZone. Alas, this oscilloscope Tetris (Russian language, English translation) isn’t that at all — but that doesn’t make it any less cool.
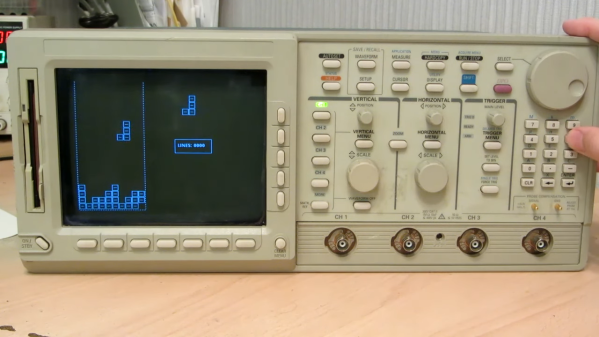
If you’re interested in recreating [iliasam]’s build, it’ll probably help to be a retro-oscilloscope collector. The target instrument here is a Tektronix TDS5400, a scope from that awkward time when everything was going digital, but CRTs were still cheaper and better than LCDs. It’s based on a Motorola 68EC040 processor, sports a boatload of discrete ICs on its main PCB, and runs VxWorks for its OS. Tek also provided a 3.5″ floppy drive on this model, to save traces and the like, as well as a debug port, which required [iliasam] to build a custom UART adapter.
All these tools ended up being the keys to the kingdom, but getting the scope to run arbitrary code was still a long and arduous process, with a lot of trial and error. It’s a good story, but the gist is that after dumping the firmware onto the floppy and disassembling it in Ghidra, [iliasam] was able to identify the functions used to draw graphics primitives on the CRT, as well as the functions to read inputs from the control panel. The result is the simple version of Tetris seen in the video below. If you’ve got a similar oscilloscope, the code is up on GitHub.
Care for a more hardware-based game-o-scope? How about a nice game of Pong? Or perhaps a polar breakout-style game is what you’re looking for. Continue reading “Tetris On An Oscilloscope, The Software Way” →