Biting Off More Than I Can Chew

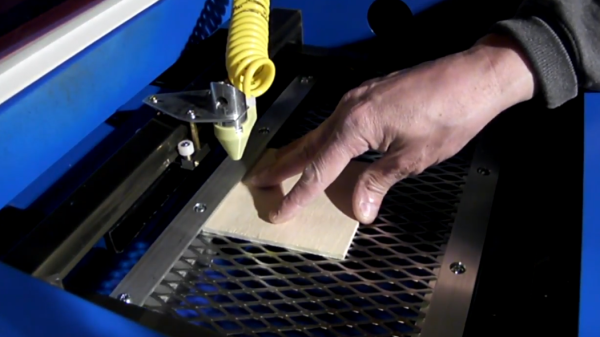
Earlier this year, I bought one of those K40-style laser machines that was listed at a ridiculously low price, and it arrived broken. Well, let me qualify that: the laser tube and the power supply work perfectly, but that’s about the best you can say about it.

On first power-up, it made a horrible noise, the Y-axis was jammed, the X-axis was so off-square that it was visibly apparent, and it turned out that as I fixed one of these problems after the other, that it was just the tip of the iceberg. The Y-axis was jammed because the belts were so tight that they made the motor bind. Replacing them, because they were simply too short, got the stage moving, but it didn’t engage the endstops. Fixing those revealed that the motor was stepped wrong, and flipping the pins in the connector finally got it homing in the right direction. Full disassembly and reassembly steps required at each stage here.

The X-axis just needed adjustment, but the opto on its endstop had been completely crushed by a previous failed homing, and I had to desolder and resolder in a new one. (Keep your junkbox well stocked!) With the machine working, it became obvious that the driver board was barely usable. It accelerates horribly jerkily, which makes the motors skip and stall. It had to be run artificially slowly because it couldn’t make the corners. So I put in a new motor controller board that handles Gcode and does legitimate acceleration ramps.

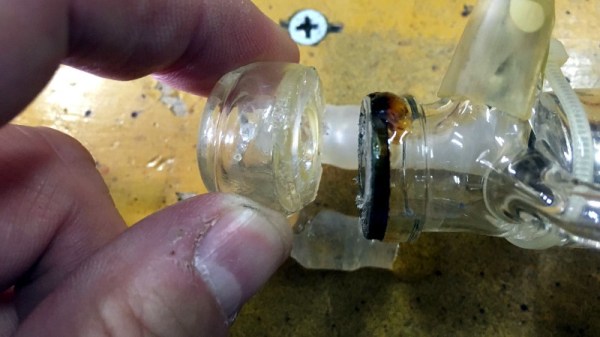
Movement mostly fixed, it was time to align the laser. Of course, the optical path is all messed up, they forgot the o-ring that holds the focusing lens in place, and the thing keeps powering down randomly. This turns out to be because of the aiming red laser pointer, which has a positive case, which is shorting through the single wrap of electrical tape that “insulates” it from the machine’s frame. When this shorts, the motor driver board browns out. Lovely!

Once I was finally able to start aligning the beam, I discovered that the frame is warped out of plane. The simple solution is to take it all apart again and shim it until it’s flat, but I just haven’t had the time yet. I’m not beaten, but it’s been eating up hours after hours on the weekends, and that time is scarce.

I love DIY, and I love taking a machine apart in order to understand it. Once. But I’m now on my tenth or twelfth unmounting of the motion stage, and frankly, it’s no fun any more. It would have been quicker, if maybe not cheaper, to have built this machine entirely from scratch. At least for the moment, I’ve bitten off more than I have time to chew.

Two chillers side-by-side - the fake chiller on the left and the water fountain chiller (lid-less) on the right

Gutting And Upgrading Laser “Chiller” With No Chill

Getting a cheap CO2 laser cutter is great for your workshop needs, and while you might get a weaker-than-declared laser tube, it’s still going to cut whatever you need to be cut. That might not be the case for the cooling equipment you’re getting alongside it, however, as [RealTimeKodi] shows in a post-project blogpost. They bought a CX3000 “chiller” and found out it had no chiller components (Nitter), only equipped with a radiator, a fan, and a pump.

Having your laser tube water be somewhat close to ambient temperature is something you can already achieve with an aquarium pump and a bucket of water — and it isn’t worth paying $100 for. Left with the sunk cost and an unfulfilled need for a proper chiller, [RealTimeKodi] started looking for paths to take – first one was using TEC elements. The upgrade process was fun, but the result was subpar, as the elements gobbled power with hardly any useful output to show for it.

[RealTimeKodi] didn’t give up, and eventually found an old water fountain chiller with chiller-like components inside, sold for $200. They could’ve used the water fountain as-is, but a few design issues and thirst for adventure got in the way, indisputably forcing them to stuff the fountain’s guts into the CX3000’s case.

Buying a laser cutter can sometimes feel like buying a 3D printer a decade ago — you get a K40, learn to use it, add the missing safety features, mod in autofocus, upgrade the control board, expand the work surface… That said, our experience shows that you don’t need any of those if A4-sized 3 mm wood cutting suit you, but a proper chiller is still worth its weight in gold-plated acrylic.

Continue reading “Gutting And Upgrading Laser “Chiller” With No Chill”

Hackaday Podcast 005: Undead Lightbulbs, Home Chemistry, And The Strength Of 3D Printing

Catch up on interesting hacks from the past week with Hackaday Editors Mike Szczys and Elliot Williams. This week we discuss the story behind falling lifetime ratings for LED bulbs, look at finite element analysis to strengthen 3D printed parts, admire the beauty of blacksmithing, and marvel at open source Lidar development. We delve into great reader suggestions for Blue Pill projects sparked by last week’s podcast, discuss some history of the V2 rocket, and cover Chromecast control hardware, glowing home chemistry, K40 laser cutter add-ons, and more.

Links for all discussed on the show are found below. As always, join in the comments below as we’ll be watching those as we work on next week’s episode!

Take a look at the links below if you want to follow along, and as always, tell us what you think about this episode in the comments!

Direct download (60 MB or so.)

Continue reading “Hackaday Podcast 005: Undead Lightbulbs, Home Chemistry, And The Strength Of 3D Printing”

Spring-Loaded Bed For K40 Laser Acts As An Auto-Focus

Laser engraving and cutting has something in common with focusing the sun’s rays with a magnifying glass: good focus is critical to results. If materials of varying thicknesses are used, focus needs to be re-set every time the material changes, and manual focusing quickly becomes a chore. [Scorch Works] has a clever solution to avoid constant re-focusing that doesn’t involve sensors or motors of any sort. The result is a self-adjusting bed that compensates for material height changes, ensuring that the top surface of the material is always a fixed distance from the laser’s head.

The way [Scorch Works] has done this is to make two spring-loaded clamps from angle aluminum and a few pieces of hardware. When a sheet of material is placed into the machine, the edges get tucked underneath the aluminum “lips” while being pushed upward from beneath. By fixing the height of the top layer of angle aluminum, any sheet stock always ends up the same distance from the laser head regardless of the material’s thickness.

[Scorch Works] shows the assembly in action in the video embedded below, along with a few different ways to accommodate different materials and special cases, so be sure to check it out.

Continue reading “Spring-Loaded Bed For K40 Laser Acts As An Auto-Focus”

Expanding The K40 Laser Cutter With Aluminum Extrusion

The K40 laser cutter is an excellent option if you need to laze some plywood or acrylic. It’s ubiquitous, it’s cheap, and there’s a vast community out there that will help you support any issue you could have. Unfortunately, the K40 laser cutter is lacking. It has a small bed, and it doesn’t have the latest technology like ‘switches’ that turn off the laser when you open the door.

[frederik] recently upgraded his K40 to something great. He’s calling it the Layzor, and it has a huge 600×400 mm bed area, a feed-through slot for even wider workpieces, and fancy technology [frederik] is calling an ‘E-stop’. Sounds expensive, doesn’t it?

The build began by scavenging the K40 laser cutter for the electronics and laser tube, then building a new frame out of aluminum extrusion. A few parts had to be custom made, including a few stepper motor mounts and something to hold the laser tube. All of this was tied up in a box with acrylic panels, and went together as easily as any other CNC machine.

The finished project is great. It’s a relatively powerful laser cutter capable of most hobby work, and it was cheap. The total cost for this build was under €500. That’s not including the scavenged K40, but that’s still an amazing price for a very capable laser cutter.

A Lesson In K40 Laser Repair

The K40 laser cutter has become ubiquitous in hackerspaces and well-equipped home workshops over the past few years, as a relatively inexpensive introduction to laser cutting and a machine that is readily hackable. Tokyo Hackerspace have one, but sadly their laser tube failed after relatively little use. Replacing a laser tube might be a routine component change for some readers, but it’s still worth looking at in some detail.

Their tube had failed at its output lens cooling cap, a component that is glued onto the end of the tube rather than bonded, and which had snapped off. There had been no mechanical stress upon it, but it was found  that the arrangement of their cooling system caused it to drain between uses and thus air bubbles could accumulate. The resulting cooling inefficiency caused enough thermal stress for the bond between the tube and the end piece to fail.

The in-depth analysis of what caused the failure and step-by-step description of the procedure should be of interest to any K40 owner. Little things such as ensuring that the tube is rotated to the right angle for all air bubbles to make their way out of it, or making sure that when the pump is switched off the water isn’t all pulled out of it by gravity seem obvious, but these are traps that will have caught more than one K40 owner.

We’ve covered many K40 stories over the years, but a good place to start for the novice might be this commissioning story, or even this tale of a hackerspace’s modifications to their model.